Loading
Create what's next
Automation Fair registration is open! Make plans today to join us in Chicago, November 17-20.
Learn more
Chevron RightChevron Right
Drives | Micro800

Easy Dashboards and Control for a Powerflex 520

Revision: A (12/28/2022) - Deploy Time: 60 Minutes
Engineering working in a control cabinet panel containing PowerFlex and other Rockwell Automation products
On This Page:
  • What is this for?
  • Installation guide
Innovation Center Home

Easy Dashboards and Control for a Powerflex 520 enables you to have a ready to use code and HMI screens to apply them with PowerFlex 523 and PowerFlex 525 drives. This is a Connected Component Workbench development that provides basic parameters monitoring and control, either from a PanelView 800 or remotely (through VNC).

Target to use with PowerFlex 523 and 525 component drives from Rockwell Automation.

This code can be used with the following equipment:

  • PowerFlex 523 
  • PowerFlex 525
  • Micro850
  • Micro870
  • PanelView 800

What is this for?

The main purpose is to provide visualization and basic control through principal parameters as a ready-to-use development for basic drive control. In addition, it will be possible to access the information contained in the dashboards remotely (Internet).

This can be applied to control systems that include Micro-controllers and Powerflex 520 component drives. Implicit and explicit messaging are used (the most important parameters are handled by implicit messaging).

General Features

  • Basic Control parameters modification:
    • Reference Speed
    • Acceleration Time
    • Deacceleration Time
    • Position Reference
  • Drives faults reset
  • Visualization of the following parameters:
    • Ready
    • Active
    • Command Speed
    • Actual Speed
    • Drives fault
    • Output current
    • Output voltage
    • DC Bus voltage
    • Drive temperature
    • Consumed energy
    • Elapsed power
    • Accumulated cost savings
  • Remote access to the PanelView 800 screens through FTP functionalities


Limitations/Disadvantages

  • Limited to PowerFlex 523 and 525
  • Limited to Micro800 and PanelView 800
  • Parameters selected are fixed


How can I make it work?

The architecture implies the following hardware:

  • PowerFlex 523, PowerFlex 525
  • Micro 850, Micro 870
  • PanelView 800

And this is the required software:

  1. Connected Component Workbench, version 21 or higher.
  2. The firmware of the equipment used must be compatible with the version of Connected Component Workbench.
  3. User-defined Function Blocks:
  • RA_PF523_VEL
  • RA_PF525_VEL
  • RA_PF525_POS
  • RA_PFx_ENET_PAR_READ
  • RA_PFx_ENET_PAR_WRITE

Knowledge

Basic knowledge of programing and configuration in Connected Component Workbench software:

  • PowerFlex 523/525 and PanelView 800 configuration
  • Ladder Language

Downloads

Please note: You will need to agree to the Terms & Conditions for each download.

Easy Drive Master files ›
Legal Disclaimer Acceptance. ROCKWELL AUTOMATION WILL PROVIDE ACCESS TO ROCKWELL PRODUCTS (BEST PRACTICES, APPLICATIONS AND KNOWLEDGE) ON THE CONDITION THAT YOU ACCEPT AND COMPLY WITH THE FOLLOWING TERMS AND CONDITIONS. YOU ACCEPT AND AGREE TO BE BOUND BY THE TERMS OF THIS AGREEMENT BY DOWNLOADING, INSTALLING, COPYING, OR OTHERWISE USING PRODUCTS. IF YOU ARE ACCEPTING THESE TERMS ON BEHALF OF ANOTHER PERSON, COMPANY, OR OTHER LEGAL ENTITY, YOU REPRESENT AND WARRANT THAT YOU HAVE FULL AUTHORITY TO BIND THAT PERSON, COMPANY, OR LEGAL ENTITY TO THESE TERMS. IF YOU DO NOT AGREE TO THESE TERMS, DO NOT DOWNLOAD, INSTALL, COPY, ACCESS, OR USE THE PRODUCTS, SOFTWARE AND/OR CLOUD SERVICES. 1. Rockwell Automation retains full ownership and title to all Products and related documentation. No rights or licenses are granted other than those set forth in this Agreement. Company grants to Rockwell Automation a non-exclusive, worldwide, royalty-free, perpetual, non-revocable license to use any feedback Company provides regarding the Products, even if Company has designated the feedback as confidential. Rockwell Automation will be entitled to use the feedback without restriction or compensation to Company. 2. Company may not lease sub-lease, assign, license, sub-license or otherwise transfer any of the Products without the prior written consent of Rockwell Automation. Company may not assign or otherwise transfer access rights to the Products without the prior written consent of Rockwell Automation. Any reverse assembly, reverse engineering, decompilation, and creation of derivative works based on the Products by Company is prohibited. 3. Company acknowledges that Products provided under this Agreement are Rockwell Automation’s Confidential Information and are covered by effective or pending copyrights, patents, trademarks and/or trade secrets of Rockwell Automation, and Company agrees to maintain confidentiality by not disclosing Products or documentation to any third party without the prior written consent of Rockwell Automation and to protect the confidentiality of the Products as it would Company’s own confidential information. Company agrees that its obligation of confidentiality under this paragraph shall survive expiration or termination of this Agreement. 4. Company agrees that Products provided under this Agreement are prototypes and examples and its application and results may vary depending on each customer and project conditions. Rockwell Automation do not warranty the same results. This Agreement shall in no way be construed as a commitment by Rockwell Automation at any time to manufacture and/or offer Products for sale. There is no explicit or implicit service level agreement associated with using the Products. Rockwell Automation does not warrant that the functions contained in the Products will meet Company’s requirements. Company agrees to use all Products only in accordance with the instructions and only for the intended usages identified in the documentation. 5. EXCLUSION OF WARRANTIES AND LIMITATION OF LIABILITY. THE PRODUCTS ARE PROVIDED "AS IS". ROCKWELL AUTOMATION DISCLAIMS ANY AND ALL WARRANTIES, EXPRESS, IMPLIED OR STATUTORY, INCLUDING WITHOUT LIMITATION ANY WARRANTIES OF MERCHANTABILITY OR FITNESS FOR A PARTICULAR PURPOSE. ROCKWELL AUTOMATION EXPLICITLY DISCLAIMS ALL WARRANTIES OF NON- INFRINGEMENT AND EXPRESSLY DOES NOT WARRANT THAT THE PRODUCTS, IN WHOLE OR IN PART, WILL BE ERROR FREE OR FREE FROM SECURITY VULNERABILITIES. IN NO EVENT SHALL ROCKWELL AUTOMATION BE LIABLE FOR (i) LOST PROFITS, LOST SAVINGS, DOWNTIME, SPECIAL, INDIRECT OR CONSEQUENTIAL DAMAGES OF ANY KIND, OR (ii) ANY PERSONAL INJURY, PROPERTY DAMAGE OR ENVIRONMENTAL DAMAGE ARISING OUT OF OR IN CONNECTION WITH THIS AGREEMENT, WHETHER IN AN ACTION IN CONTRACT, STRICT LIABILITY OR IN TORT INCLUDING NEGLIGENCE. 6. COMPANY AGREES TO INDEMNIFY AND HOLD ROCKWELL AUTOMATION HARMLESS FROM ALL COSTS, AWARDS, DAMAGES, EXPENSES AND FEES (INCLUDING ATTORNEYS FEES) RESULTING FROM OR RELATED TO ANY THIRD-PARTY CLAIMS (INCLUDING EMPLOYEES AND AGENTS OF COMPANY) AGAINST ROCKWELL AUTOMATION, ITS DISTRIBUTORS, AGENTS, OFFICERS, DIRECTORS OR EMPLOYEES FOR PERSONAL INJURY (INCLUDING DEATH), PROPERTY DAMAGE OR ENVIRONMENTAL DAMAGE RELATED TO OR RESULTING FROM THE USE OF THE PRODUCTS. 7. In the event a Product is exported, Company agrees to comply with all applicable United States Export Control Law and Regulations, and the applicable export control laws of other countries. This Agreement shall be governed by the laws of the state of Wisconsin. This Agreement is the complete and exclusive Agreement between Rockwell Automation and the Company, and supersedes all prior agreements, whether written or oral, relating to the Products.

Need Help?

If you need help with an application or have feedback from the Innovation Center, please contact us.

Installation Guide 

Step 1: Communication Settings

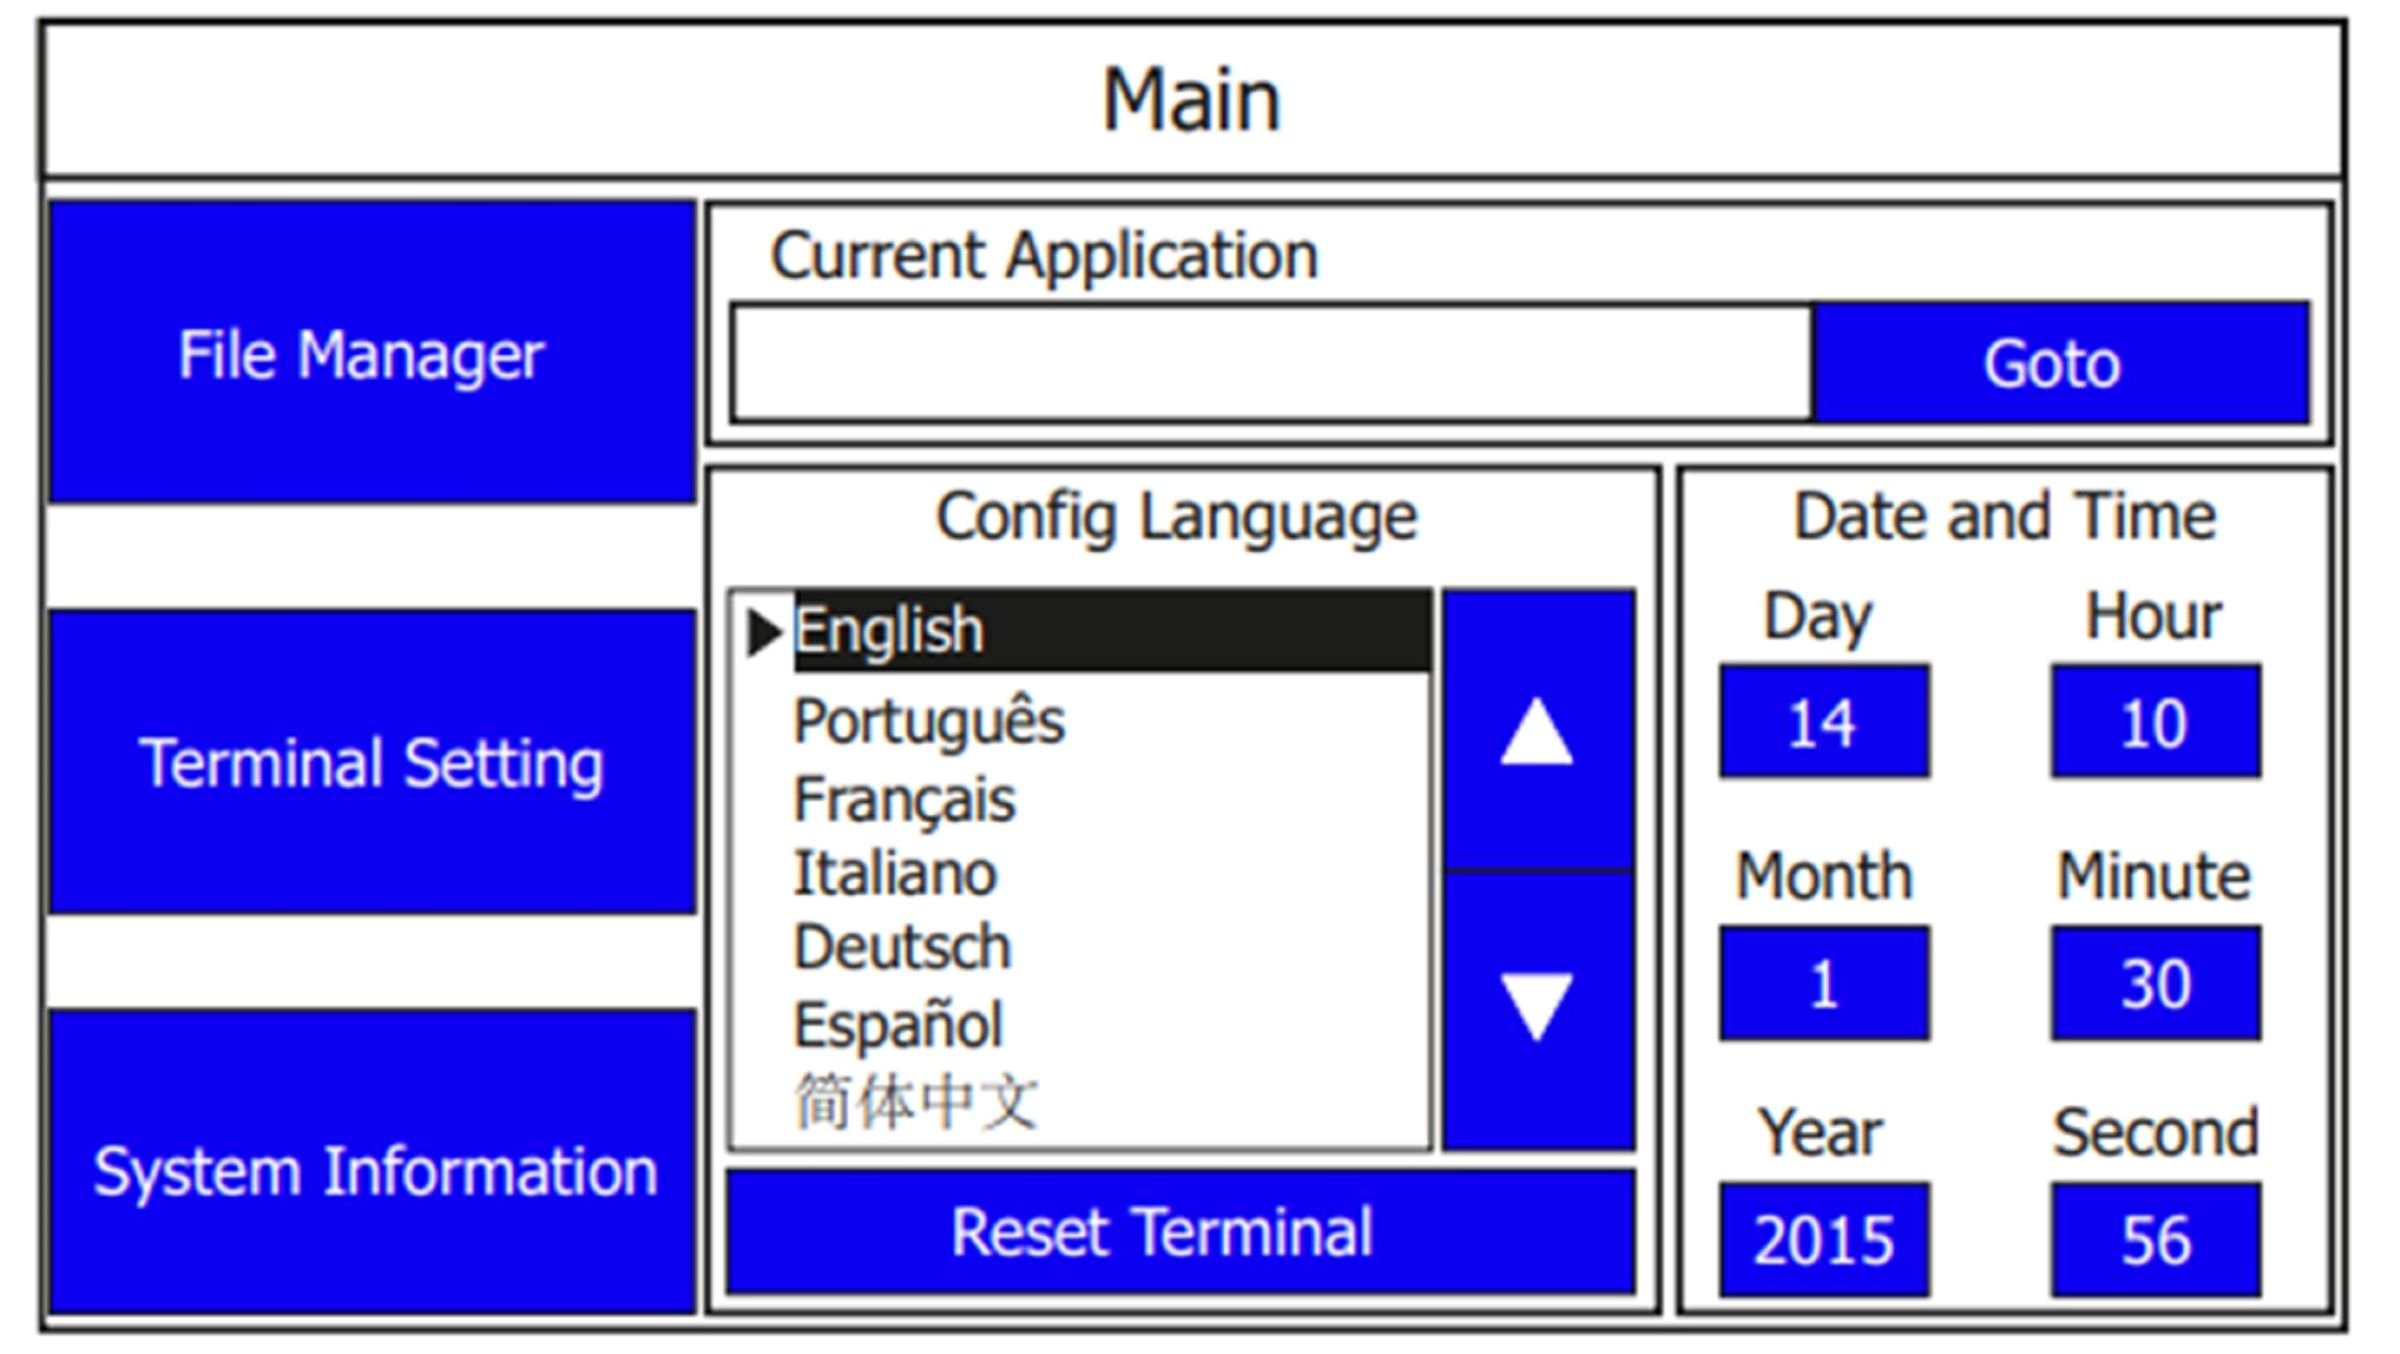
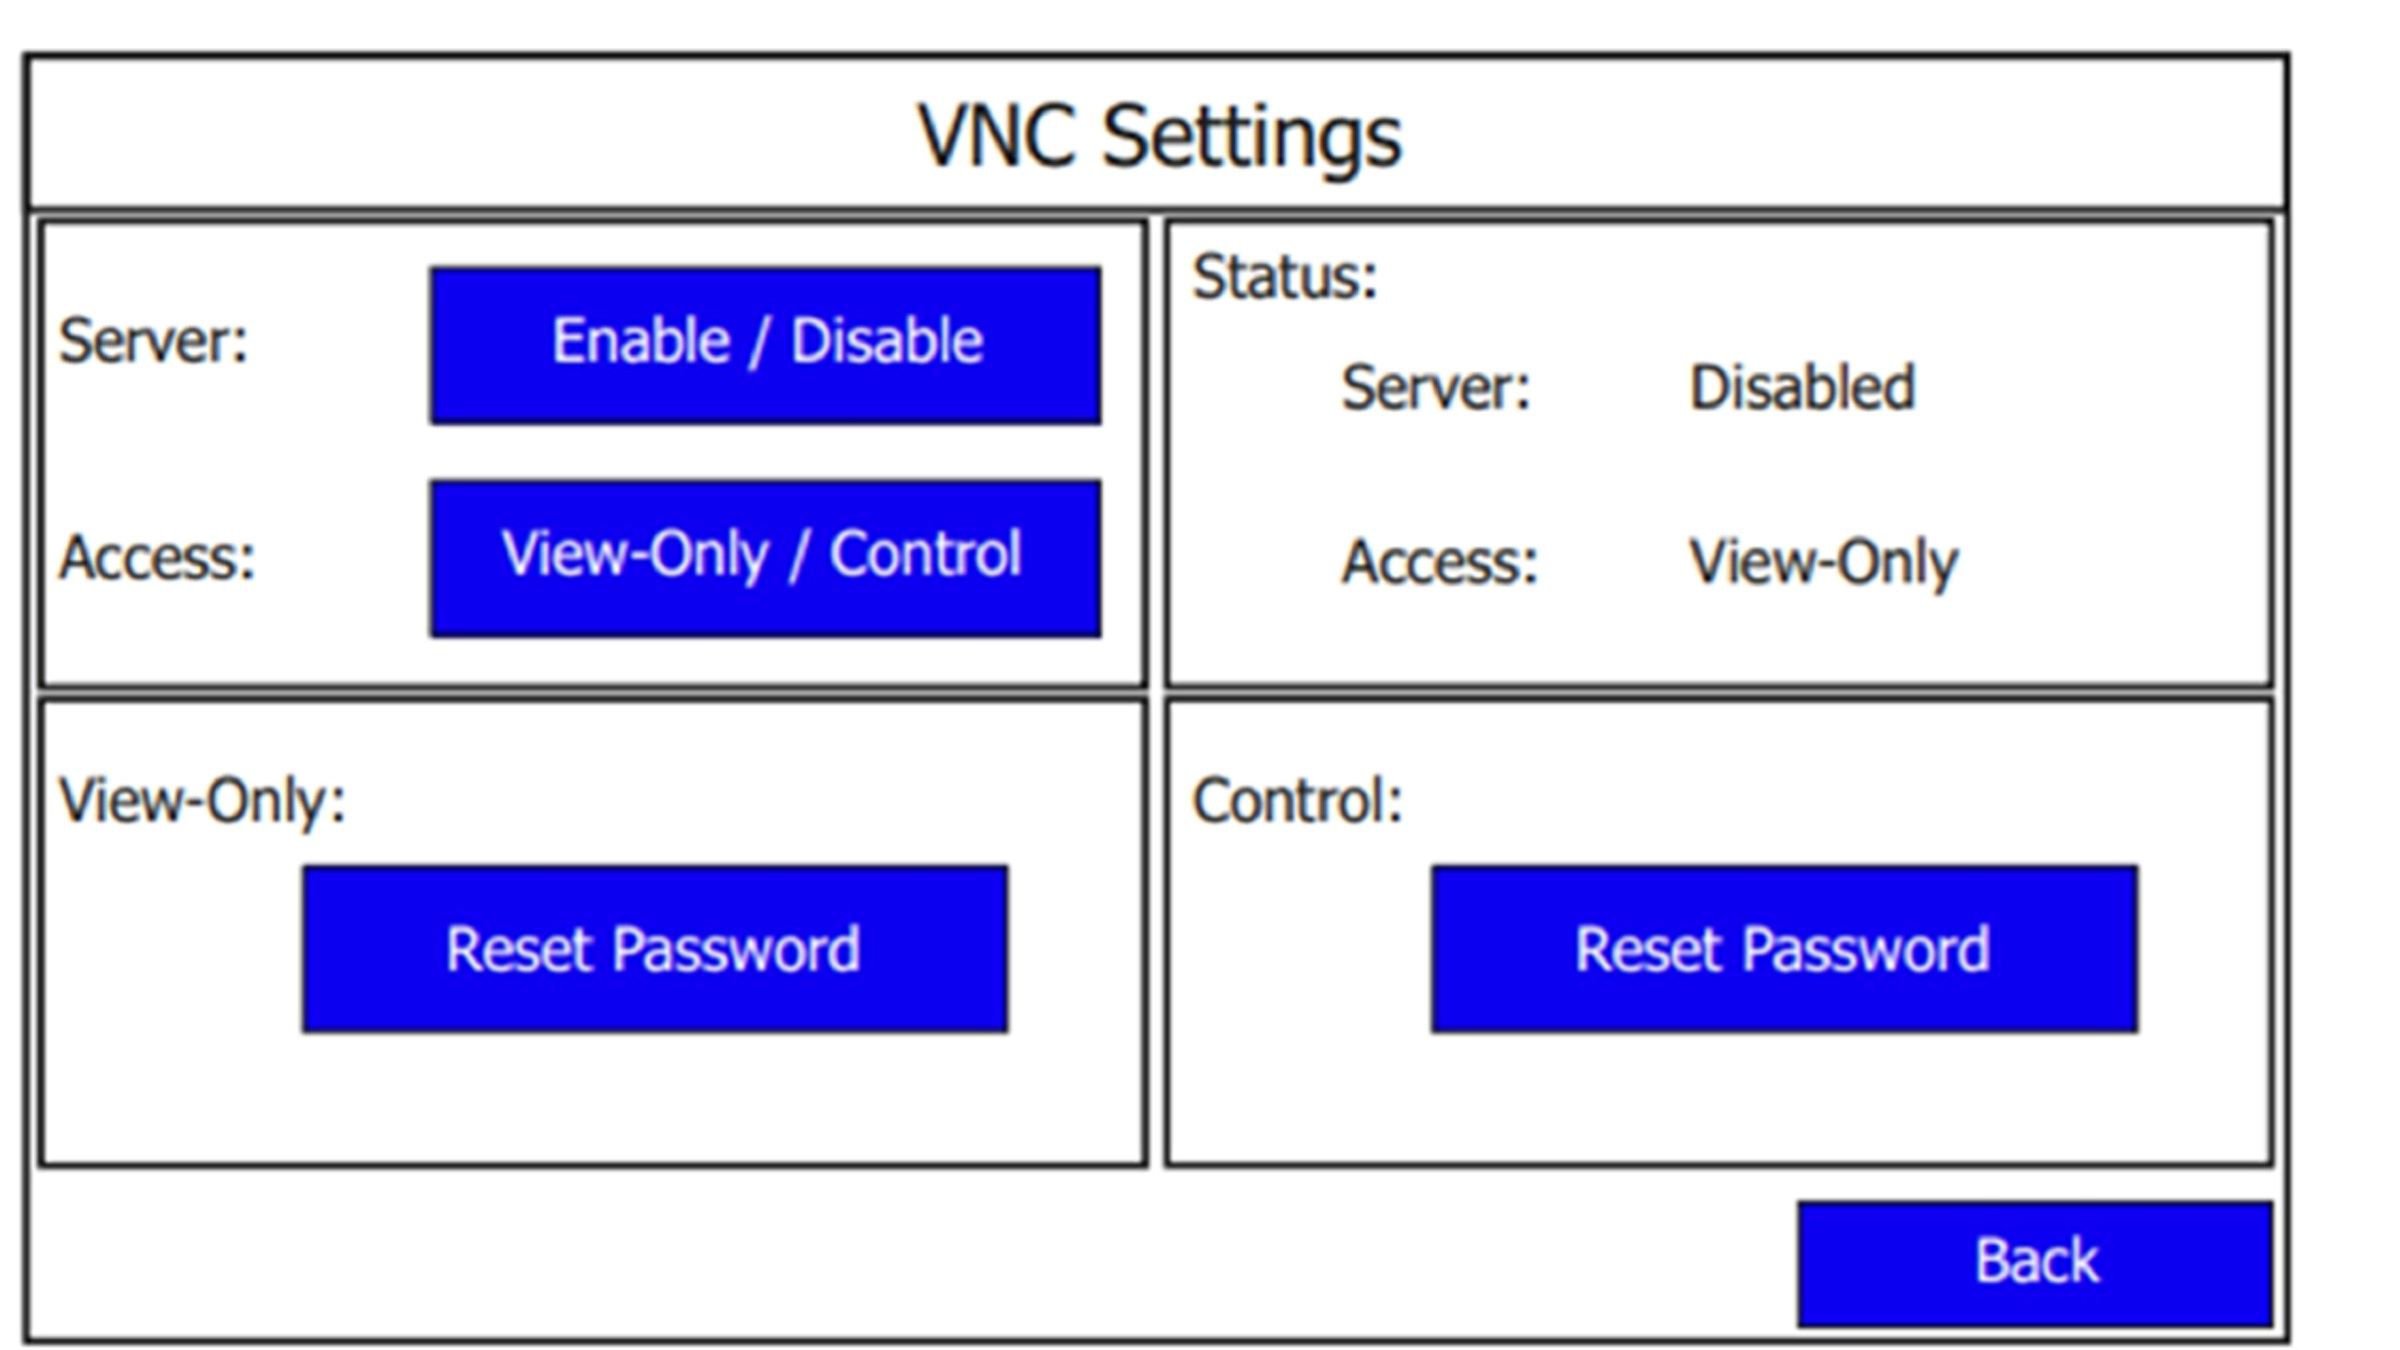
1.1 Configure VNC settings in PanelView 800: Go to the main configuration screen.

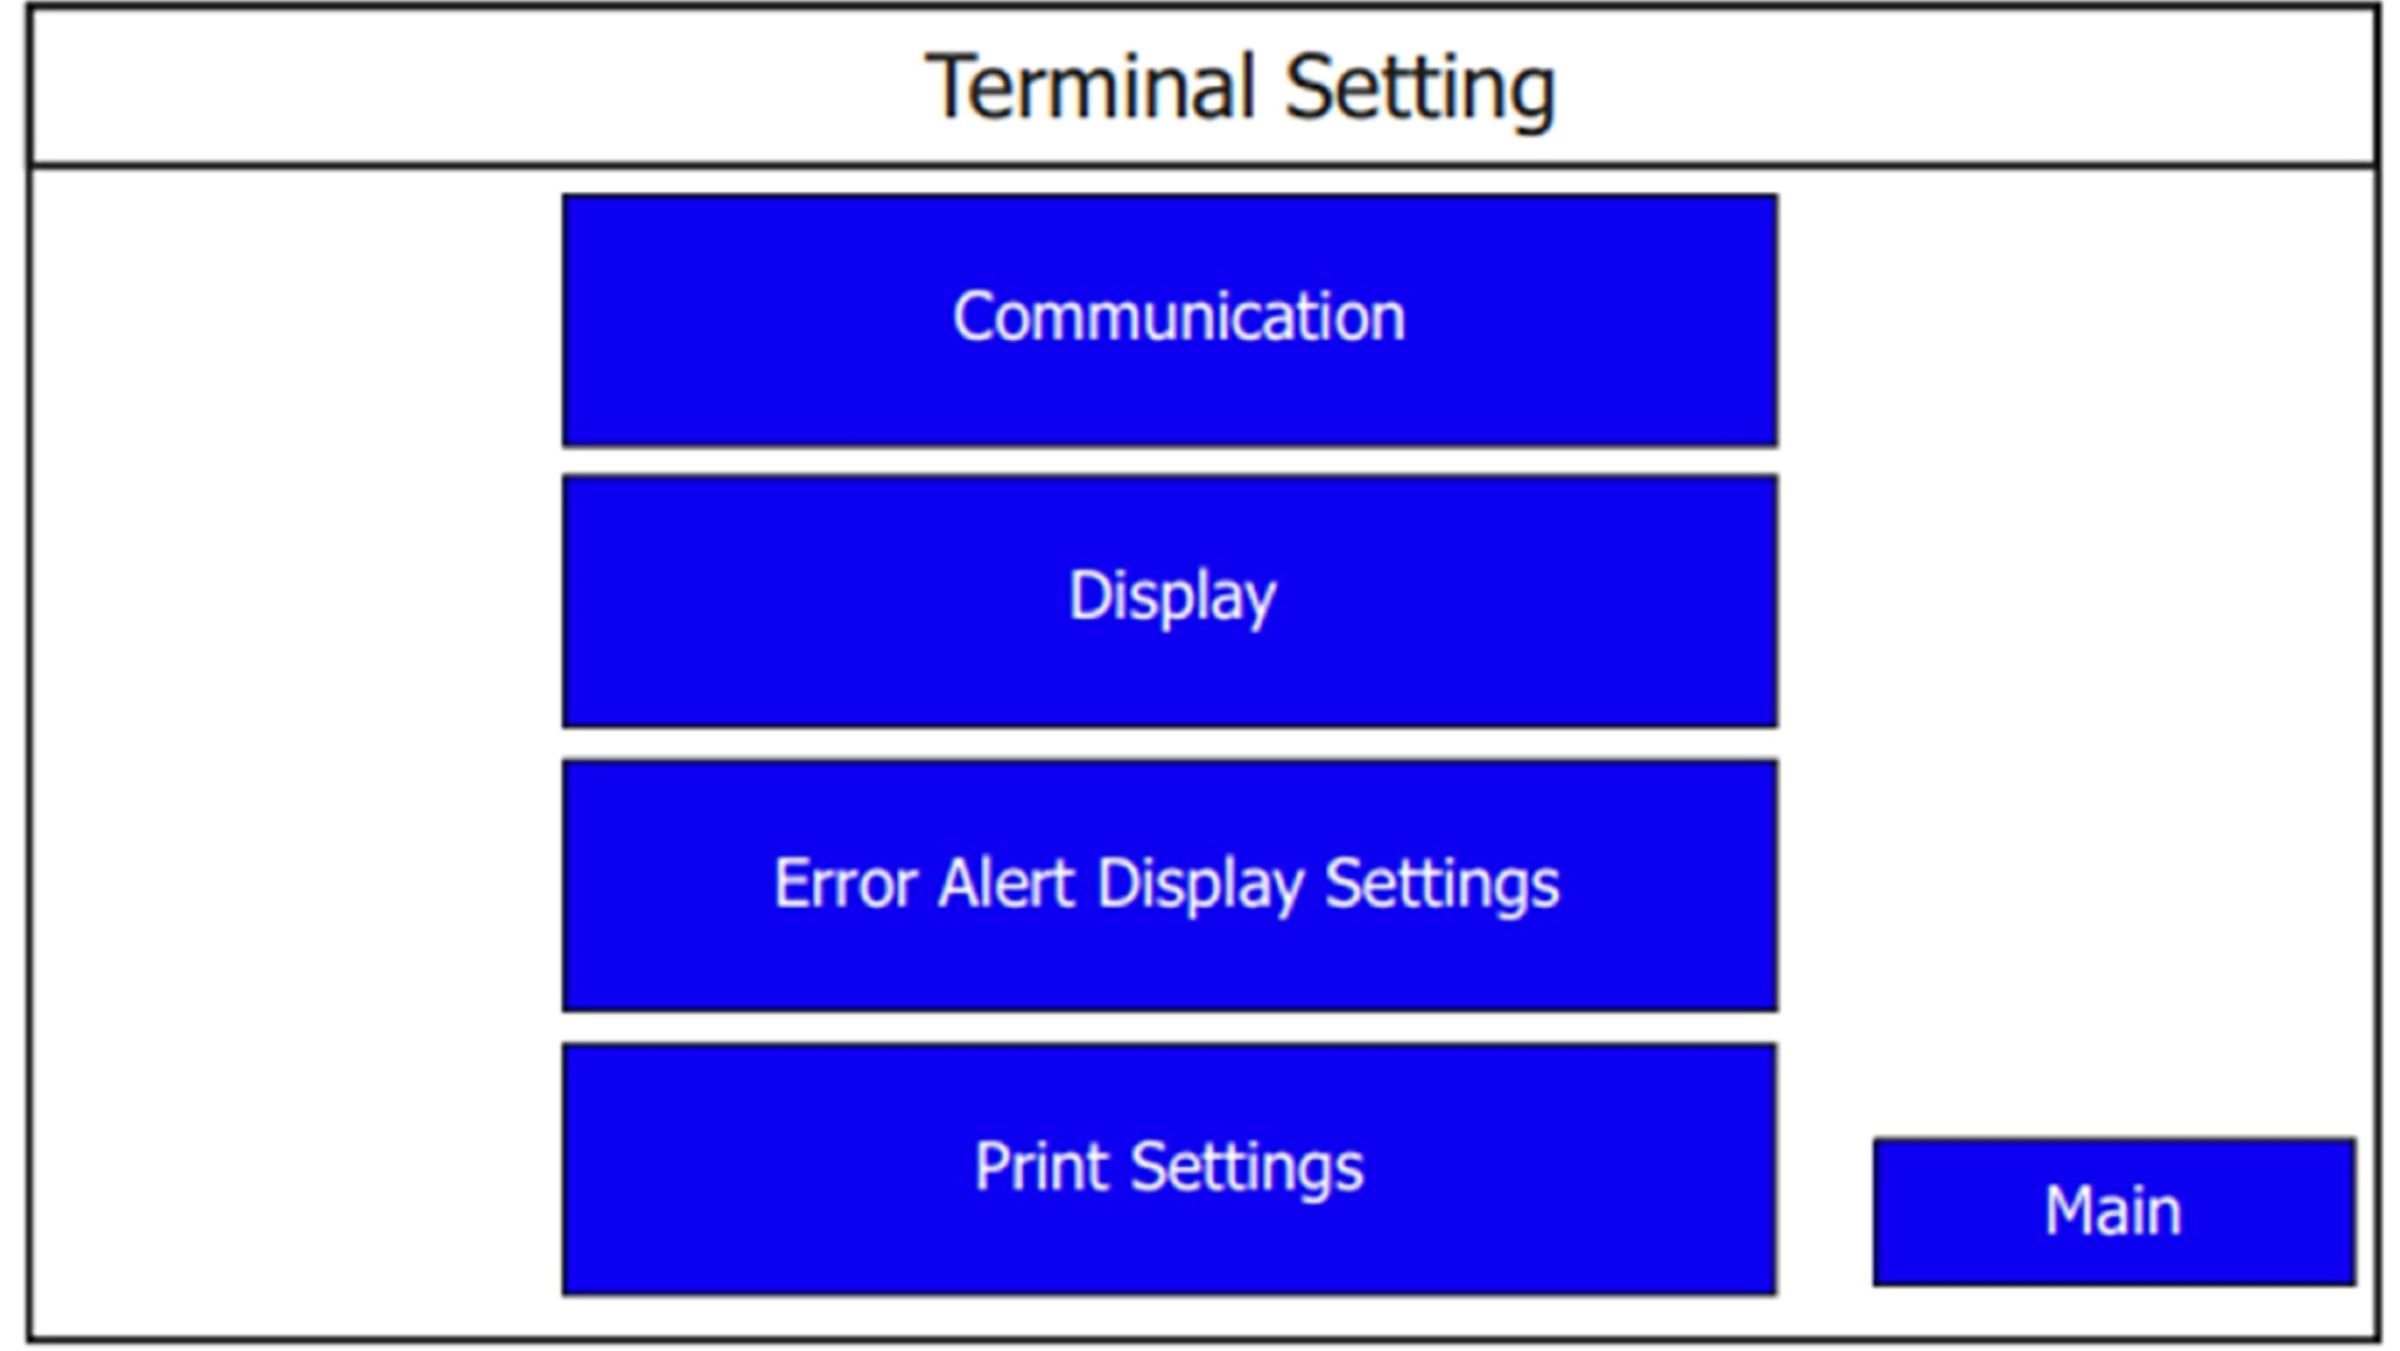
1.2 Press terminal settings.

1.3 Press Communication.

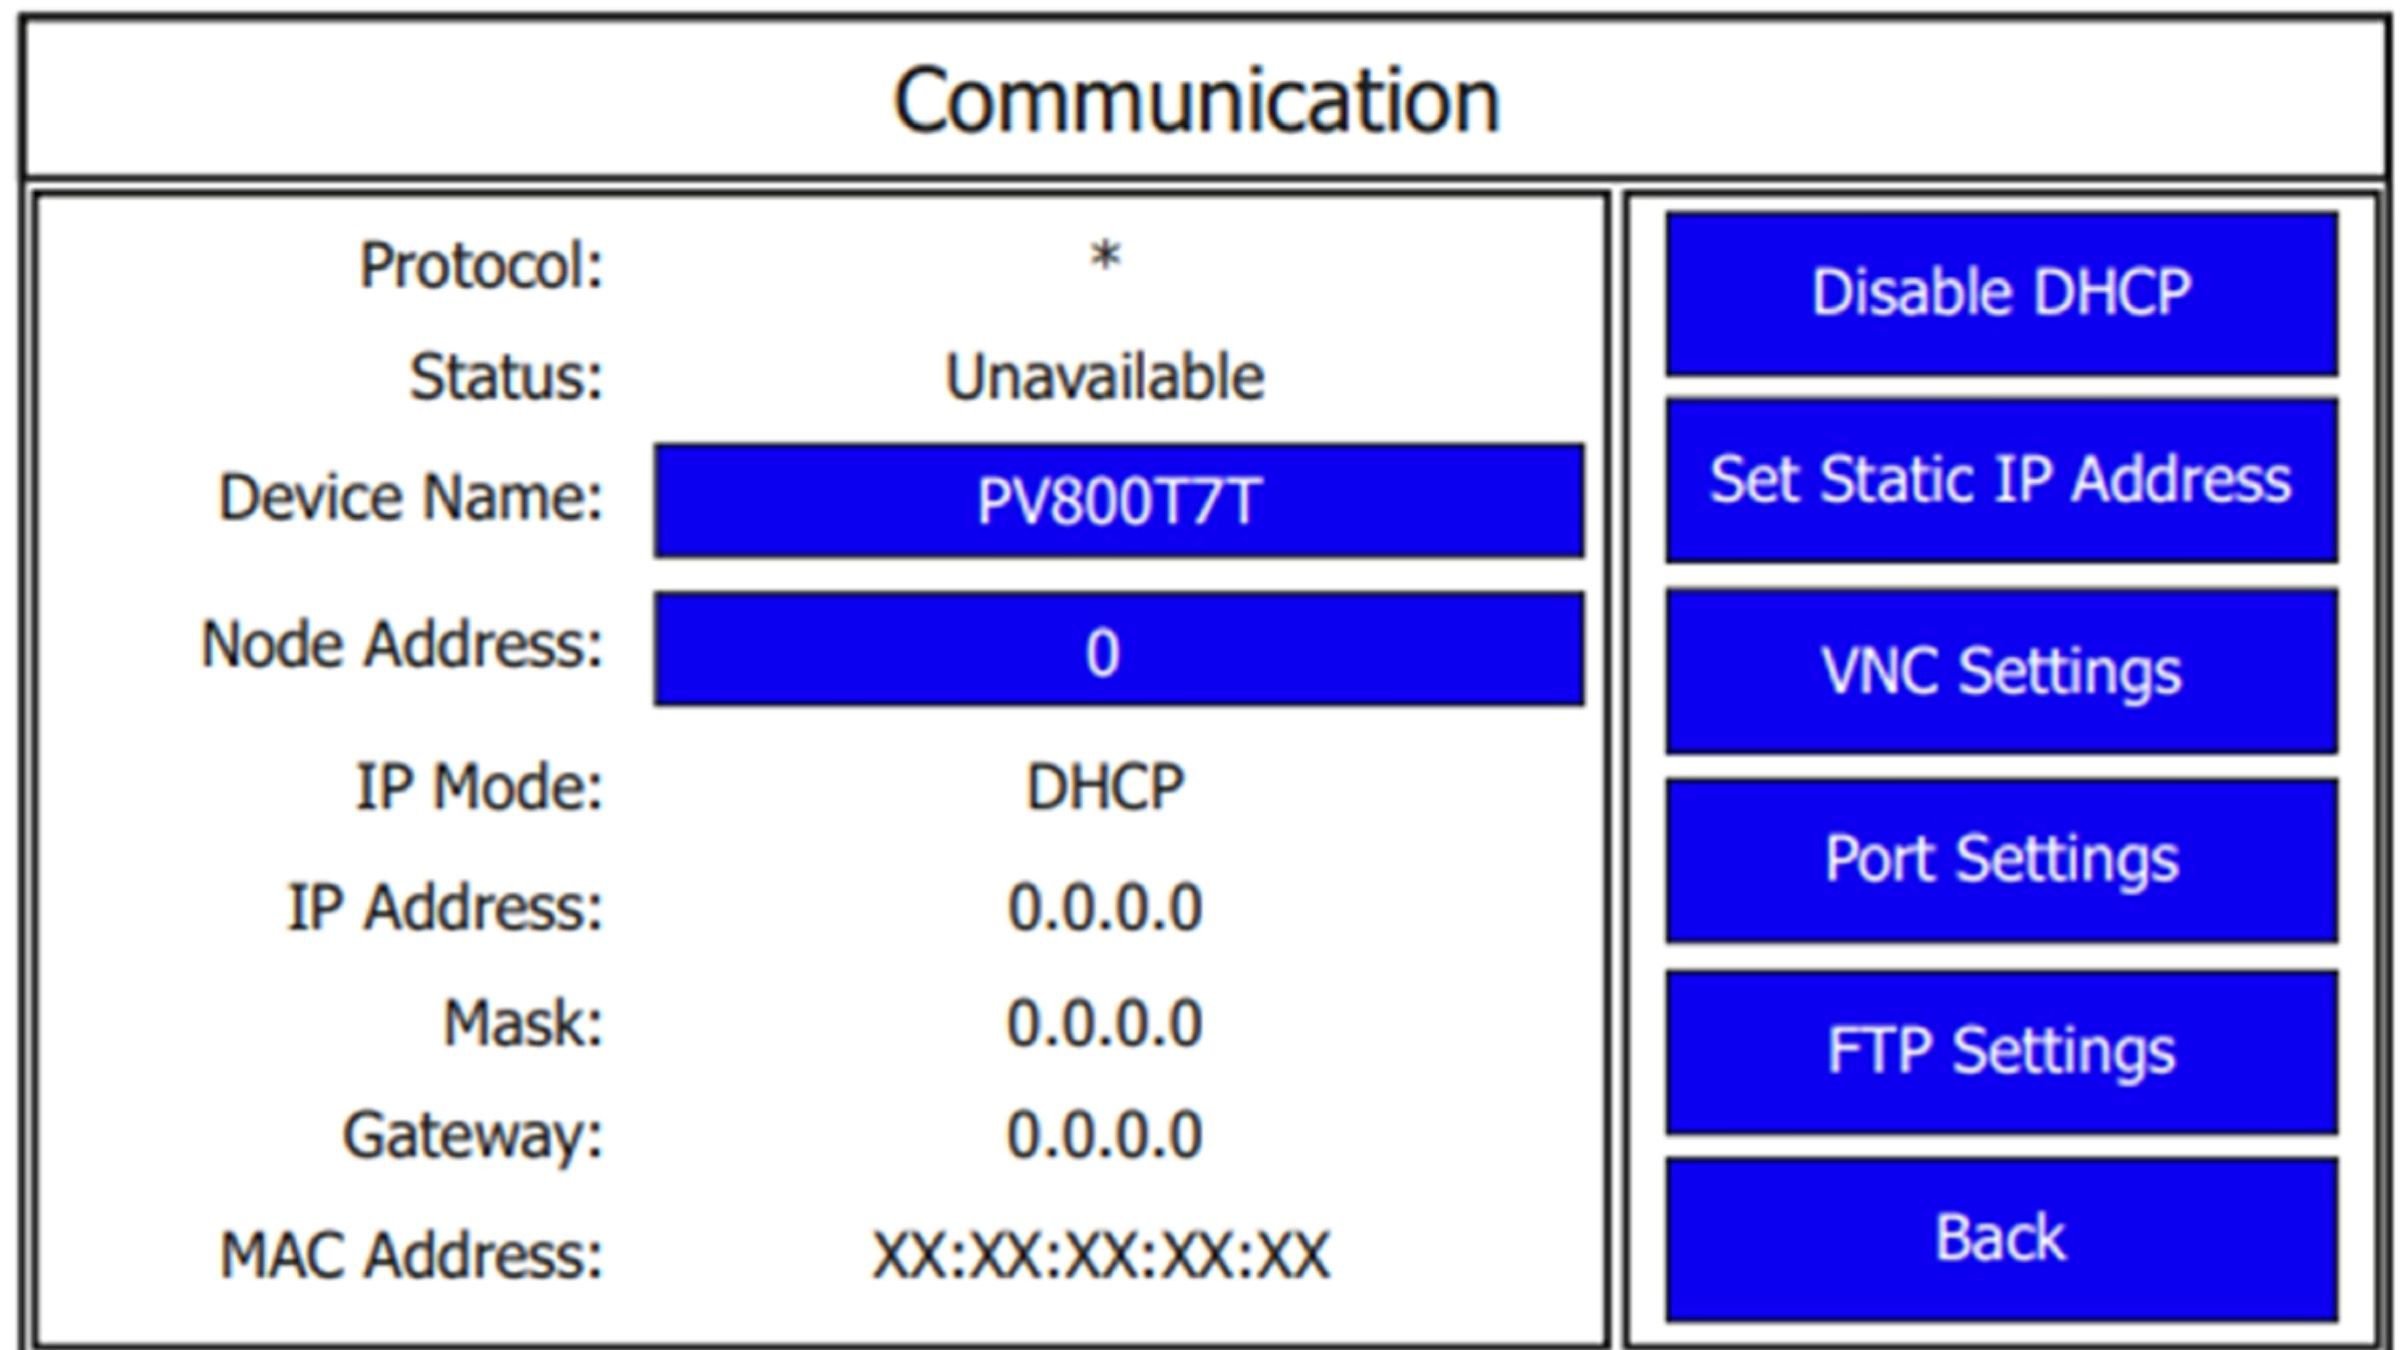
1.4 Press VNC Settings.

  • Step 1 - screenshot

    Step 1 - Image 1

  • Step 1 - screenshot

    Step 1 - Image 2

  • Step 1 - screenshot

    Step 1 - Image 3

  • Step 1 - screenshot

    Step 1 - Image 4

  • Step 1 - screenshot

    Step 1 - Image 1

  • Step 1 - screenshot

    Step 1 - Image 2

  • Step 1 - screenshot

    Step 1 - Image 3

  • Step 1 - screenshot

    Step 1 - Image 4

  • Step 1 - screenshot

    Step 1 - Image 1

  • Step 1 - screenshot

    Step 1 - Image 2

  • Step 1 - screenshot

    Step 1 - Image 3

  • Step 1 - screenshot

    Step 1 - Image 4

Step 1 - screenshot
Step 1 - screenshot
Step 1 - screenshot
Step 1 - screenshot

Step 2: Parameters import

2.1 Import “Parameters_52X”.

Step 3: PanelView800 configuration

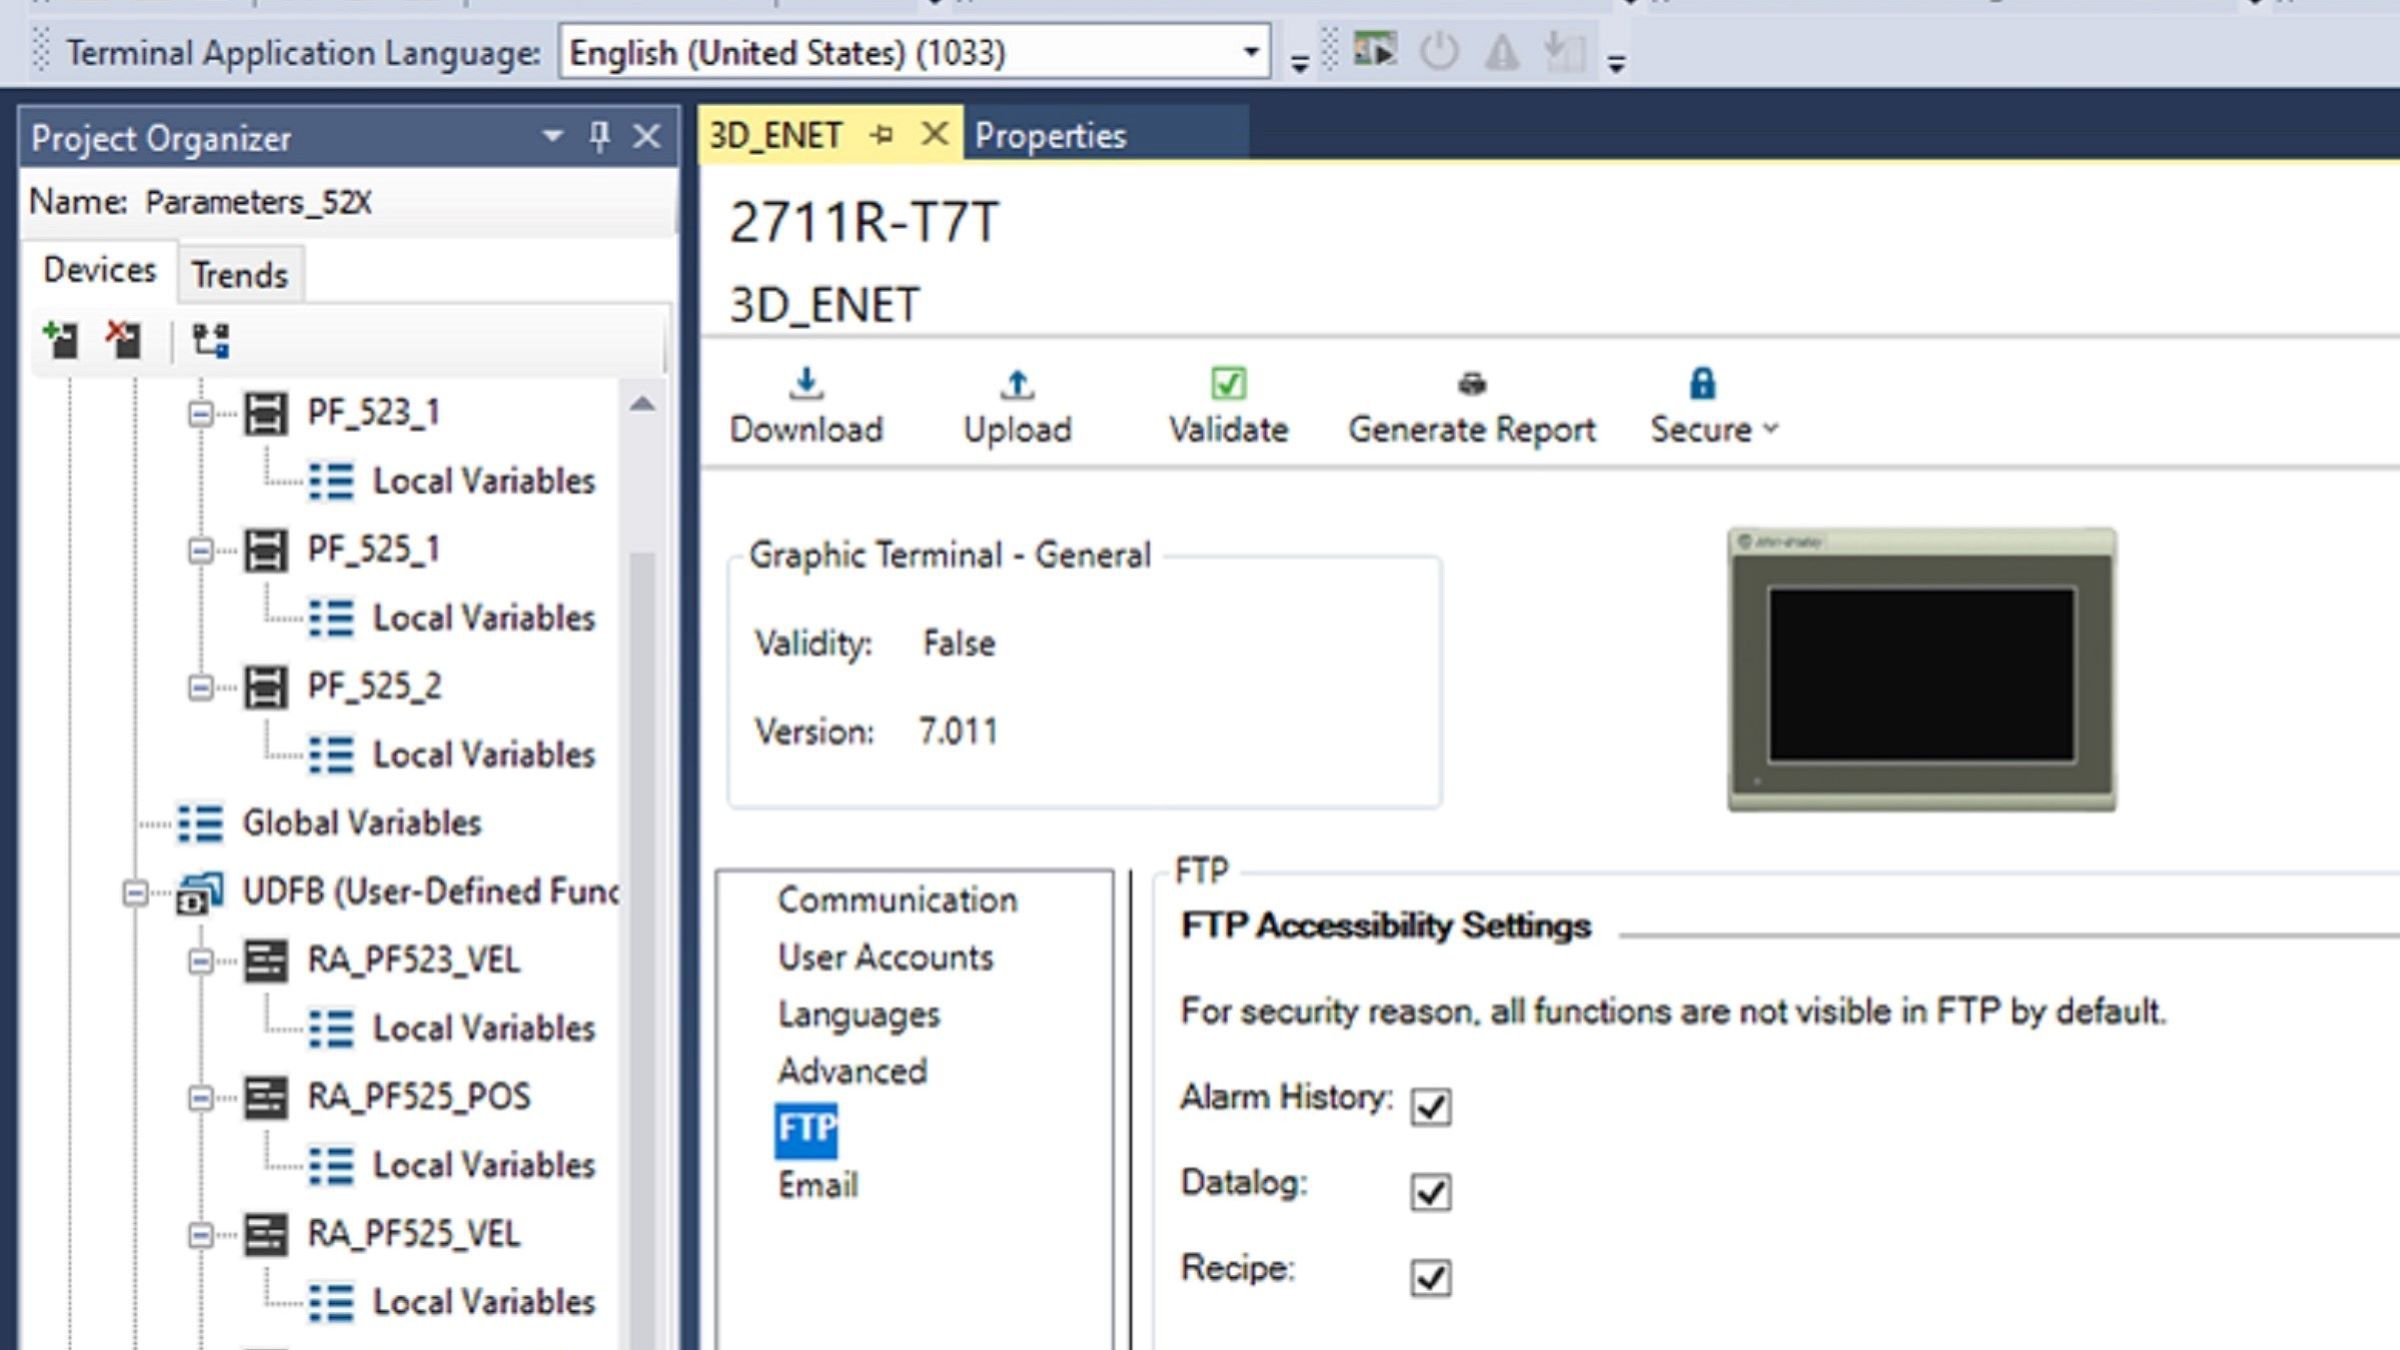
3.1 Verify that all FTP Accessibility Settings are enable.

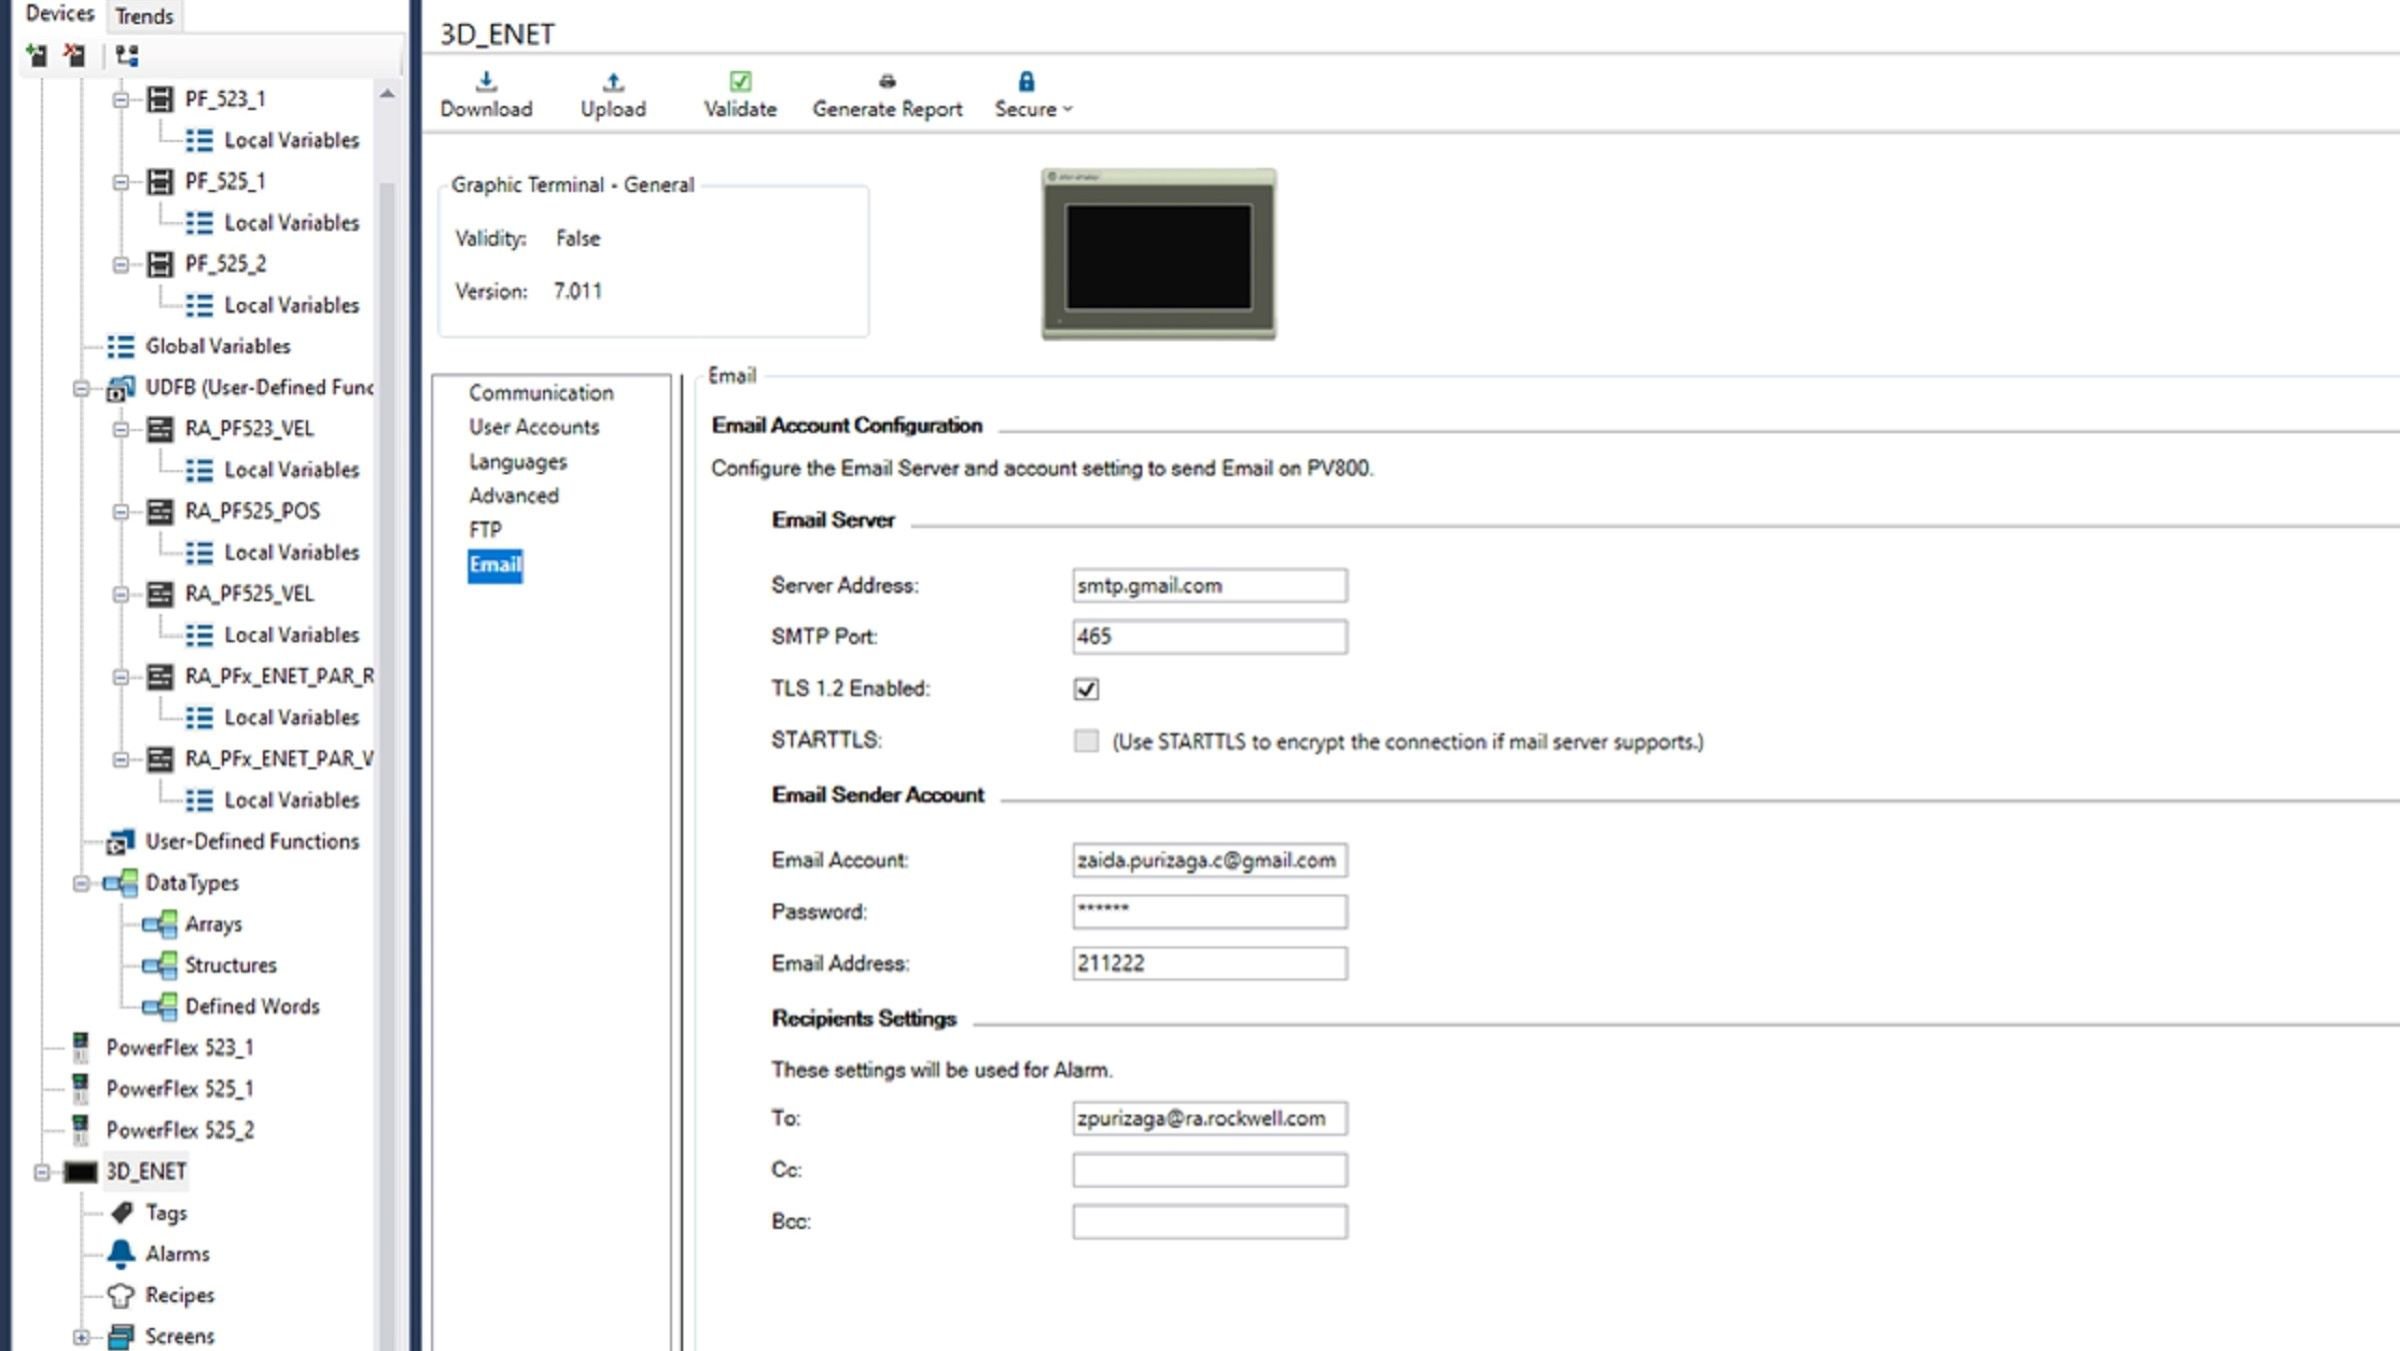
3.2 Configuration of email server and account setting to send email on PV800 (optional).

  • Step 3 - screenshot

    Step 3 - Image 1

  • Step 3 - screenshot

    Step 3 - Image 2

  • Step 3 - screenshot

    Step 3 - Image 1

  • Step 3 - screenshot

    Step 3 - Image 2

  • Step 3 - screenshot

    Step 3 - Image 1

  • Step 3 - screenshot

    Step 3 - Image 2

Step 3 - screenshot
Step 3 - screenshot

Step 4: Configuration of the PowerFlex 523/525

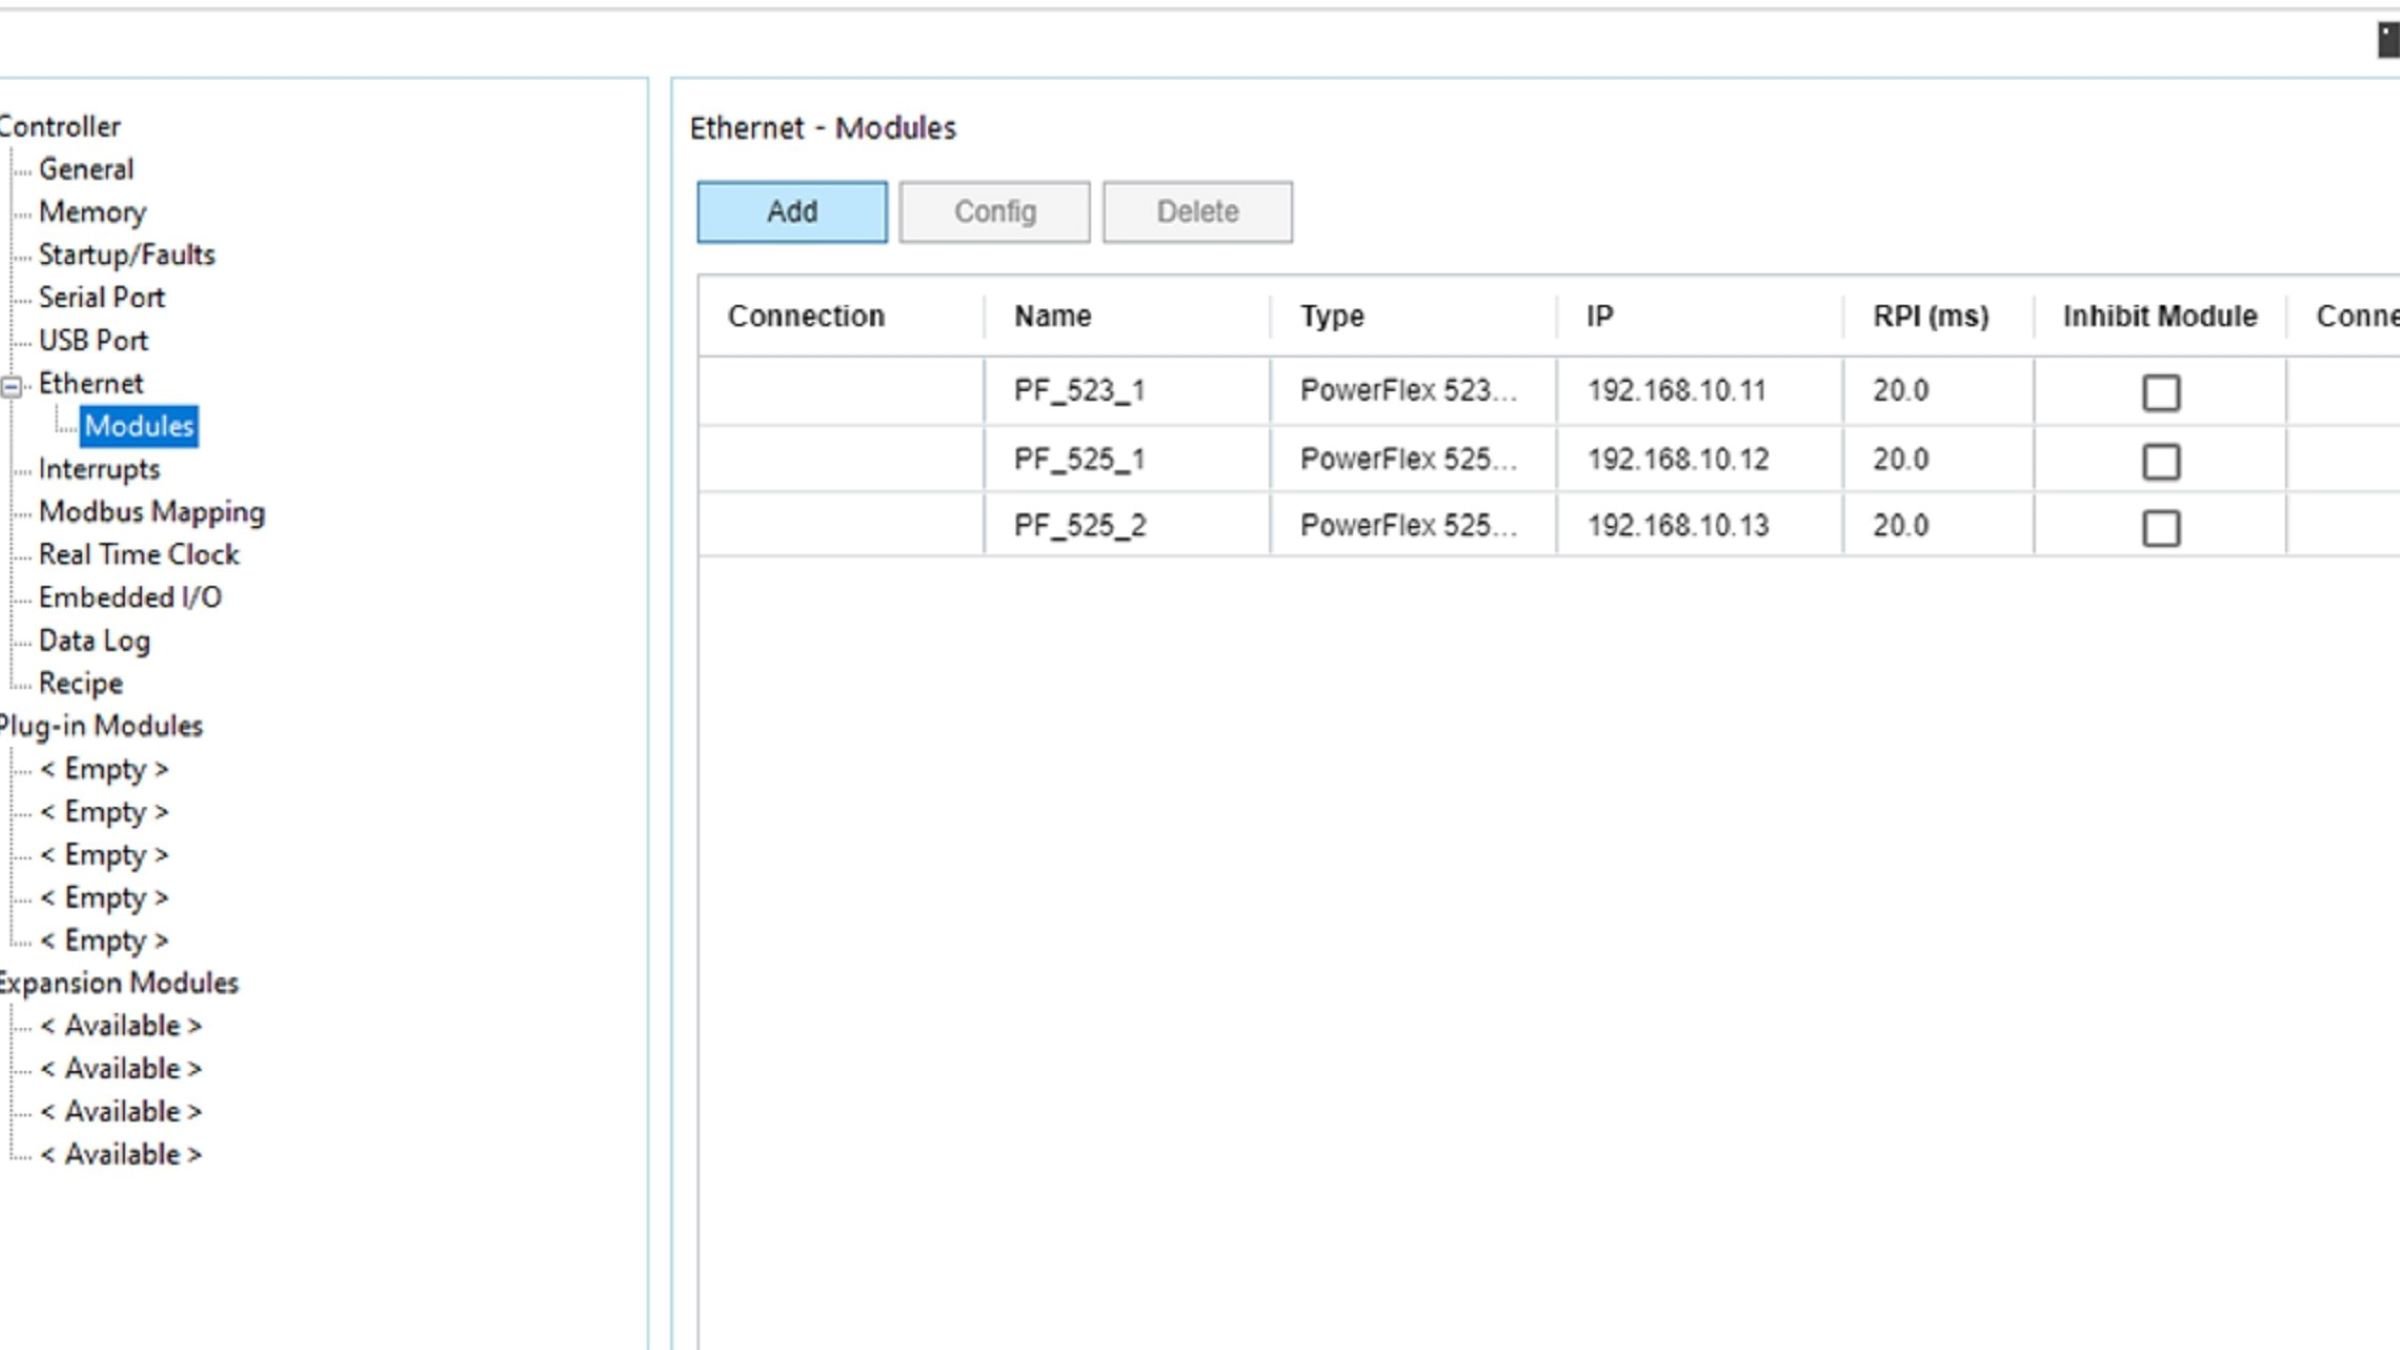
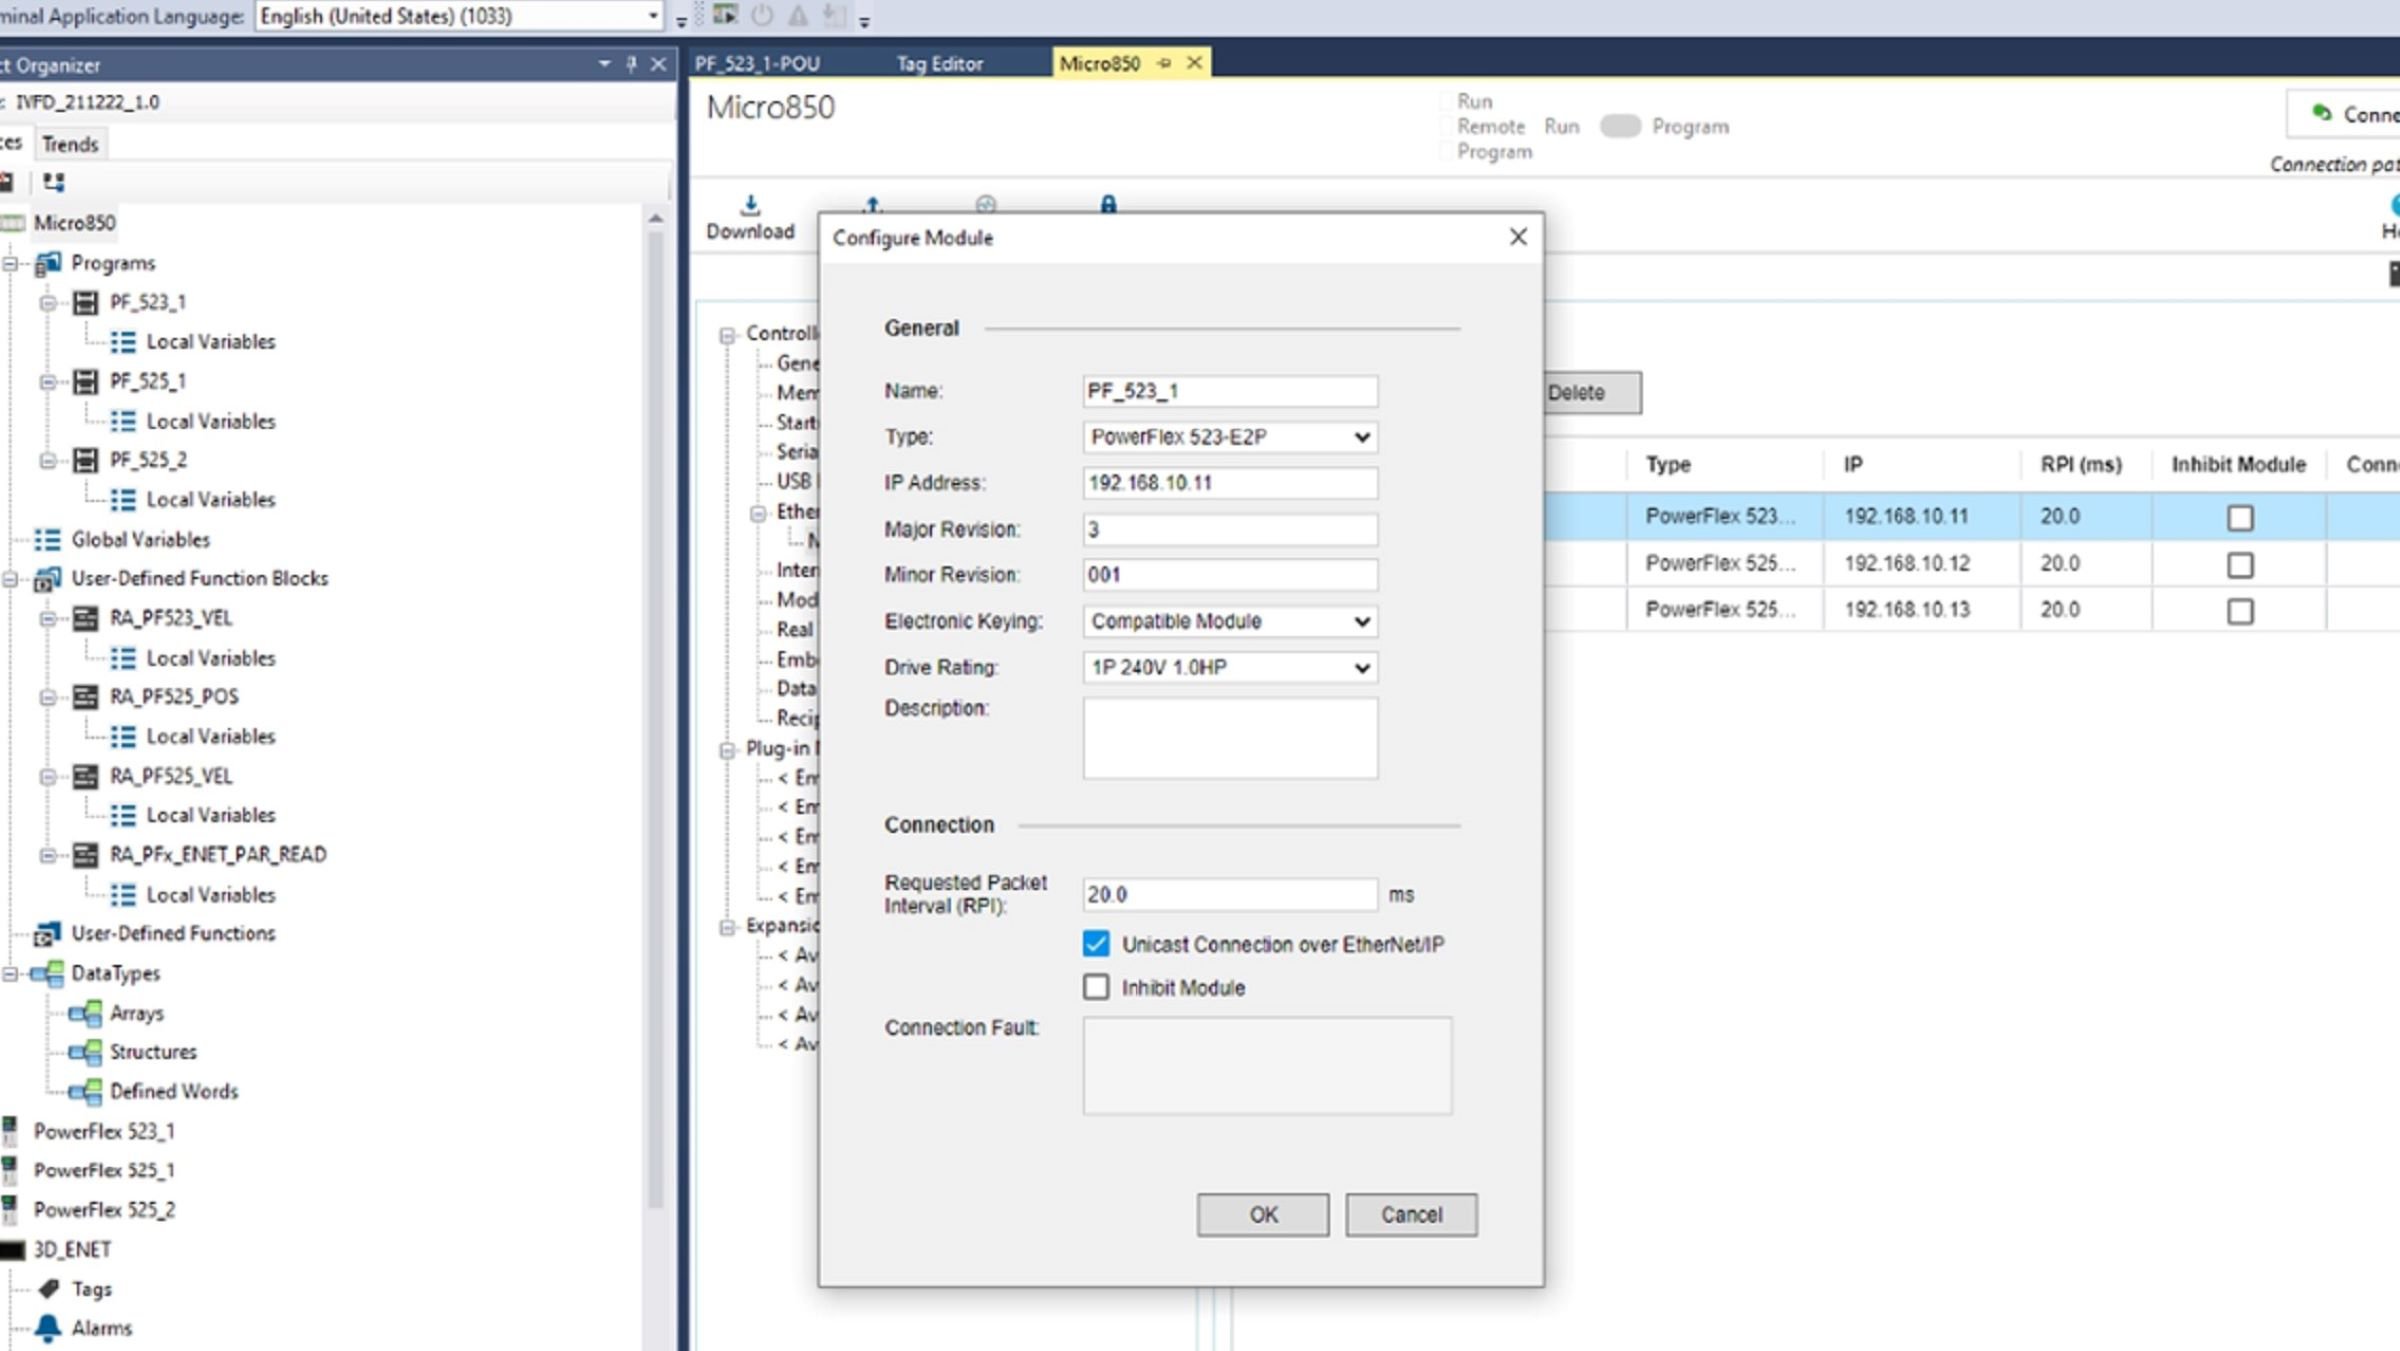
4.1 Create the PowerFlex as Ethernet modules (this enables implicit messaging)

4.2 PowerFlex523 communicated with EIP card (2 ports) and speed control mode.

4.3 PowerFlex525 communicated with EIP card (2 ports) and speed control mode.

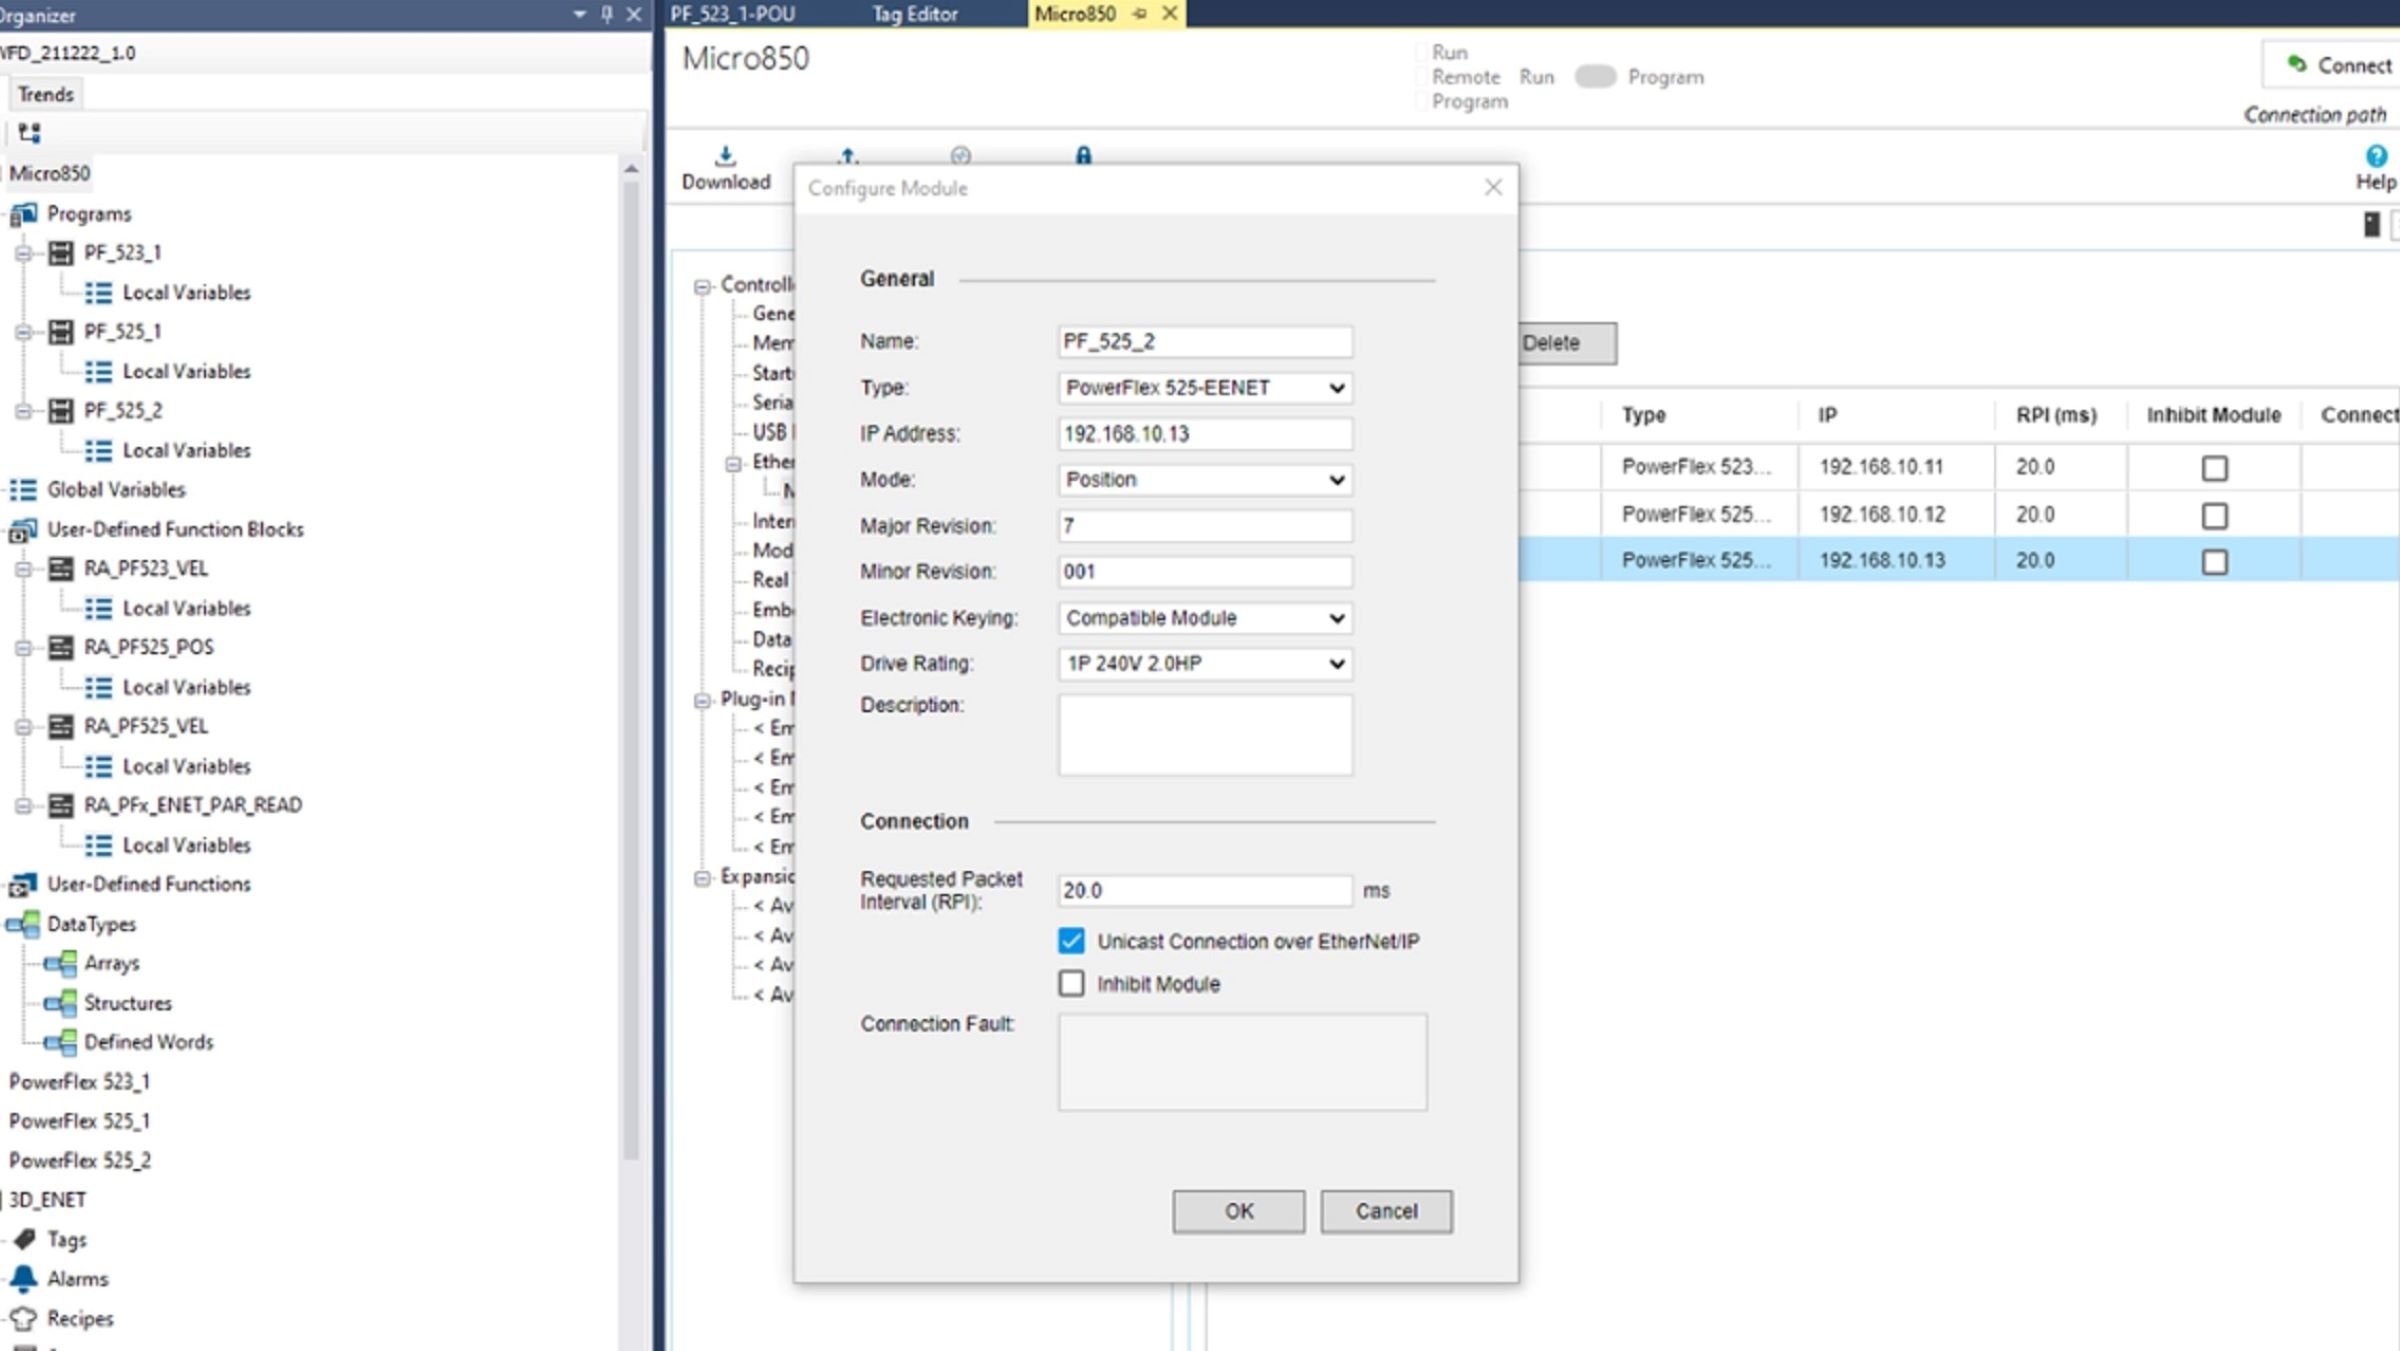
4.4 PowerFlex525 communicated by ethernet Embedded IP and position control mode.

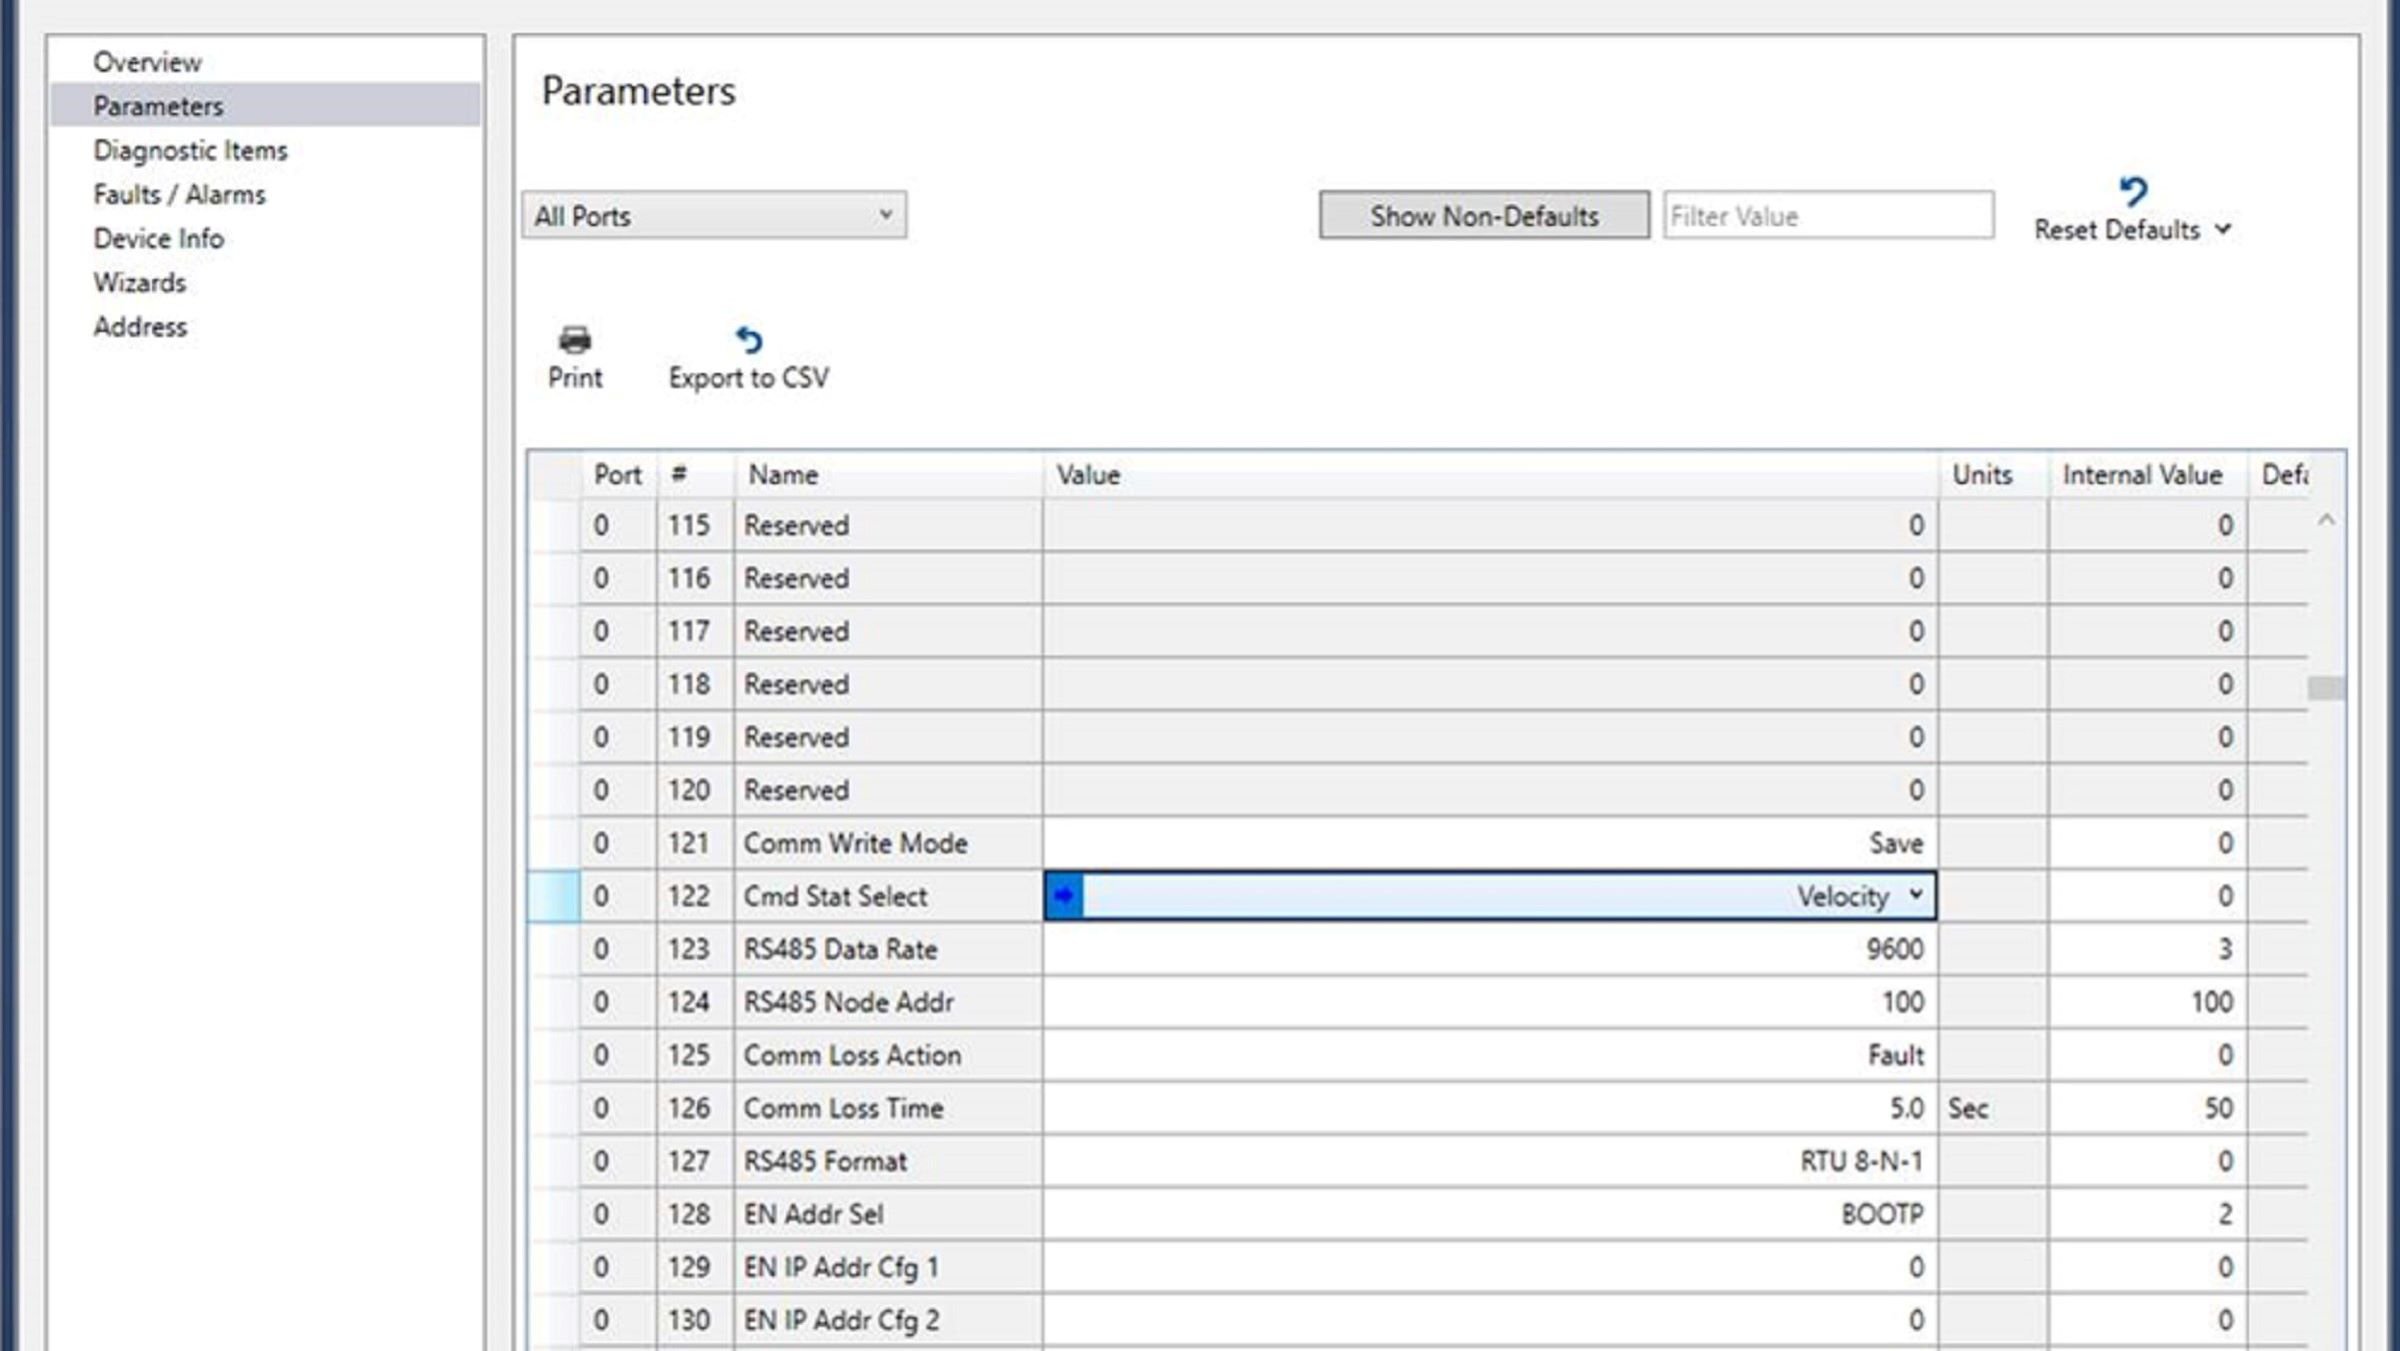
4.5 Configuration of parameters for Ethernet communication. For communication by 25-COMM-E2P card.

4.6 Configuration of parameters for Ethernet communication. For the communication of the PF525 through the embedded EIP port.

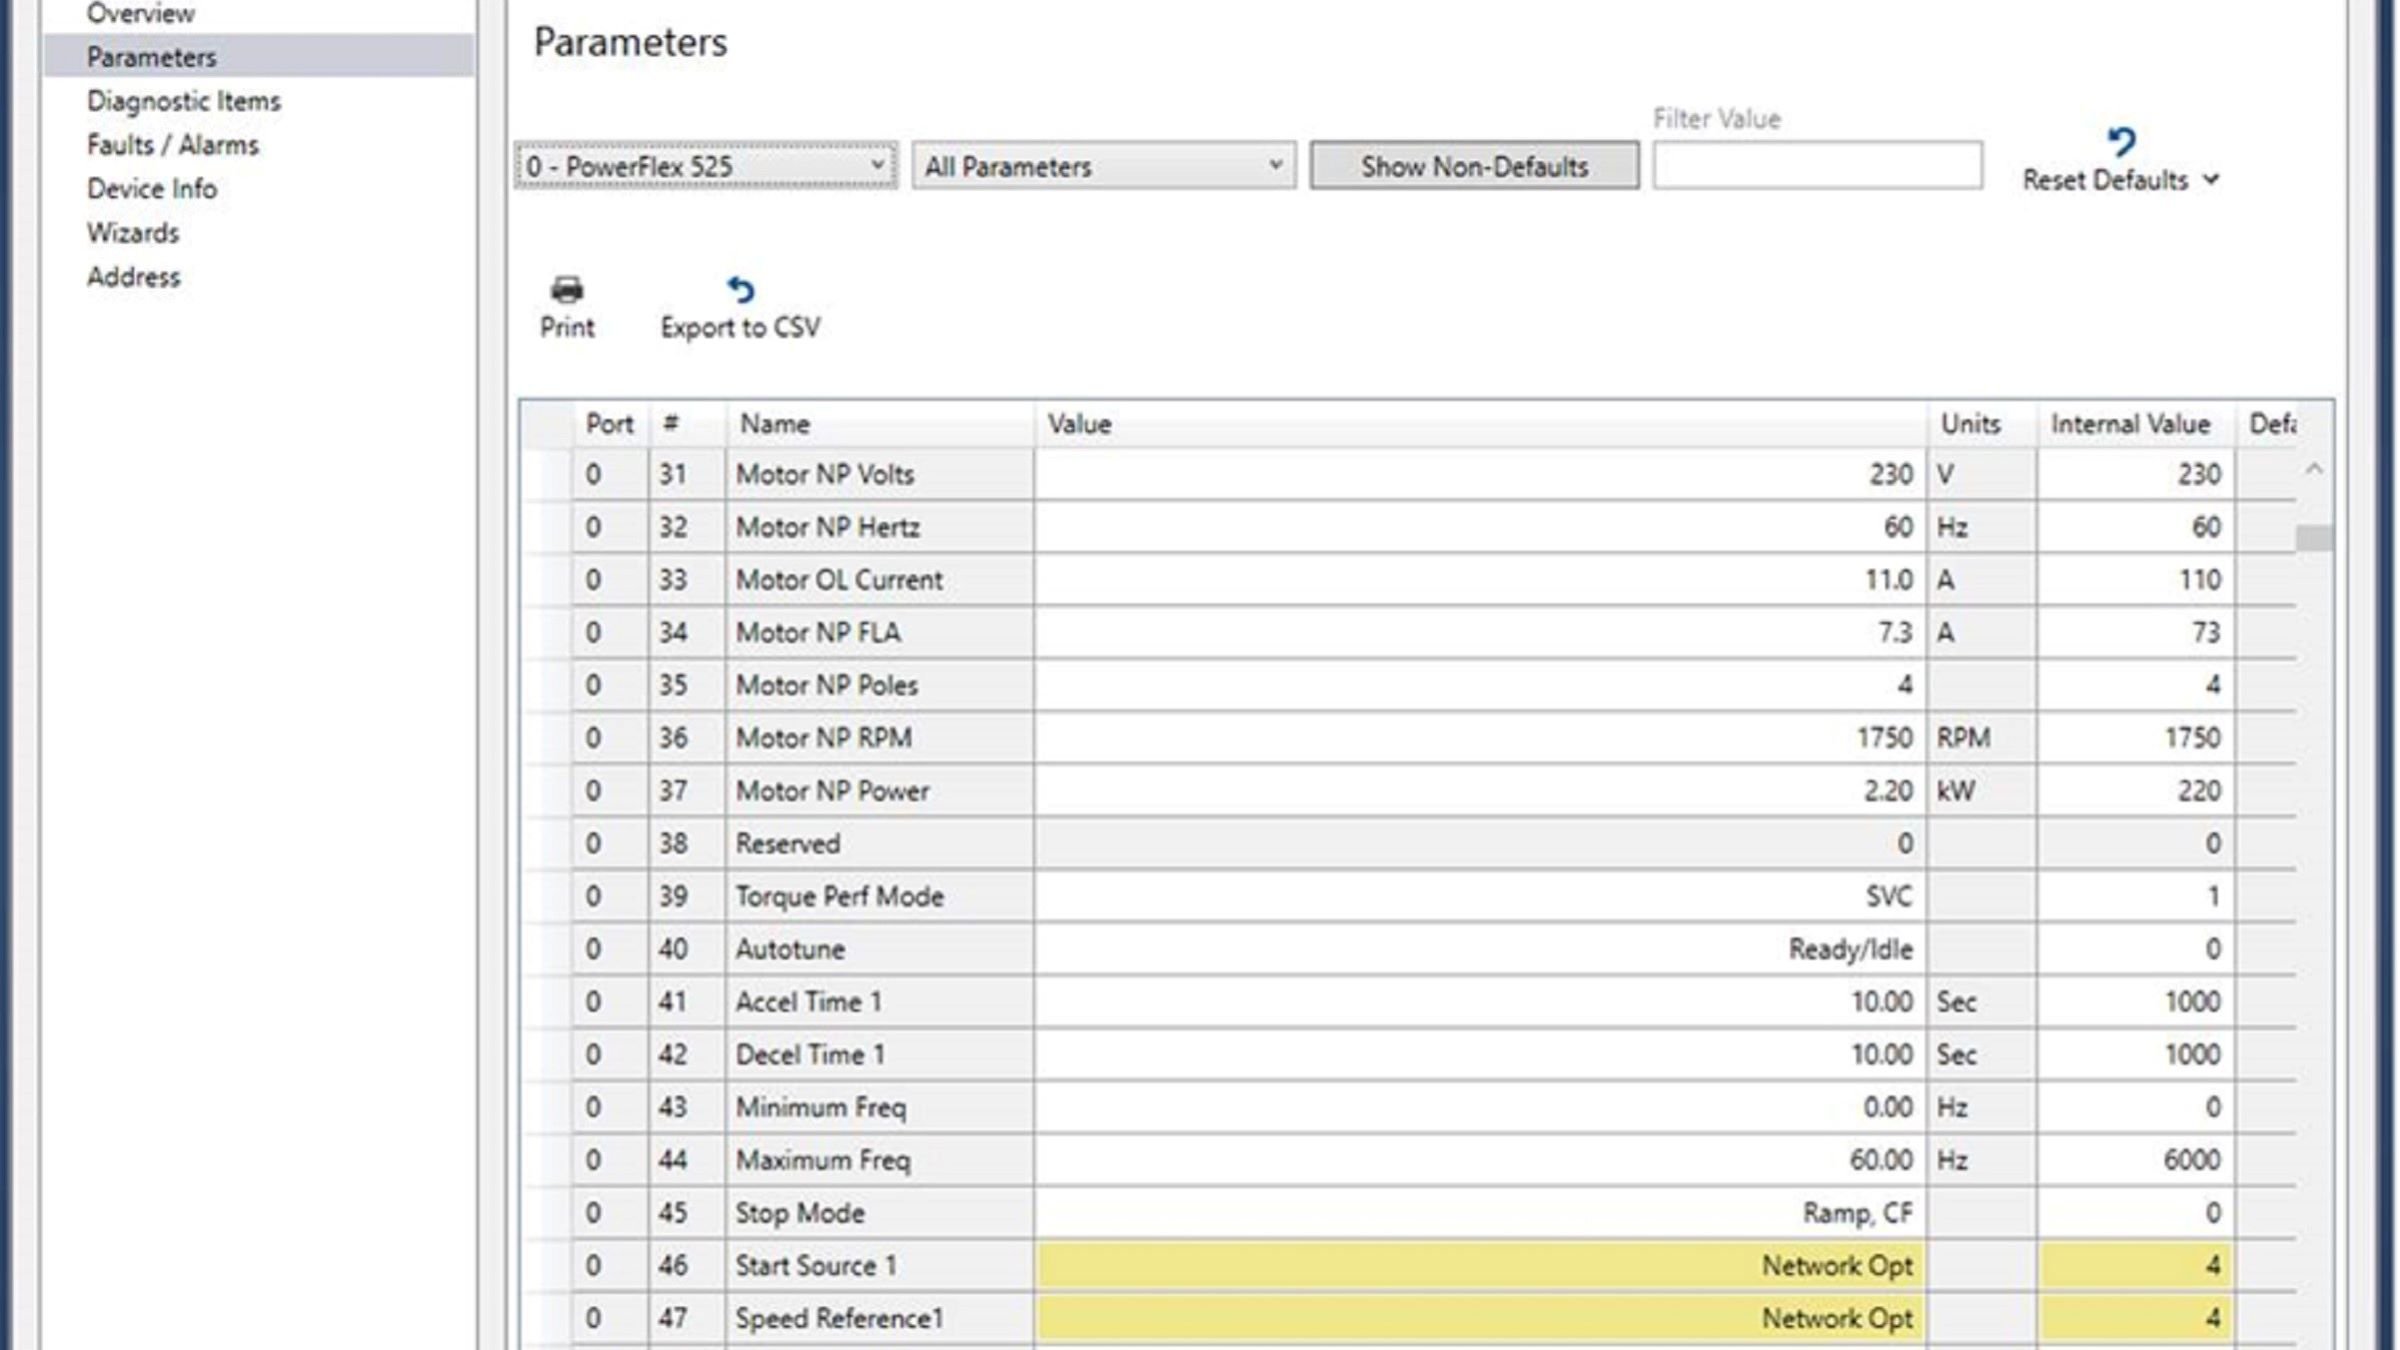
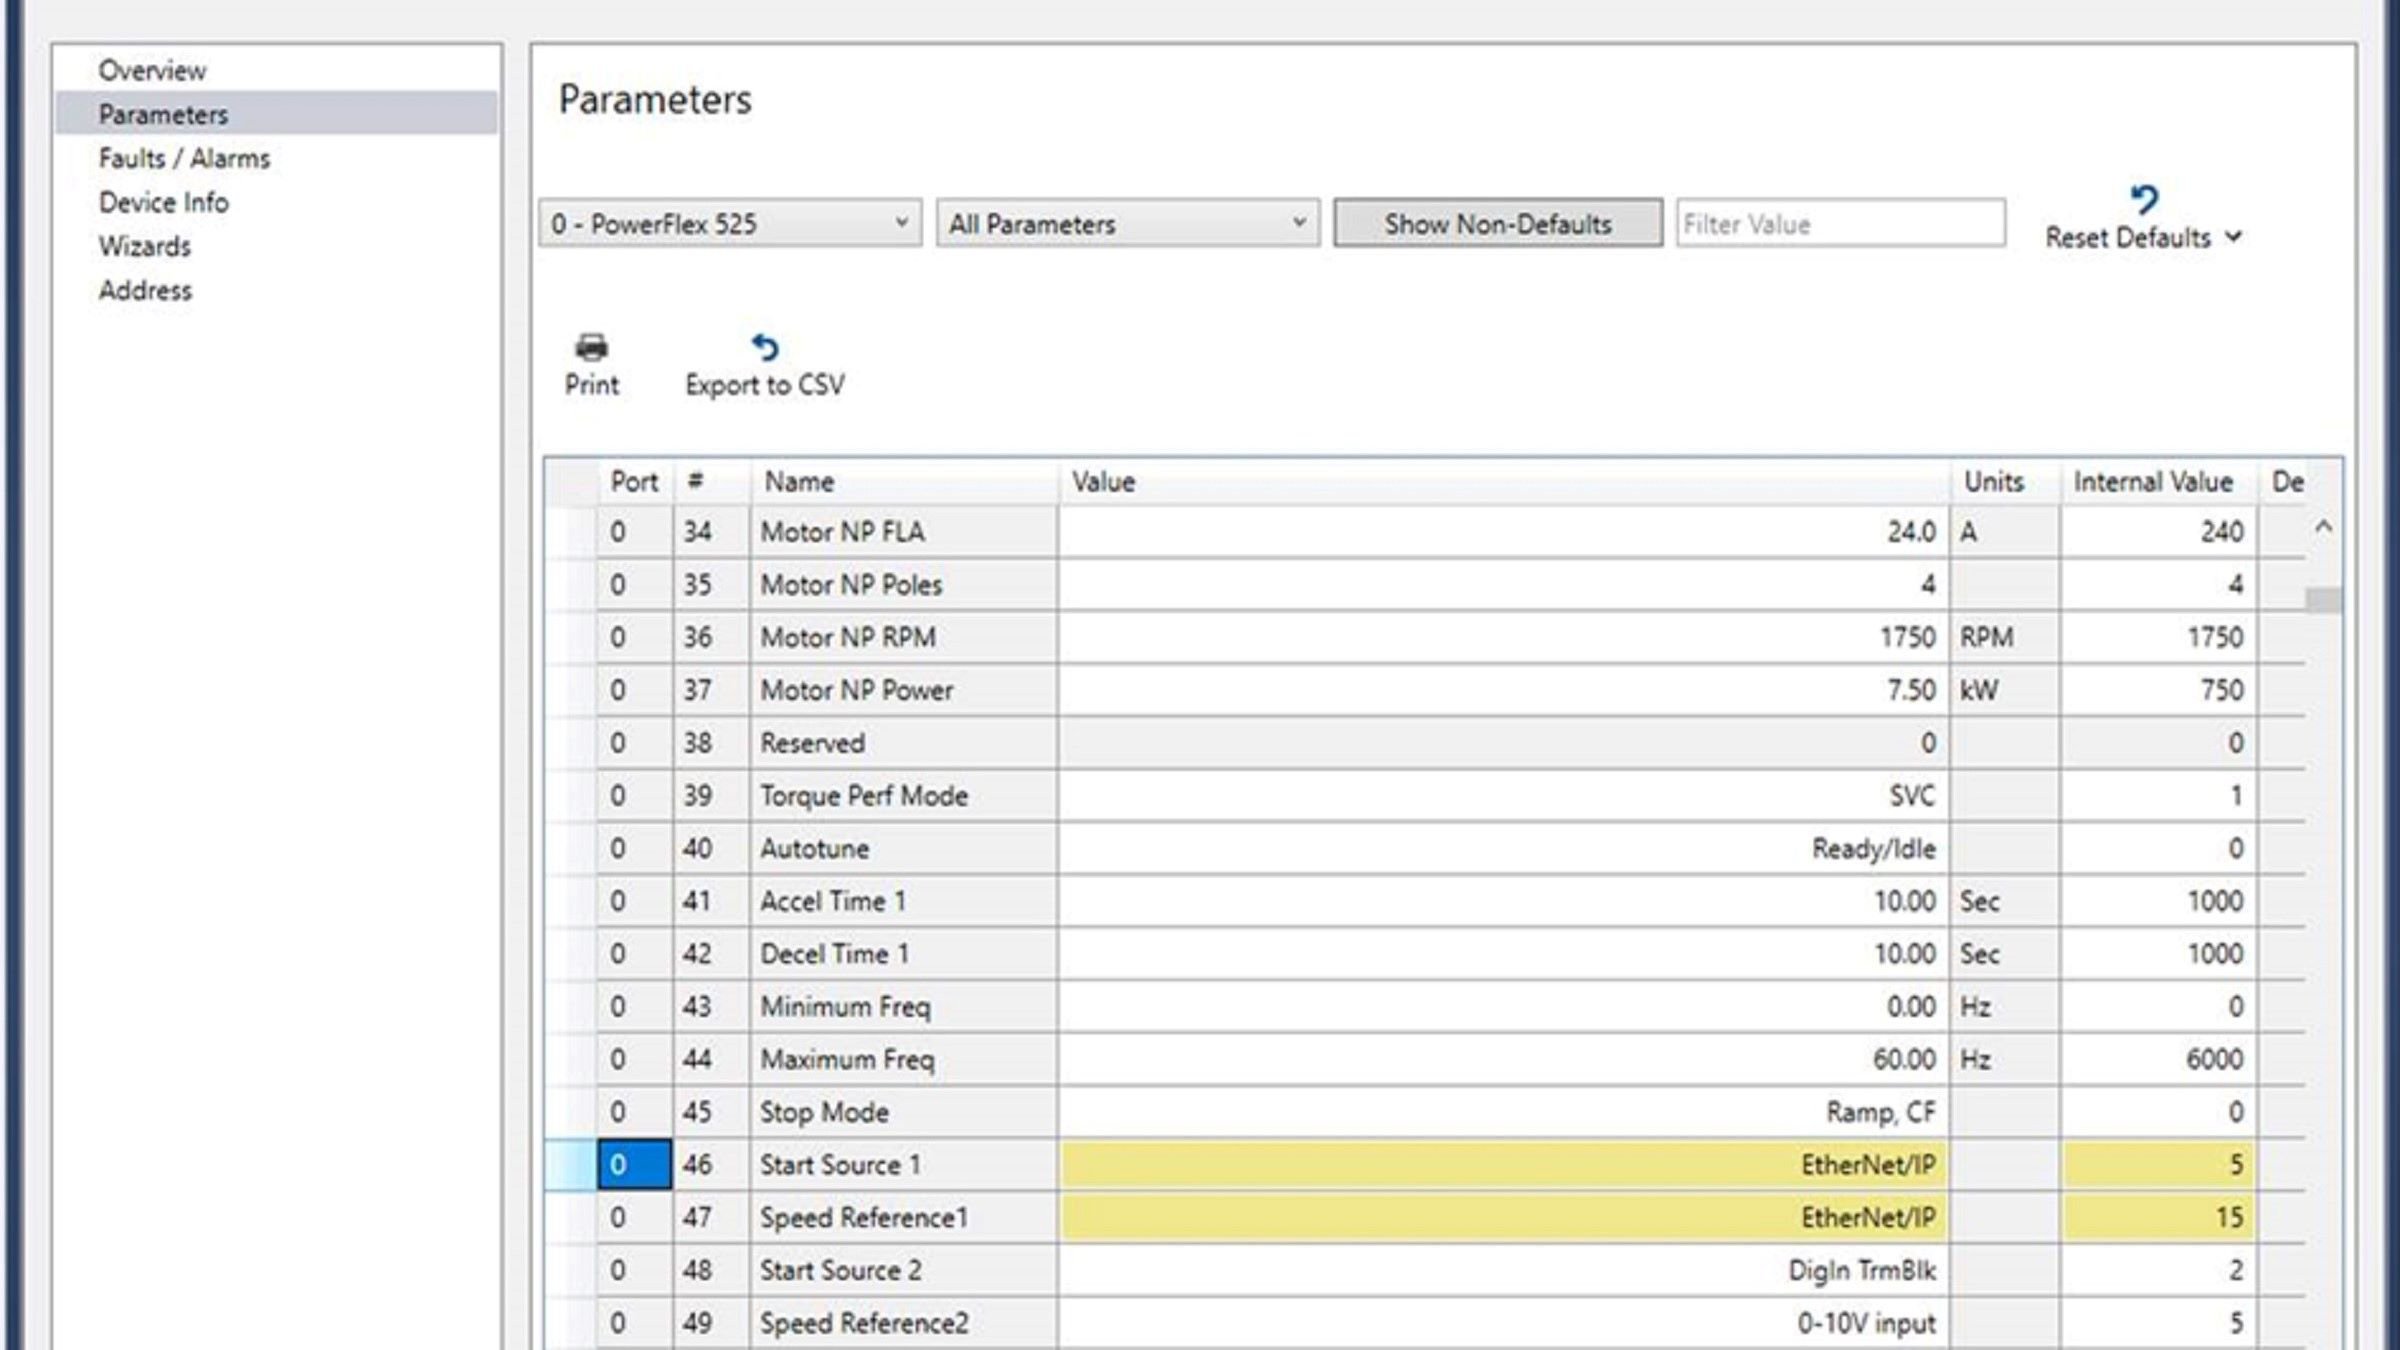
4.7 Parameter setting for control mode: Speed.

4.8 Parameter setting for control mode: Position.

  • Step 4 - screenshot

    Step 4 - Image 1

  • Step 4 - screenshot

    Step 4 - Image 2

  • Step 4 - screenshot

    Step 4 - Image 3

  • Step 4 - screenshot

    Step 4 - Image 4

  • Step 4 - screenshot

    Step 4 - Image 5

  • Step 4 - screenshot

    Step 4 - Image 6

  • Step 4 - screenshot

    Step 4 - Image 7

  • Step 4 - screenshot

    Step 4 - Image 8

  • Step 4 - screenshot

    Step 4 - Image 1

  • Step 4 - screenshot

    Step 4 - Image 2

  • Step 4 - screenshot

    Step 4 - Image 3

  • Step 4 - screenshot

    Step 4 - Image 4

  • Step 4 - screenshot

    Step 4 - Image 5

  • Step 4 - screenshot

    Step 4 - Image 6

  • Step 4 - screenshot

    Step 4 - Image 7

  • Step 4 - screenshot

    Step 4 - Image 8

Step 4 - screenshot
Step 4 - screenshot
Step 4 - screenshot
Step 4 - screenshot
Step 4 - screenshot
Step 4 - screenshot
Step 4 - screenshot
Step 4 - screenshot

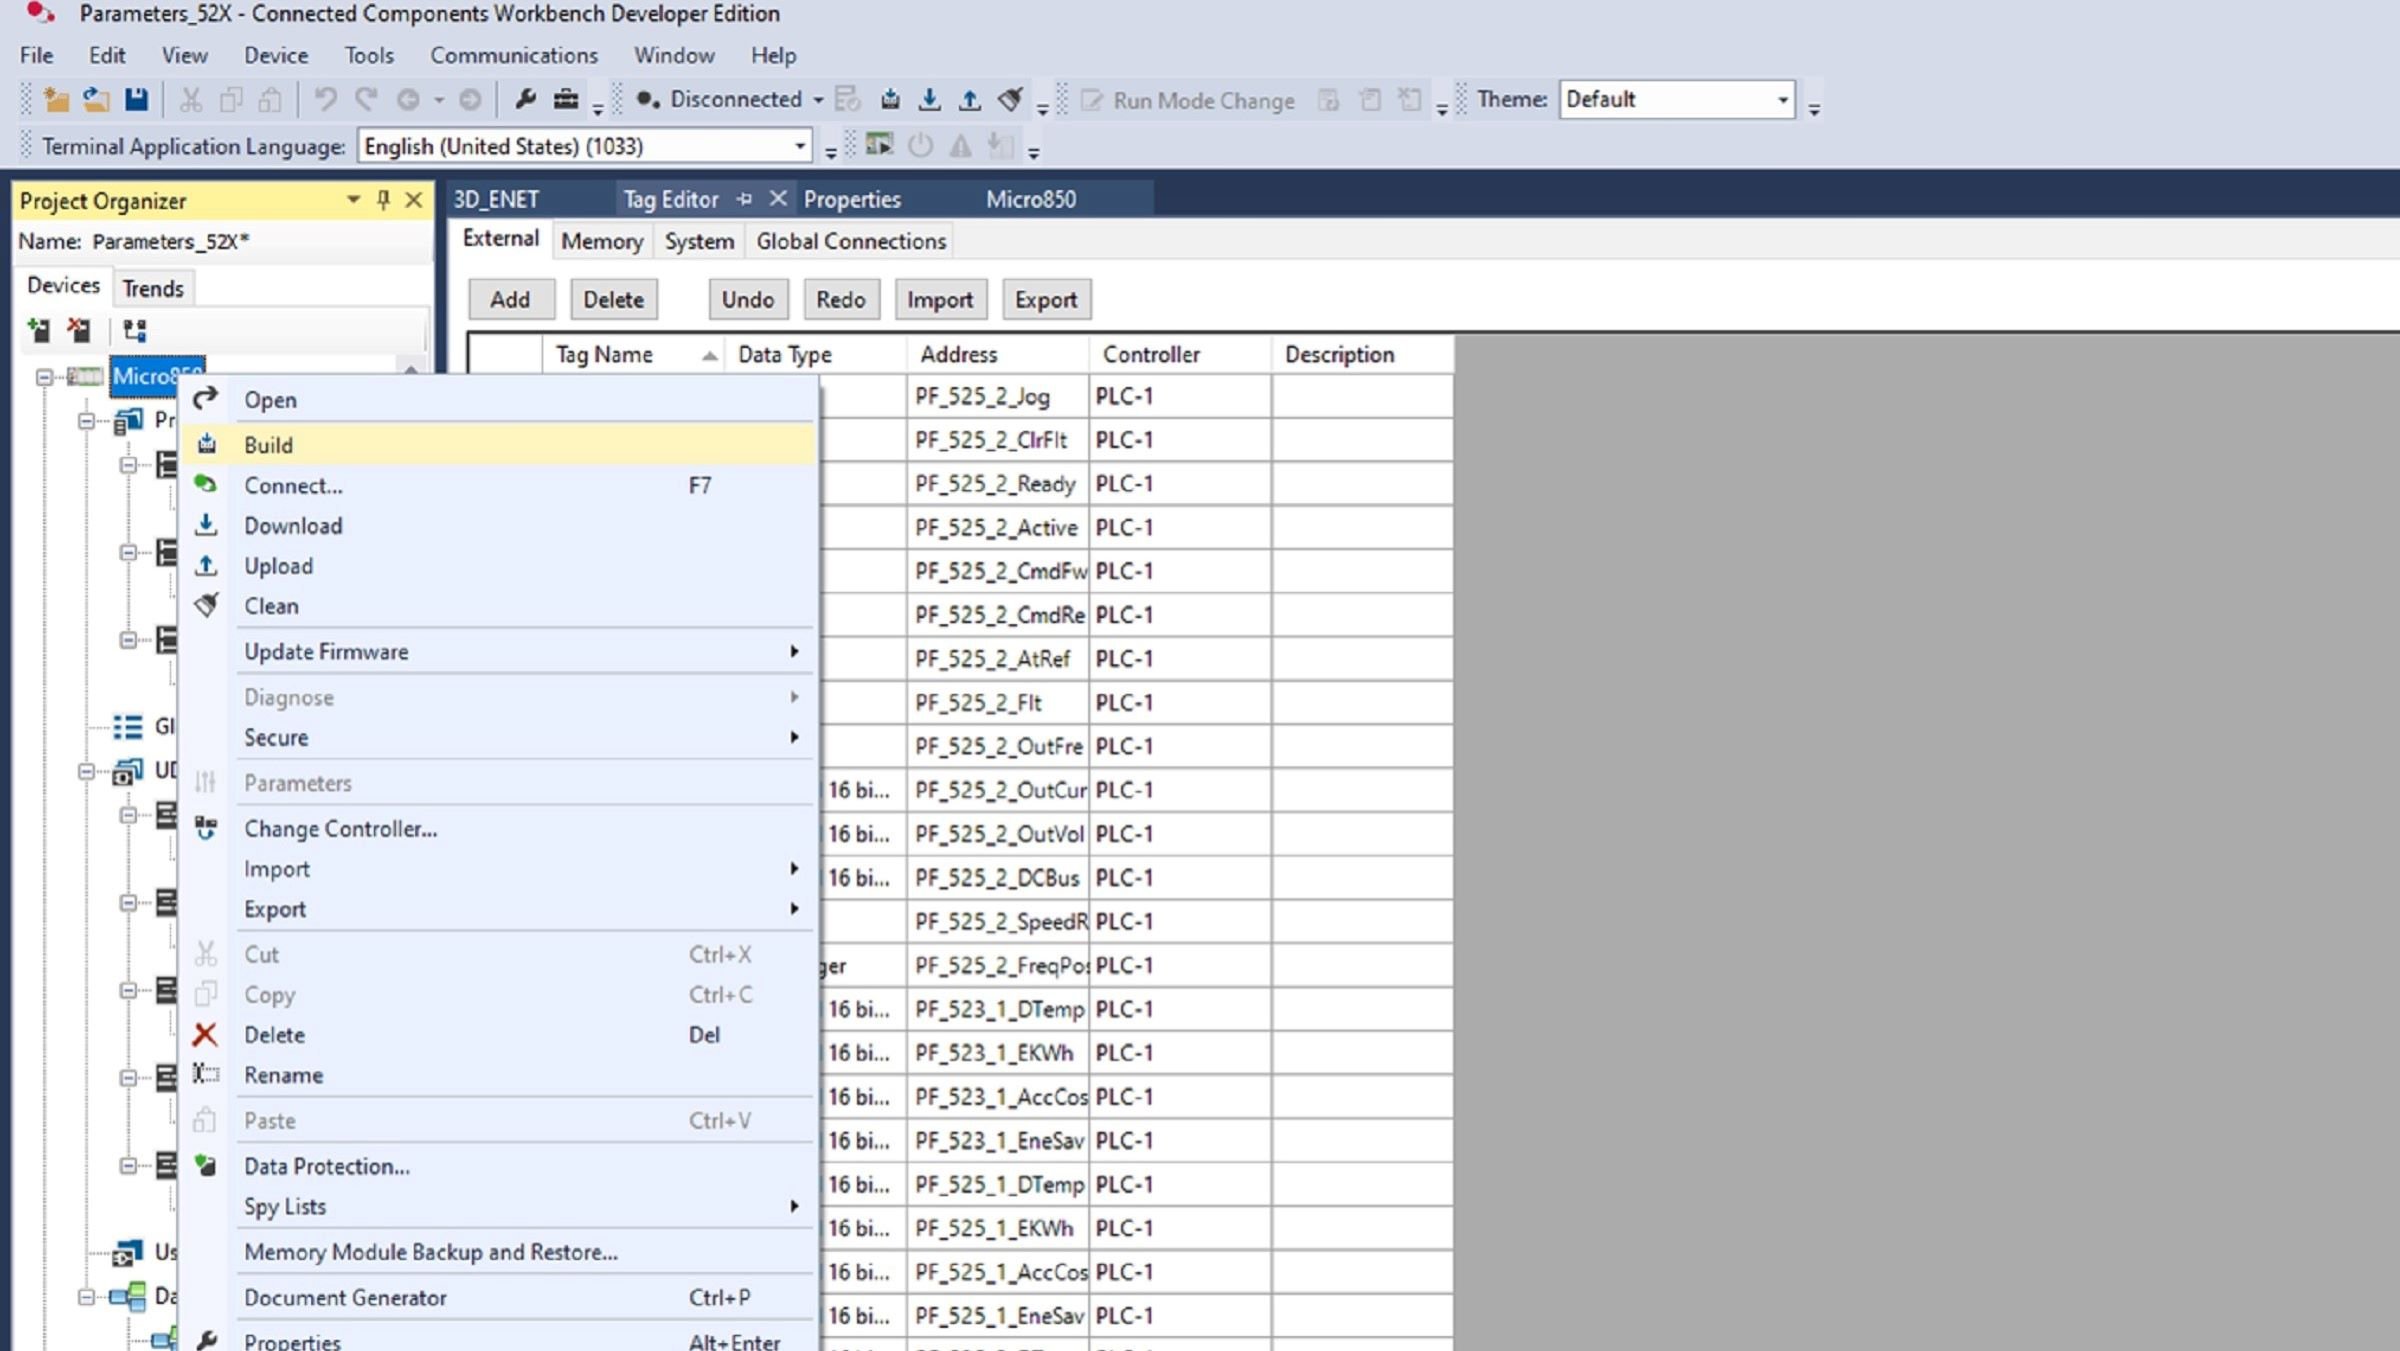
Step 5: Program download and commissioning

5.1 Compile the Micro800 program.

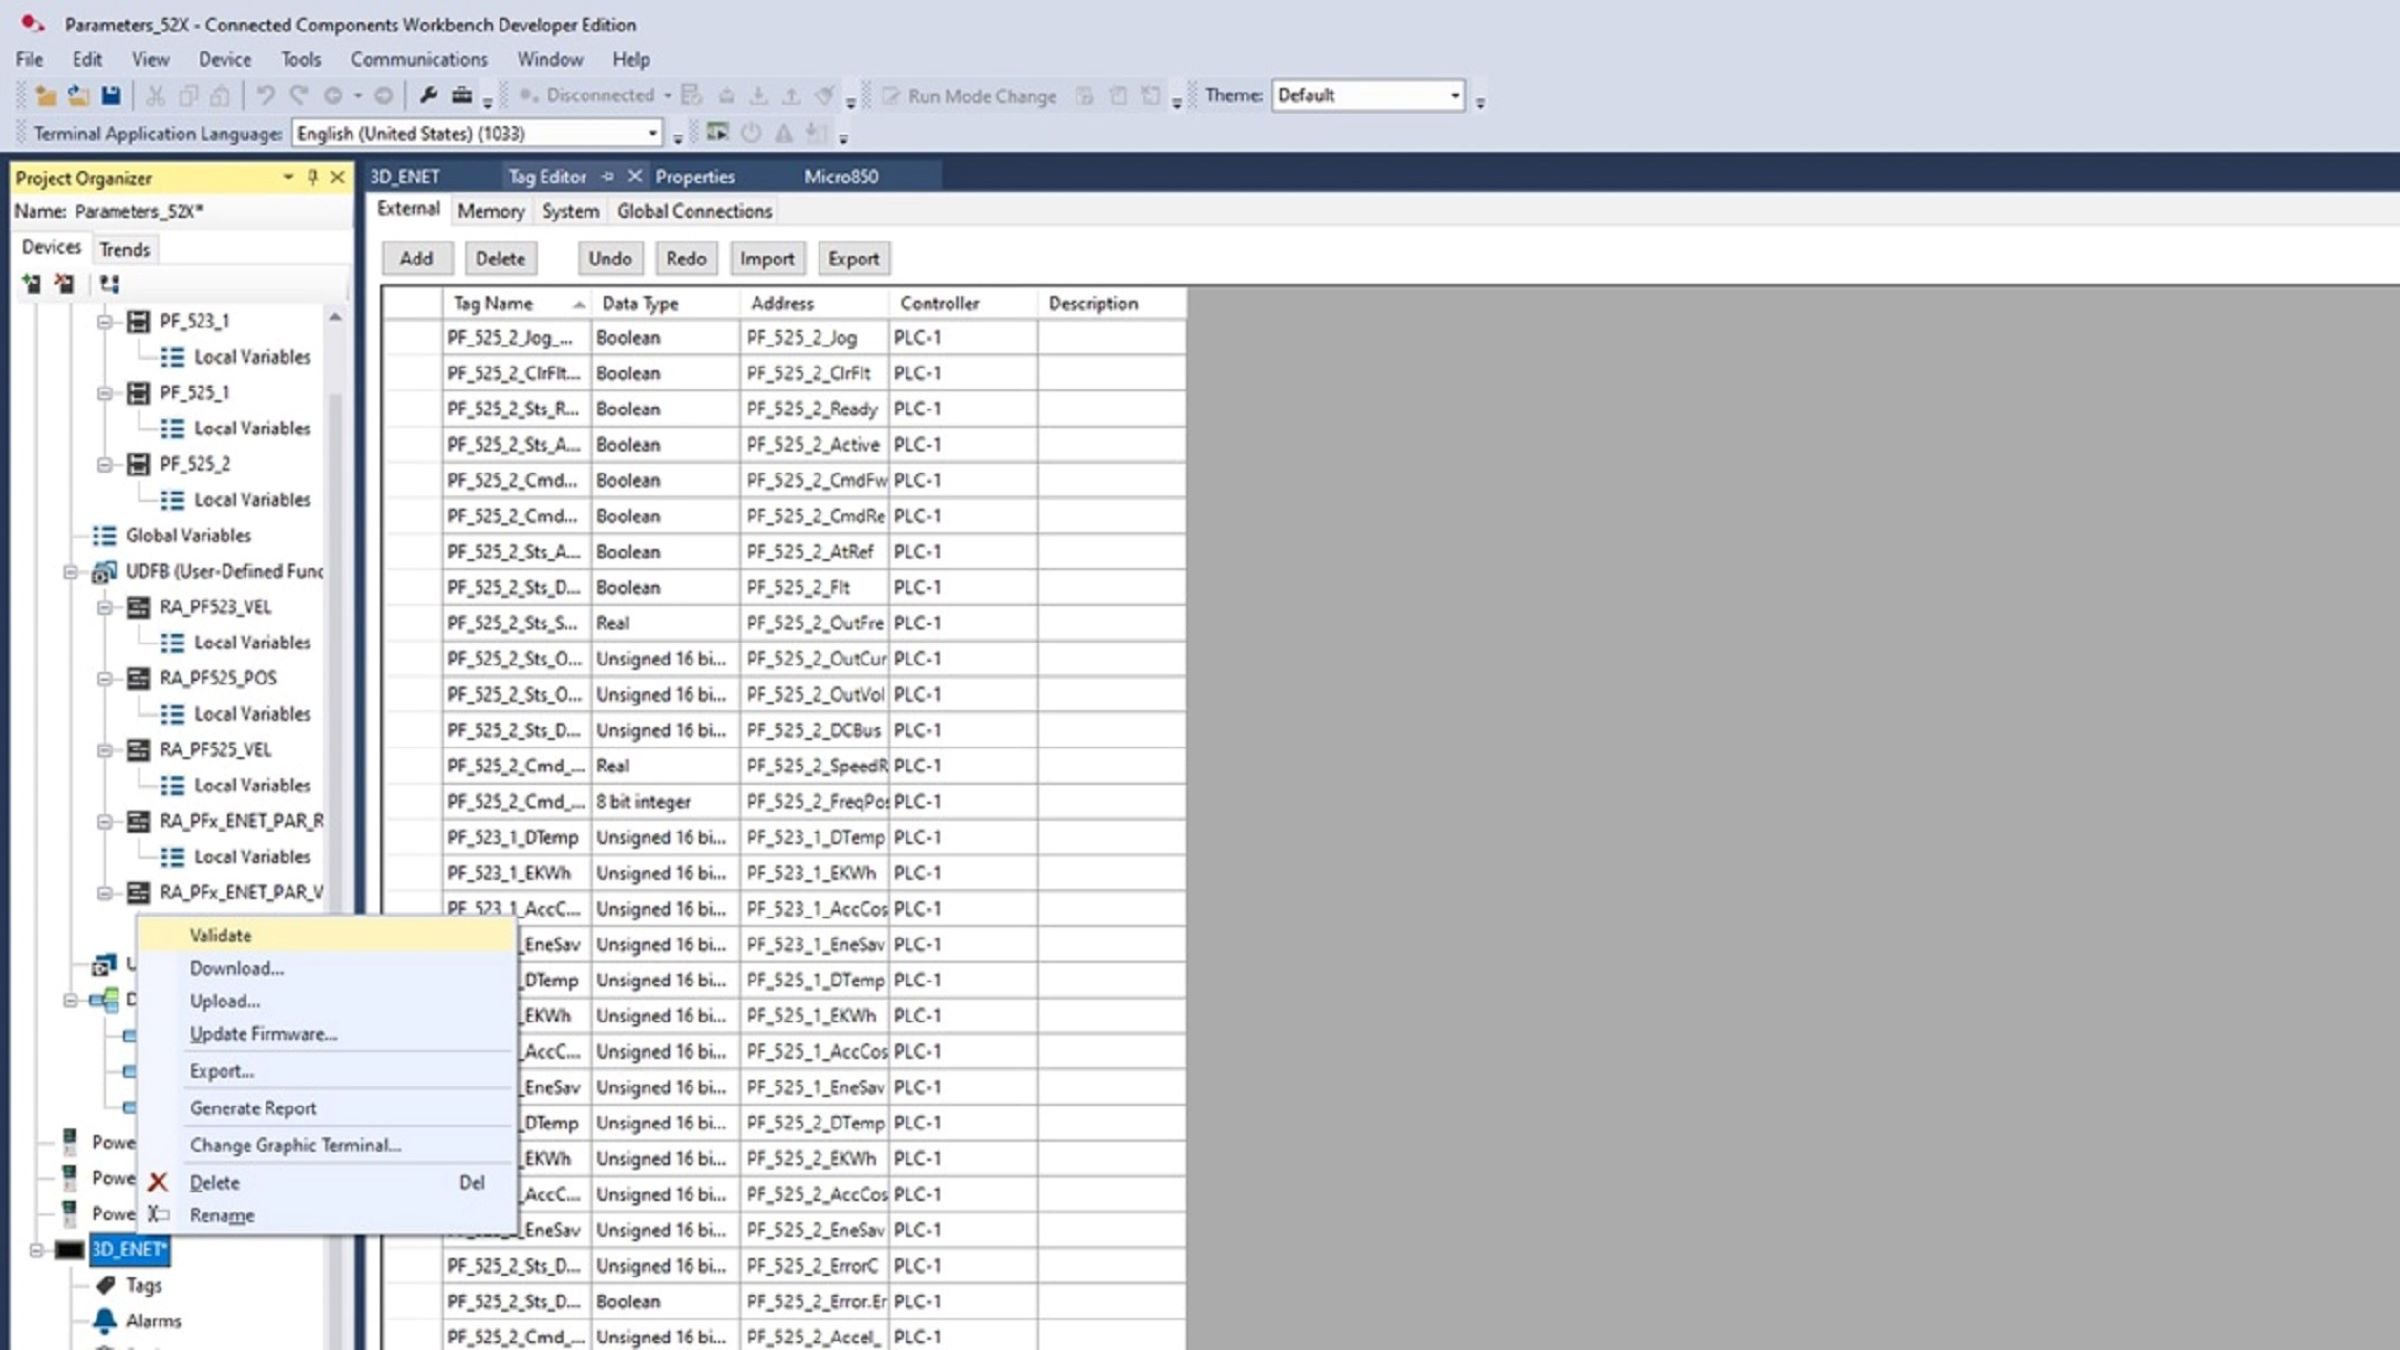
5.2 Validate PV800 application.

5.3 Verify the right connection and IP assignment of the equipment in the Ethernet IP network.

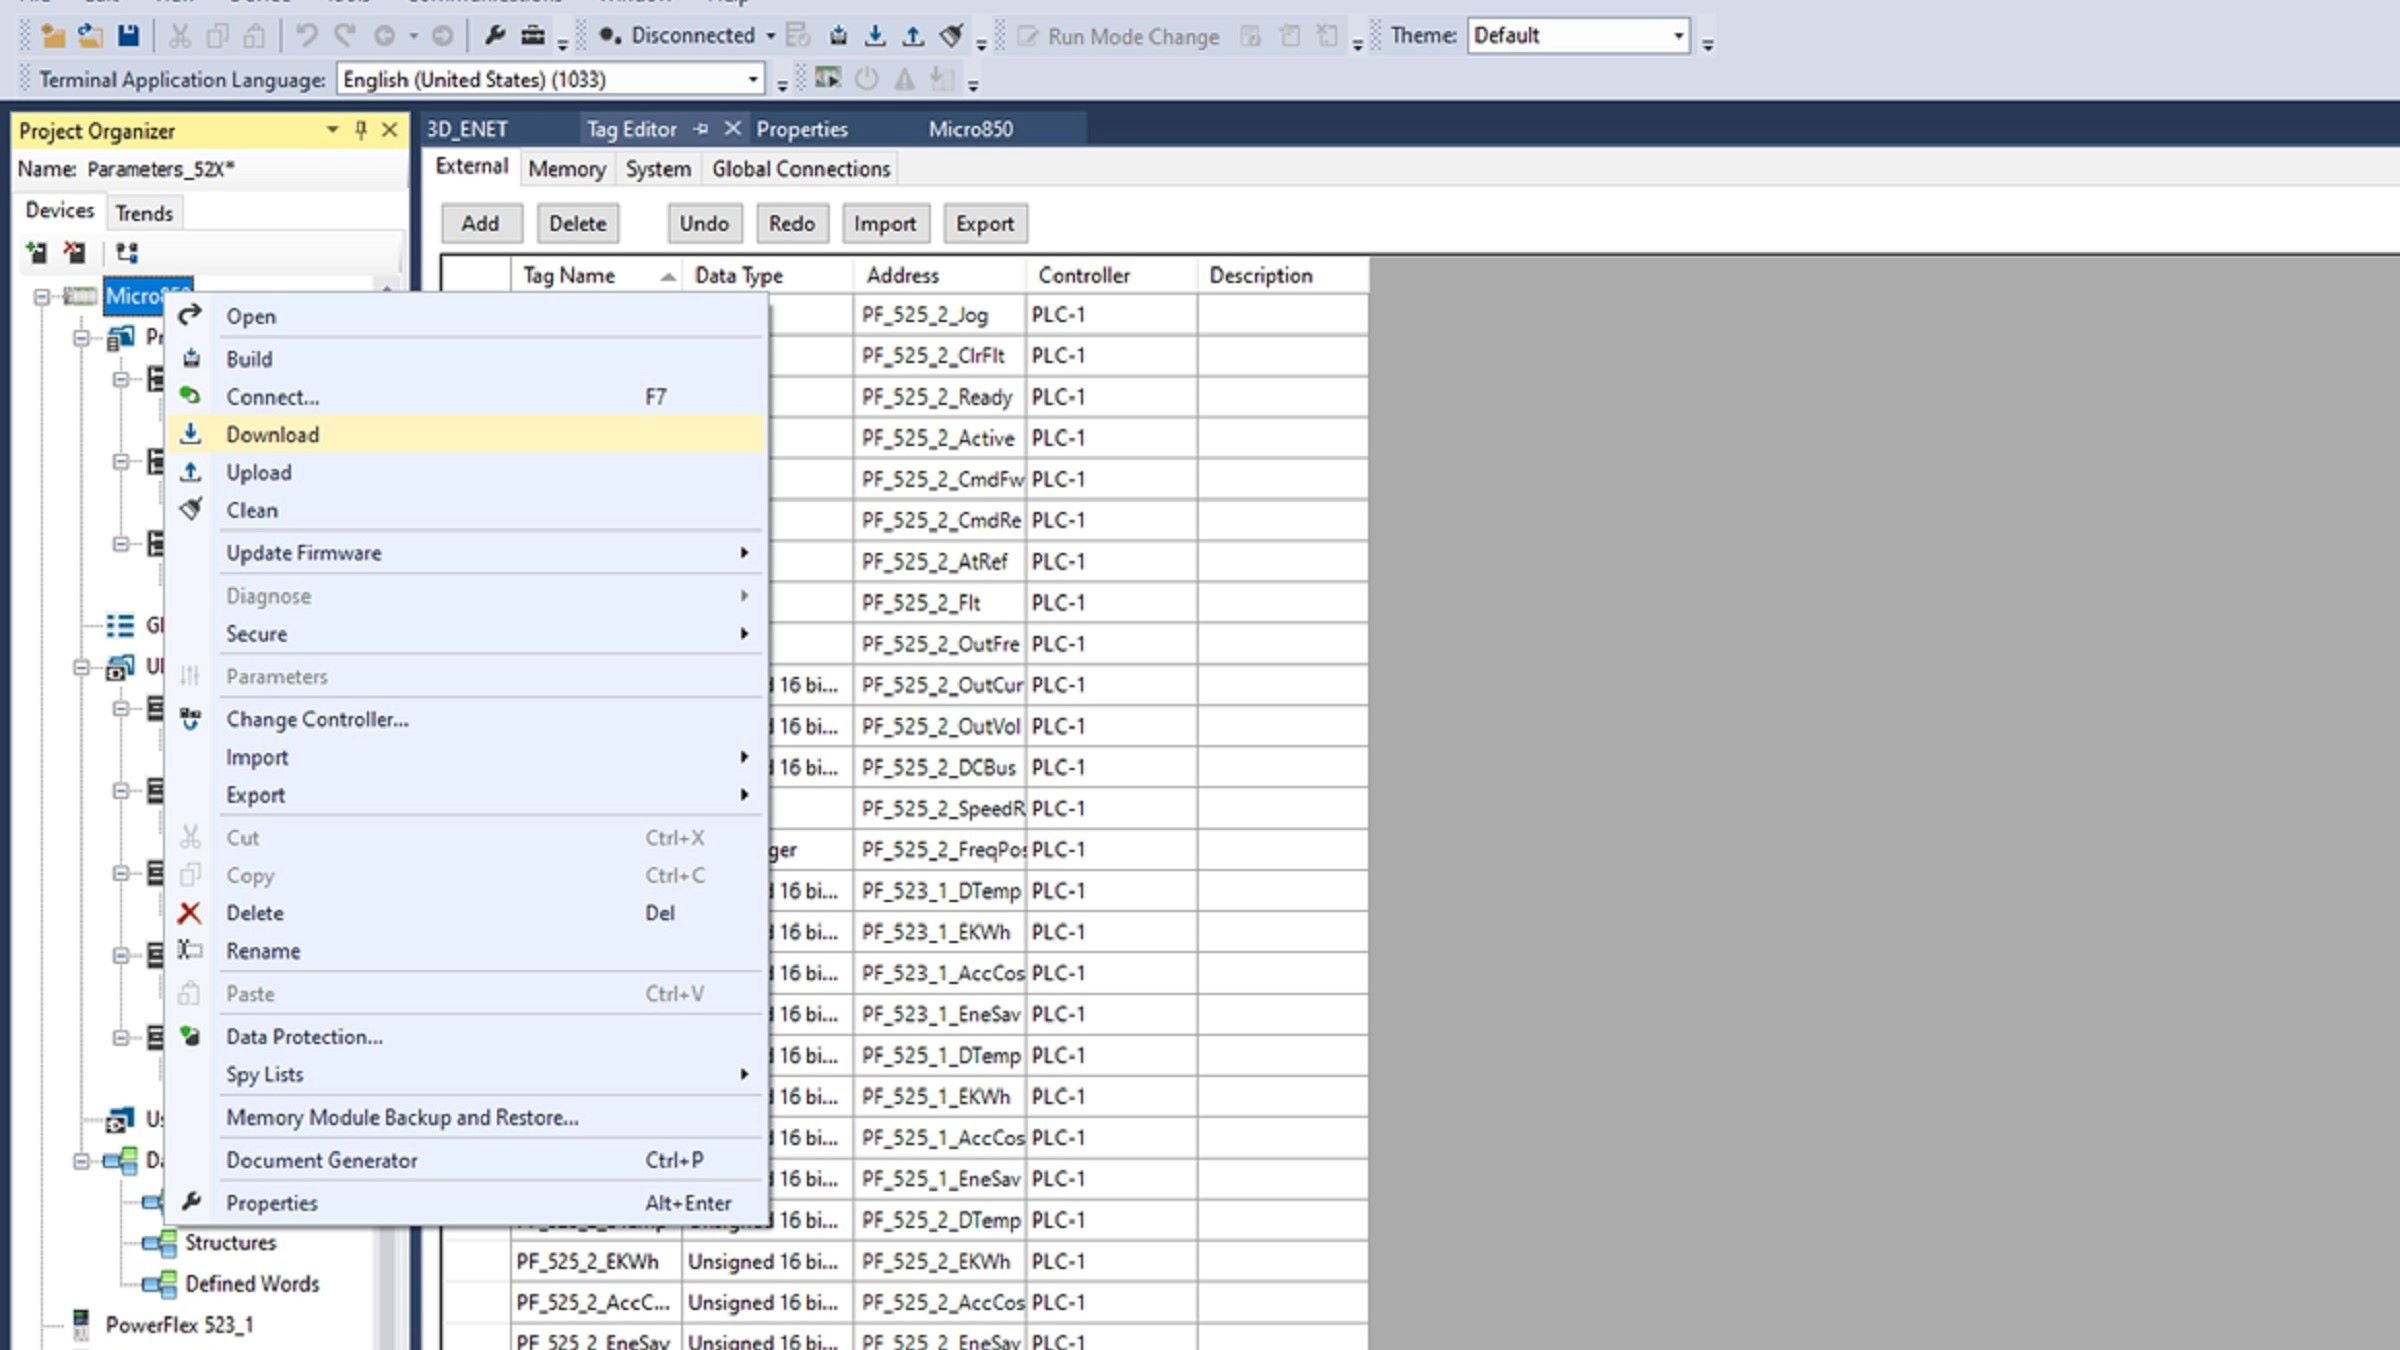
5.4 Download program (without errors) to Micro800 controller and leave in run mode.

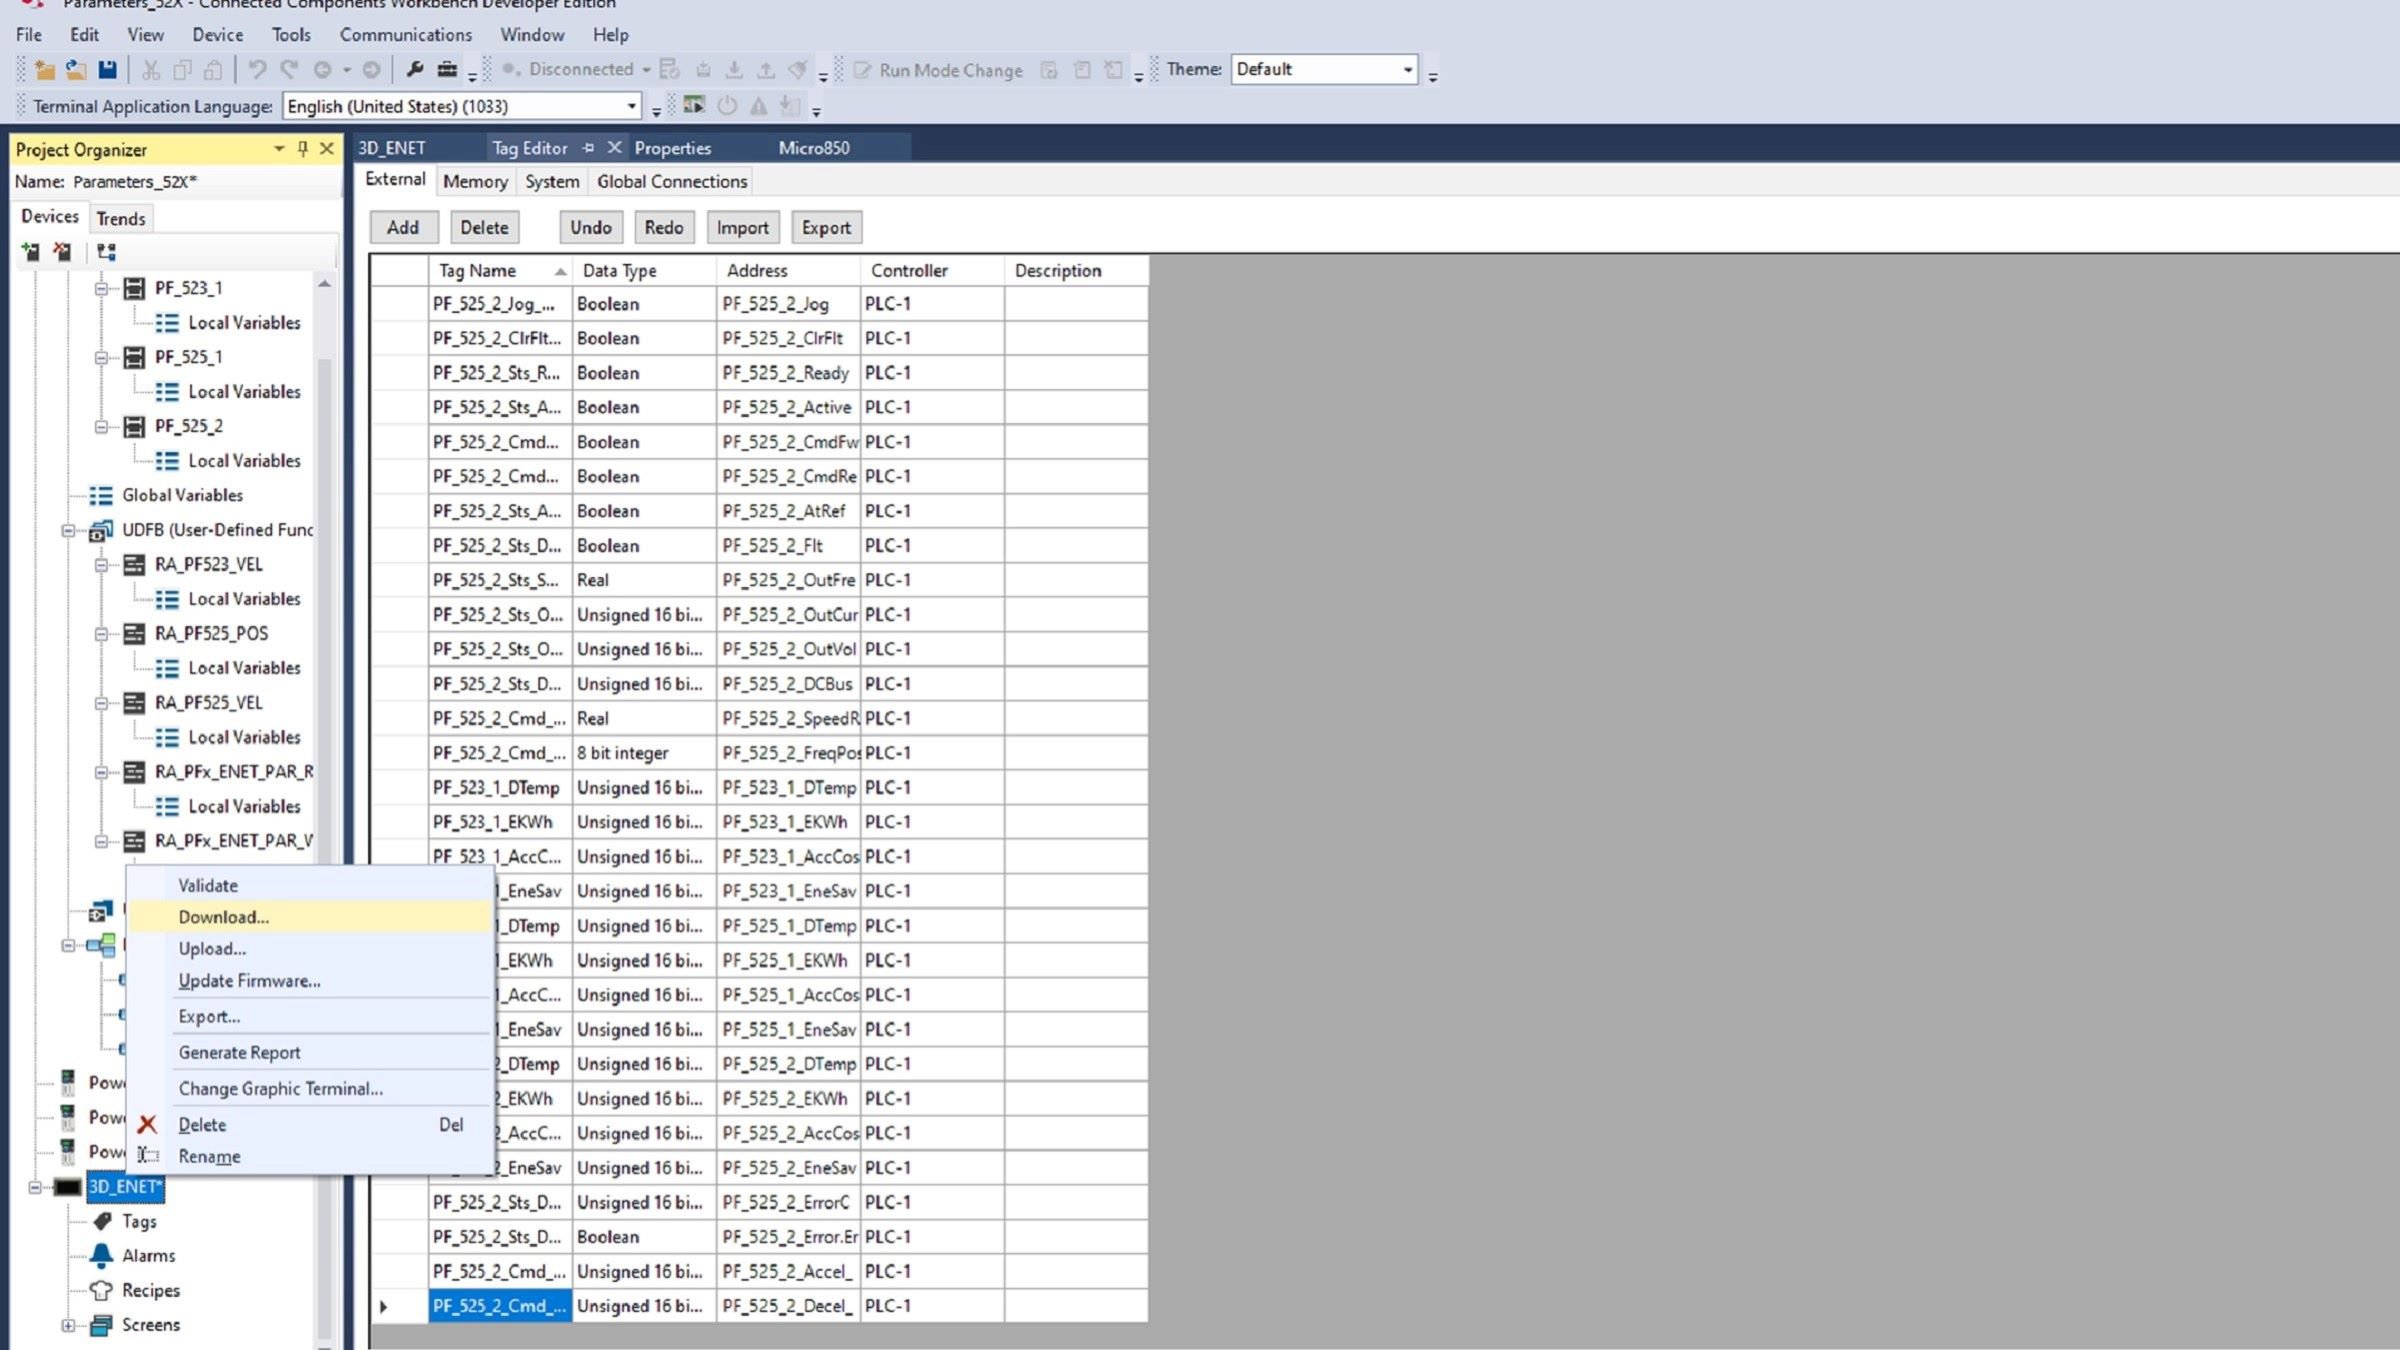
5.5 Download the HMI application to the PV800 and execute it.

  • Step 5 - screenshot

    5.1

  • Step 5 - screenshot

    5.2

  • Step 5 - screenshot

    5.4

  • Step 5 - screenshot

    5.5

  • Step 5 - screenshot

    5.1

  • Step 5 - screenshot

    5.2

  • Step 5 - screenshot

    5.4

  • Step 5 - screenshot

    5.5

  • Step 5 - screenshot

    5.1

  • Step 5 - screenshot

    5.2

  • Step 5 - screenshot

    5.4

  • Step 5 - screenshot

    5.5

Step 5 - screenshot
Step 5 - screenshot
Step 5 - screenshot
Step 5 - screenshot
Have a general inquiry?

Rockwell Automation and our partners offer exceptional industry knowledge to help design, implement, and support your automation investment.

Contact Rockwell Automation
  1. Chevron LeftChevron Left Rockwell Automation Home Chevron RightChevron Right
  2. Chevron LeftChevron Left Sup... Chevron RightChevron Right
  3. Chevron LeftChevron Left Pro... Chevron RightChevron Right
  4. Chevron LeftChevron Left Downloads Chevron RightChevron Right
  5. Chevron LeftChevron Left Innovation Center Chevron RightChevron Right
  6. Chevron LeftChevron Left Easy Dashboards and Control for a Powerflex 520 Chevron RightChevron Right
Please update your cookie preferences to continue.
This feature requires cookies to enhance your experience. Please update your preferences to allow for these cookies:
  • Social Media Cookies
  • Functional Cookies
  • Performance Cookies
  • Marketing Cookies
  • All Cookies
You can update your preferences at any time. For more information please see our Privacy Policy
CloseClose