Add an Advanced SVG image
Add an Advanced SVG image to the canvas to change the properties of individual image parts at design time or runtime. For example, you can signal a hardware part malfunction by highlighting a hardware component representation.
Prerequisites
To control the image properties, obtain an SVG file that conforms with these requirements:
- File format is SVG 1.2 Tiny
- File contains all image elements and properties you want to configure
- Fill and stroke properties exist and have colors defined as XML attributes or inline CSS
- Color values are hexadecimal
TIP:
If the SVG file does not conform with the requirements, the image will display as expected, but you will not be able to change the image properties.
- To add an Advanced SVG image
- InProject view, right-click the object or folder to contain the image and then select .
- Double-click the empty imagethat appears on the canvas.

- InSelect file, select the image to display and then chooseSelect.TIP:To find items, start typing the item name to find inSelect file.If the file does not appear inSelect file, selectand in
 Import file(s)Import file(s), select the file to import and then chooseSelect.
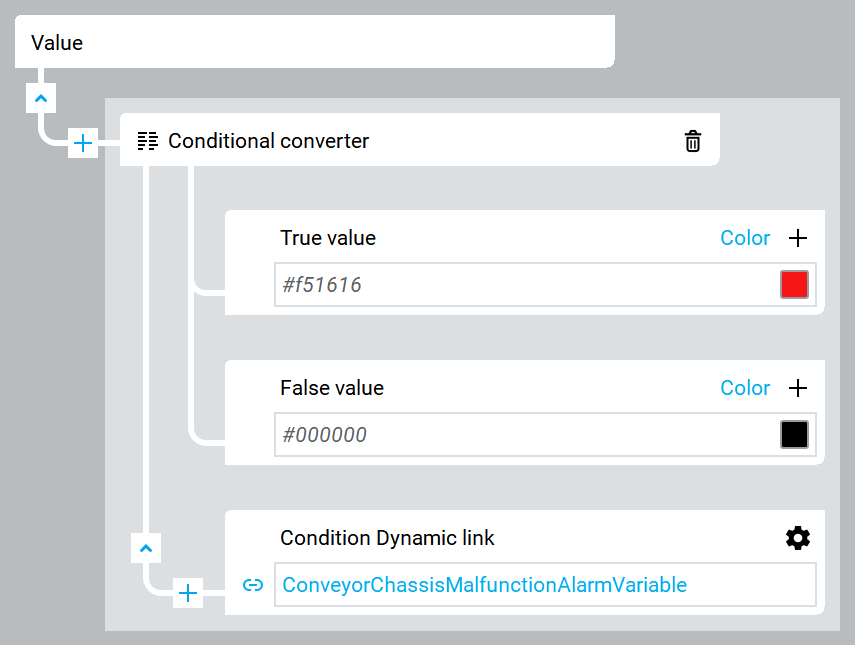
 - (optional) Open the SVG file in a text editor and verify that both the@idattribute of the image element that you want to change and that property that you want to modify exist in the SVG file.For example, to be able to change the polygon style of a chassis:<g id="ConveyorChassis"> <polygon style="fill:#3C4660;" points="8.532,379.733 503.466,379.733 503.466,277.333 8.532,277.333"/> </g>
- InProperties, expandSVG Element Properties, and then inID, select the image element to change.TIP: The drop-down options for SVG file elements correspond with the@idattributes of the SVG file elements. If values do not appear in the drop-down, the SVG image may not conform with the requirements needed to control the image properties.
- InProperty, select the property to change for the selected image element and then inValue, either select
 Add Dynamic Linkto create a complex dynamic link or enter a value for the indicated property:
- Color. Select or enter the Hex value for the color, or create a complex dynamic link with a converter to hexadecimal color values. For example:
- Opacity. Enter a value from 0-100 to make the image element either completely transparent or completely opaque.
- Stroke width. Enter the width of the line in pixels.
- Stroke dasharray. Specify the array of dashes by either:
- Selecting or enteringSolid. This is the default.
- Entering a single number. The number represents both the length of dash and the length of space between the dashes. For example, enter 5 so that both the dash length and the length of space between the dashes is 5 pixels.
- Configuring a series of numbers separated by semi colons in the repeatable format #;#. The first number represents the length of dash and the number after each semi colon represents the length space between dashes. The entered series is repeated. For example, enter 5;2;10;3 to have the first dash be five pixels and the space after that dash to be two pixels, followed by another dash that is 10 pixels and a space that is 3 pixels. The series repeats itself to display the shorter dash followed by a longer dash for the entire line.
TIP:When binding the dasharray property to a string variable or tag in a controller, an invalid string value results in the dasharray property value when that value changes to the value in the SVG file at runtime.For example, if the dash array is defined as a solid line in the advanced SVG but is currently displayed as a dash pattern, if the value of the bound tag in the dasharray property changes to an invalid value such as abc or contains a string format typo such as 1;5:8, the value reverts to the solid line specified in the SVG file.TIP: The property you select for the image element must be in the SVG image file along with the image element or you will not be able to configure the property for the image element. - To add an additional property for the SVG, next toSVG Element Properties, selectand then repeat steps 5 and 6. For example, if you configured
 Colorfor an SVG image element, you could add anOpacityproperty to change the opacity of that same image element or a different image element.
 - To change default properties for the SVG, inProperties, expandAppearanceand change the properties by either creating a complex dynamic link or entering a value.
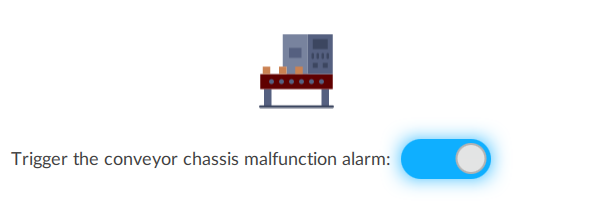
Advanced SVG image example - disabled alarm (gray conveyor chassis)

Advanced SVG image example - enabled alarm (red conveyor chassis)
svg
advanced svg
Provide Feedback