Configuring OPC UA Extractor
Introduction
This topic describes the steps to configure FTDM, CDF and the CDF OPC UA extractor in order for OPC UA data to egress to CDF. It is assumed that a CDF Project has been created using FTDM. It is also assumed, for this example, that an OPC UA Server is running and accessible. Before you begin, ensure the CDF project already exists.
Create a Dataset in the CDF project
- Navigate to your project in CDF.
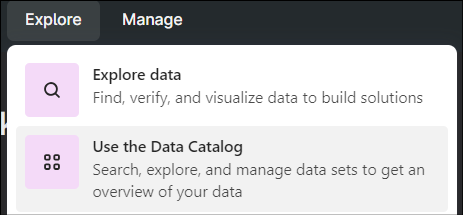
- Navigate toExplore > Use the Data Catalogand click [Create a Data Set].
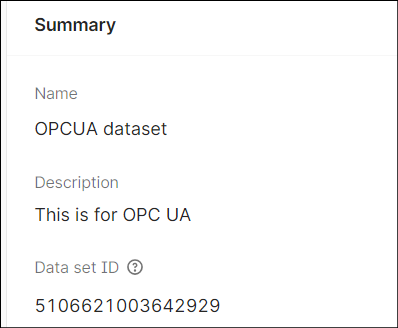
- Provide the basic information for the data set and click [Create].
- Open the data set and note down theData set IDfor later use.
Create a Pipeline in the CDF project
- Navigate to your project in CDF and selectIntegrate > Monitor Extractors.
- On the Extraction pipelines screen, click [Create extraction pipeline].
- Select theData setcreated earlier.
- Provide the basic information for the extraction pipeline and click [Create].
Register an OPC UA Extractor
- On the FactoryTalk DataMosaix Management Console, select theExtractor Infotab.
- Click the [Add] icon.
- On the Extractor Info Detail screen, provide a unique and meaningful name for the extractor.
- In the Pipeline field, provide the extraction pipeline name created earlier.
- Select the Source Type as OPC UA.
- Click Save and Create Credentials to register the extractor.
- Copy and save the client secret information.
Download the OPC UA Extractor
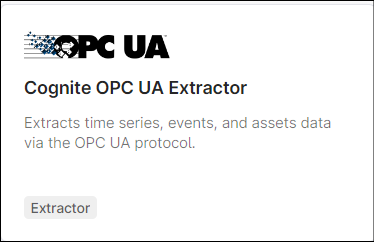
- Navigate to your project in CDF and selectIntegrate > Connect to source systems.

- On the Extract data screen, locate theCognite OPC UA Extractorand select it.
- Select the download option that suits the on-prem environment on which the extractor is to be installed.NOTE:If you choose the windows installer, you will need to run this installer as a local admin on the on-prem machine.
After this you can configure the extractor on-prem or with minimal configuration on the CDF portal application.
Configure the OPC UA Extractor on-prem
This section provides information about on-prem configuration file to allow the OPC UA extractor to connect to and push data to the CDF project.
Extract or install the extractor attributes depending on the download option you chose.
The following snapshot shows the configuration file for the setup described in the referenced steps above. Note that, in this example, the secret field in idp-authentication is an environment variable on the machine running the extractor. It is suggested that you set all “sensitive” information as environment variables and reference them in the same way the client secret is referenced in the example below
version: 1
source:
    endpoint-url: opc.tcp://10.86.208.238:4843
    auto-accept: false
    queue-length: 10
    username:
    password:
    browse-chunk: 100
    attributes-chunk: 1000
    x509-certificate:
        file-name: C:\ProgramData\Integration Objects\CertificateStores\UA Client\TrustedCertificates\certs\QApplication@MSoftEng [217138286D2707CD88DB07986A32D85B39367D68].der
    browse-throttling:
        max-node-parallelism: 10
cognite:
    data-set-id: 4424354087714408
    project: apdtest1-37
    host: https://westeurope-1.cognitedata.com
    extraction-pipeline:
        pipeline-id: pipeline External Id
        frequency: 3000
    idp-authentication:
        # URL to fetch tokens from. Either this or tenant must be present.
        token-url: "https://datamosaix-prod.us.auth0.com/oauth/token"
        # Application Id
        audience: "https://cognitedata.com"
        client-id: client Id of FTDM Extractor
        # Client secret
        secret: ${COGNITE_CLIENT_SECRET}
        # List of resource scopes, ex:
        scopes:
extraction:
    id-prefix: ''
    data-types:
        auto-identify-types: true
events:
    enabled: true
history:
    throttling:
        max-node-parallelism: 100
state-storage:
    interval: 10
logger:
    file:
        level: "information"
        path: "logs/log.txt"
Navigate to the “config” sub-folder of the installed/extracted folders and create or edit a config.yml file
The following fields in the config file mentioned above are likely to be specific to your environment
- endpoint-url: the url of your OPC UA Server
- username and password may be required for your OPC UA Server
- x509-certificate: the path to the x509 certificate used by your OPC UA Server
- data-set-id: this is the value noted in the step described earlier on this page
- project: this will be the name of your CDF project
- pipeline-id: the “External id” of the pipeline created in the step described earlier on this page
- token-url: this is the OAuth Token URL endpoint on the FTDM Auth0 Idp.https://datamosaix-prod.us.auth0.com/oauth/token
- client-id: this is the Client ID noted when you registered the extractor on FTDM
- secret: this is the Client Secret noted when you registered the extractor on FTDM. You will need to edit or create a system environment variable called “COGNITE_CLIENT_SECRET“ to hold this value.
Configuration through Pipeline in CDF
This section describes how to configure the OPC UA Extractor using a configuration that is stored on the CDF web site. A very minimal configuration file is also required on-prem. This minimal on-prem configuration file is required in order for the extractor to establish an authorized connection to the CDF host site.
Minimal on-prem Configuration file for the OPC UA Extractor
The following example shows the very minimal configuration file that is required on-prem. This file contains only the information required to establish an authorized connection to the Cognite API, to connect to the selected CDF project and to identify the pipeline to be used on that project.
Note that the “type” field here is “remote”
# Whether to read configuration from CDF or just use this file.
      # If this is set to "remote", you must only specify "version", "cognite" with
      # "project", "host", and "api-key" or "idp-authentication", and "extraction-pipeline"
      type: remote
      cognite:
      project: apdtest1-37
      host: https://westeurope-1.cognitedata.com
      extraction-pipeline:
      pipeline-id: GUID value
        frequency: 3000
    idp-authentication:
        # URL to fetch tokens from. Either this or tenant must be present.
        token-url: "https://datamosaix-prod.us.auth0.com/oauth/token"
        # Application Id
        audience: "https://cognitedata.com"
        client-id: ClientId
        # Client secret
      secret: ${COGNITE_CLOUDOPCUA_CLIENT_SECRET}
The file includes token URL. Use the following URL:
https://datamosaix-prod.us.auth0.com/oauth/token
Pipeline Configuration for the OPC UA Extractor
With the above on-prem configuration in place, the following steps will place the remainder of the extractor’s configuration into the pipeline of the CDF project named in the section above.
Navigate to your pipeline by selecting
Integrate > Monitor Extractors
. Browse to the “Configuration file for extractor” section and paste the configuration there. This completes the pipeline configuration.
The snippet below shows an example of the configuration that will be appropriate in this field of the pipeline.
Note: it does not contain any of the information supplied in the on-prem configuration file described in the previous section
version: 1
source:
    endpoint-url: opc.tcp://10.86.208.238:4843
    auto-accept: false
    queue-length: 10
    username:
    password:
    browse-chunk: 100
    attributes-chunk: 1000
    x509-certificate:
        file-name: C:\ProgramData\Integration Objects\CertificateStores\UA Client\TrustedCertificates\certs\QApplication@MSoftEng [217138286D2707CD88DB07986A32D85B39367D68].der
    browse-throttling:
        max-node-parallelism: 10
cognite:
    data-set-id: 5890192849294043
extraction:
    id-prefix: 'opcuacloud_'
    data-types:
        auto-identify-types: true
events:
    enabled: true
history:
    throttling:
        max-node-parallelism: 100
state-storage:
    interval: 10
logger:
    file:
        level: "information"
        path: "logs/log.txt"
Running the Extractor
Navigate to the installed location of the extractor on-prem and run OpcuaExtractor.exe
Validate Extractor
- Once the extractor has been configured and executed successfully, navigate to your project in CDF and open the pipeline by selectingIntegrate > Monitor Extractors.
- Click the pipeline link.You should see the information mentioning that the extractor has run successfully.
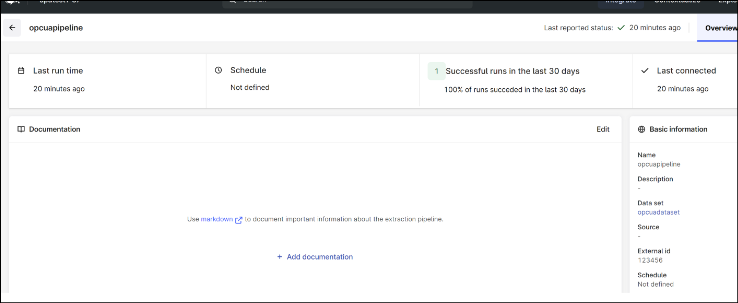
- Click on the Data set link under basic information section to open the Data set details.
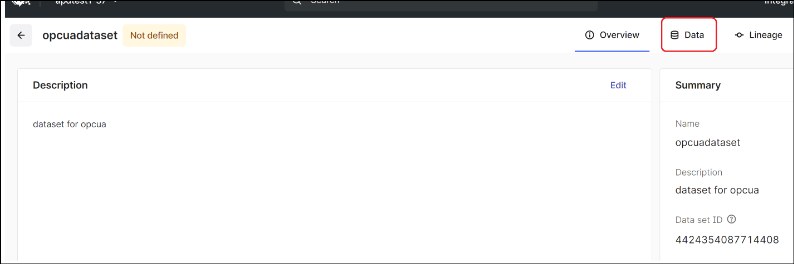
- Click on the Data tab.You should see the asset and time series data.
Troubleshooting the OPC UA Extractor
- Use a Yaml Lint site to validate your yaml file
- Look at the log file in the logging folder (as configured in the configuration file) for any error messages.
- Double-check your OPC UA endpoint-url is correct and, if required, the username, password. You may need quotes around username, password, servername.
- Double-check that all references to dataset and pipeline ids are correct.
- Double-check that the client Id and secret in the on-prem configuration file is correct.
- If you start the extractor but the dataset remains empty (no linked timeseries), this may be because the timeseries already existed before the extractor ran successfully and those timeseries are not linked to the datset. Try one of the following:
- Change the value of theid-prefixfield in the extraction section of the config yaml file and restart the extractor.
- Using postman or your favorite API client, delete all timeseries and restart the extractor.
Provide Feedback