Configuring DB (SQL) Extractor
Introduction
This page describes the steps to configure FTDM, CDF and the CDF DB extractor in order for SQL table data pushed to CDF.
It is assumed that a CDF Project has been created using FTDM and SQL server is ready with data.
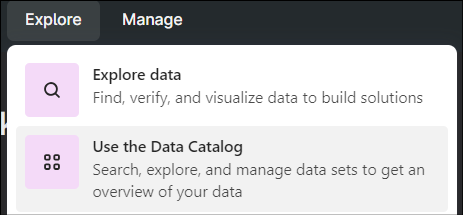
Create a Dataset in the CDF project
- Navigate to your project in CDF.
- Navigate toExplore > Use the Data Catalogand click [Create a Data Set]
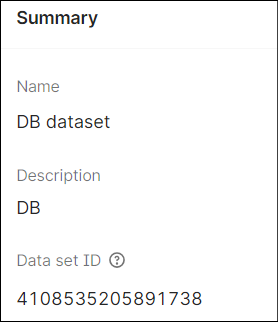
- Provide the basic information for the data set and click [Create].
- Open the data set and note down theData set IDfor later use.
Create a Pipeline in the CDF project
- Navigate to your project in CDF and selectIntegrate > Monitor Extractors.
- On the Extraction pipelines screen, click [Create extraction pipeline].
- Select theData setcreated earlier.
- Provide the basic information for the extraction pipeline and click [Create].
Register a DB (SQL) Extractor
- On the FactoryTalk DataMosaix Management Console, select theExtractor Infotab.
- Click the [Add] icon.
- On the Extractor Info Detail screen, provide a unique and meaningful name for the extractor.
- In the Pipeline field, provide the extraction pipeline name created earlier.
- Select the Source Type as OPC UA.
- Click [Save and Create Credentials] to register the extractor.
- Copy and save the client secret information.
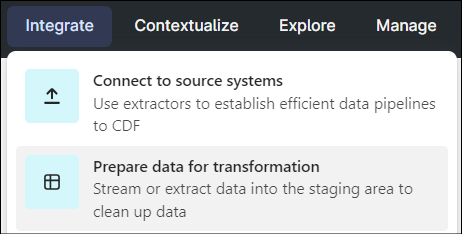
Create RAW Database and Table where extractor will push the data
- Navigate to your project in CDF and selectIntegrate > Prepare data for transformation.
- Click [Create Database].
- Click [Create table]. Provide a unique name for the table. The table name cannot be changed later.
- Select [Create empty table] and click [Create].
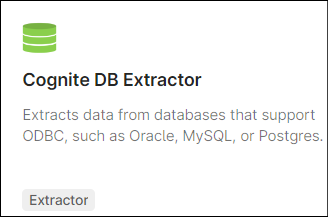
Download the DB (SQL) Extractor
- Navigate to your project in CDF and selectIntegrate > Connect to source systems.

- On the Extract data screen, locate theCognite DB Extractorand select it.
- Select the download option that suits the on-prem environment on which the extractor is to be installed.NOTE:Make sure you have ODBC drivers for the databases you are connecting to. This extractor is available as both a Windows service and a standalone executable. Click here to check how to run using both.
After this you can configure the extractor on-prem.
Configure the DB (SQL) Extractor on-prem
This section provides information of the on-prem configuration file to allow the DB(SQL) extractor to connect to and push data to the CDF project.
Extract or install the extractor attributes depending on the download option you chose.
Navigate to the folder of the installed/extracted folder and create a config.yml file. You can take reference of example-config.yaml file.
Use Environment Variables in config.yml file
- The config schema supports general interpolation with environment variables. To set a config parameter to an environment variable, use ${ENV_VAR} syntax.
- Example: To set the ‘secret’ field to the content of the ‘SECRET_KEY’ environment variable, use
The following snapshot shows the configuration file for the setup described in the steps above.
# Configuration template for the Cognite DB Extractor version 2.x
#
# The config schema supports general interpolation with environment variables.
# To set a config parameter to an environment variable, use the ${ENV_VAR}
# syntax.
#
# Example: to set the api-key field to the content of the MY_API_KEY environment
# variable, use
#   api-key: ${MY_API_KEY}
#
# For optional parameters, the default values are provided as comments.
# Uncomment them to change their values. For most scenarios the default values
# should not be changed.


# Config schema version (this template is for v2)
version: 2


# (Optional) Configure logging to standard out (console) and/or file. Level can
# be DEBUG, INFO, WARNING or CRITICAL
logger:
  # Logging to console/terminal. Remove or comment out to disable terminal
  # logging
  console:
    level: INFO

  # Logging to file. Remove or comment out to disable file logging
  file:
    level: INFO
    path: log.txt

    # (Optional) Log retention (in days).
    #retention: 7


# Information about CDF project
cognite:
  # (Optional) CDF deployment to target
  host: https://westeurope-1.cognitedata.com
  extraction-pipeline:
     external-id: "1234567"
  # CDF project
  project: createproject-v7-35

  idp-authentication:
    # OIDC client ID
    client-id: yourclientidfvJY7OXFNer8Dy8vRgABt

    # URL to fetch OIDC tokens from
    token-url: https://datamosaix-prod.us.auth0.com/oauth/token

    # Alternatively, you can specify an Azure tenant to generate token-url automatically
    #tenant: azure-tenant-uuid

    # OIDC client secret - either this or certificate is required
    secret: replacewithyoursecretS8UDidozbiC_wrReEO__PKU17ER7PAwRKBe9DVFuzqCJUb

    # Uncomment to use a key/certificate pair instead of client secret to authenticate
    #certificate:
      # Path to key and certificate
      #path: /path/to/key_and_cert.pem

      # Authority URL (Either this or tenant is required
      #authority-url: https://url.com/

    # List of OIDC scopes to request
    scopes:
      - IDENTITY
      - user_impersonation
    audience: https://cognitedata.com

  # Data set used if extractor is creating time series
  data-set:
     id: 7710072790989207


# (Optional) Extractor performance tuning.
#extractor:
  # (Optional) Number of rows to fetch from sources before uploading
  #upload-queue-size: 50000

  # (Optional) Where to store extraction states (progress) between runs.
  # Required for incremental load to work.
  #state-store:
    # Uncomment to use a local json file for state storage
    #local:
      #path:

      # (Optional) Save interval (in seconds) for intermediate file saves. A
      # final save will also be made on extractor shutdown.
      #save-interval: 30

    # Uncomment to use a RAW table for state storage
    #raw:
      # RAW database and table to use
       #database: db_extractor
       #table: sql

      # (Optional) Upload interval (in seconds) for intermediate uploads. A
      # final upload will also be made on extractor shutdown.
      #upload-interval: 30

  # (Optional) Number of queries to execute in parallel
  #parallelism: 4


# List of databases
databases:
  -
    # User-given name for DB
    name: TestDB
    # Connection string
    connection-string: Driver={ODBC Driver 17 for SQL Server};Server=IDPWVDDEV061\SQLEXPRESS;Database=TestDB;Trusted_Connection=yes;

    # (Optional) Timeout for connections/queries. Be aware that not all ODBC
    # drivers fully supports timeouts, the extractor will log warnings if the
    # timeout could not be set properly. Set to 0 to disable timeouts.
    #timeout: 60

# List of queries
queries:
  -
    # RAW example

    # User-given name for query
    name: test-my-sql
    # Name of database to use (as specified in the databases section)
    database: TestDB

    # Query to execute. Supports interpolation with {incremental_field} and
    # {start_at} to facilitate incremental load between runs
    query: >
      SELECT
        *
      FROM
        AssembalyLine

    # (Optional) Which column to use for incremental loading. Include to enable
    # incremental loading, otherwise the extractor will to a full run every
    # time. To use incremental load, a state store is required.
    #incremental-field: ID

    # (Optional / Required when incremental-field is set). Initial value of
    # {start_at}. Will only be used on the initial run. Subsequent runs will use
    # the stored state.
    #initial-start: 0

    # (Required when running as windows service / ignored otherwise) CRON
    # expression for when to execute query. Make sure to not schedule runs too
    # often, but leave some room for the previous execution to be done.
    #schedule:
    destination-type: RAW

    # Where to upload data in RAW
    destination:
      database: db_extractor_test
      table: sql_table

    # How to construct a key in RAW for a DB row. Supports interpolation with
    # columns.
    primary-key: "{ID}"
The following fields in the config file shown above are likely to be specific to your environment
- project: This will be the name of your CDF project
- client-id: This is the Client ID noted when you registered the extractor on FTDM
- secret: This is the Client Secret noted when you registered the extractor on FTDM. You will need to edit or create a system environment variable to hold this value.
- extraction-pipeline: external-id: The “External id” of the pipeline created in the step described earlier on this page
- scopes: Scopes defined in auth0 for the extractor application.
- audience: Defined in auth0 application.
- data-set-id: This is the value noted in the step described earlier on this page
- host:CDF deployment to target
- token-url: This is the OAuth Token URL endpoint on the FTDM Auth0 Idp.https://datamosaix-prod.us.auth0.com/oauth/token
- databases:name: Name of sql server database ,connection-string: required to connect to sql server.
- queries: name: user given name of query,database:name of database to use,query:Query to execute.
- destination: Where to upload data in RAWdatabase: cdf destination database name,table:cdf destination table
- primary-key: How to construct a key in RAW for a DB row
Running the Extractor
Click here to check how to run using both (Windows standalone and windows services).
Validate Extractor
- Once the extractor has been configured and executed successfully, navigate to your project in CDF and open the pipeline you created earlier.
- Click the pipeline link to verify the pipeline run details.
- SelectIntegrate > Prepare data for transformationto verify if the data is inserted into the table.
Troubleshooting DB (SQL) Extractor
- Use a Yaml Lint site to validate your yaml file.
- View the log file in the logging folder (as configured in the configuration file) for any error messages.
- Double-check your connection string.
- Double-check that all references to dataset and pipeline ids are correct.
- Double-check that the clientId and secret in the on-prem configuration file is correct.
- If you start the extractor but data fetched successfully but error while pushing data into CDF check once the scopes are properly assigned in auth0.
- If extractor ran successfully and extraction is successful but no data pushing into cdf or only few rows are getting pushed (not whole data), then check primary key which you are defining in config.yml file is present in source table or not.
- If extractor ran successfully but no data extracted then try to run the query defined in queries section of config.yml file into the sql server.
Provide Feedback