Enable Logic Limit Switch Operation - 1756-PLS
Limit switches can be combined with Enable Logic to govern limit switch operation based on the occurrence of specific conditions. For example, the And Enable feature can be used to prevent a limit switch output from turning ON unless the AndEnableInput member is ON.
The Enable Logic features can be combined with limit switches:
- And Enable
- Pulse Enable
- Windowed Enable
- Timer Enable
- RPM Enable
These features can be disabled so as not to affect limit switch operation.
And Enable
This feature enables an output to turn ON and OFF if the resolver is within the Low Limit-High Limit Setpoints and an input point is ON.
The graphic shows an output, with configured Limit Setpoints, turn ON and OFF based on the operation of an input.
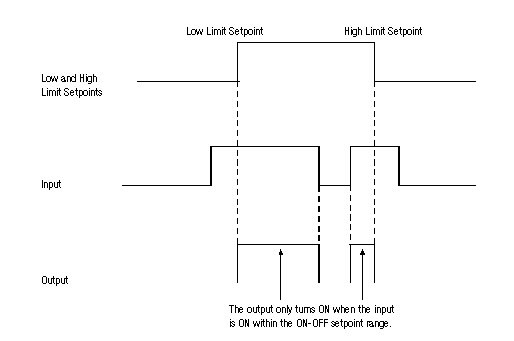
When using the And Enable, remember that the output only remains ON within the setpoints if the input is ON. If the input turns OFF, the output also turns OFF.
Pulse Enable
The Pulse Enable turns an output ON if an input is already ON when the resolver enters the setpoint. The graphic shows an output, with configured Low and High Limit setpoints, turn ON because an input is already ON when the resolver rotation reaches the ON setpoint.
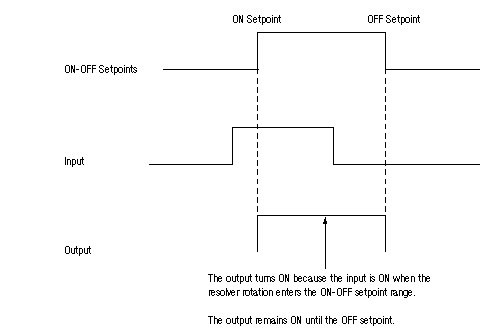
When using the Pulse Enable, remember that the output remains ON within the setpoints even if the input turns OFF after the output has been energized.
Windowed Enable
Windowed Enable allows you to turn an output ON within its Setpoints if an input turns on within a separately configured window. Typically, the output Setpoints follow the input window in the resolver’s rotation.
For example, an input may turn ON when a part reaches a specific point in an assembly line and, because the application is using the windowed enable feature, an output will turn ON at a later point in the same line causing rivets to be drilled into the part.
The graphic shows a resolver rotation with an enable window and ON-OFF Setpoints.
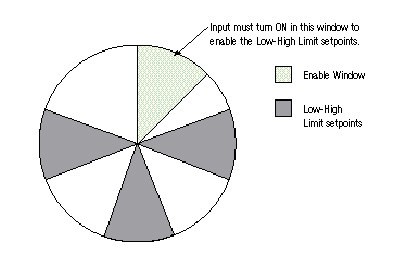
The input point designated in WindowedEnableInput must turn on between the WindowedEnableLowLimit and WindowedEnableHighLimit to enable the LimitSwitchOutput for the next resolver rotation. The ArmWindowedEnable member must be set to 1 for the 1756-PLS module to use Windowed Enable.
Timer Enable
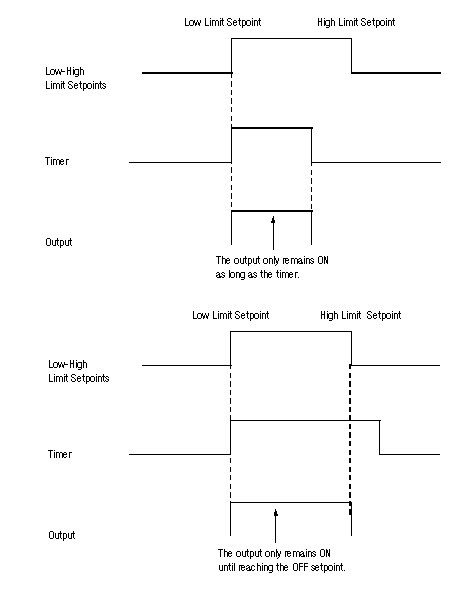
The Timer Enable limits the time an output can be ON. You set the OnTimeMaxMs member to set how long the output can be ON. If you set the On Time Maximum to 0, the output will not be limited by the timer. After the time has expired, the output turns OFF even if the resolver position is still within the Setpoints. Also, the output turns OFF at the high limit setpoint, regardless of whether the timer has expired, as shown in the second graphic.
RPM Enable
RPM Enable causes the 1756-PLS module to turn outputs OFF at speeds below the RPMEnableLowLimit and above the RPMEnableHighLimit values.
Typically, you configure the RPM low-high limits to prevent the outputs from turning ON during start-up. The table lists common RPM Low Limit and High Limit values used in 1756-PLS module applications.
RPM Enable Low Limit | RPM Enable High Limit | Resulting Operation |
0 | 1,000 | Output enabled from 0 to 1,000 RPM |
-1,000 | 1,000 | Output enabled from -1,000 to 1,000 RPM |
-32,768 | 32,767 | Output is enabled at any RPM |
1,000 | 0 | Output is disabled from 0 to 1,000 RPM |
Use negative values for the RPM Enable Low Limit and High Limit specify backward resolver rotation.
RPM Low Limit
RPM Low Limit determines the minimum resolver RPM needed to enable an output. For example, if you set the RPM minimum to 10, any resolver speed under 10 RPM will disable the output.
RPM High Limit
RPM Maximum determines the maximum resolver RPM which enables an output. For example, if you set the RPM maximum to 1000, any resolver speed above 1,000 RPM will disable the output.
Provide Feedback