- Studio 5000 Logix Designer
- Tasks, programs, and routines
- Add-On Instructions
- Controller Organizer
- Logical Organizer
- Alarms
- Tag-based alarms
- Tag Editor and Data Monitor
- Configure settings for Tag Editor and Data Monitor
- Equipment phases
- Equipment Sequences
- Equipment Sequence Diagrams
- Ladder Editor
- Structured Text Editor
- Sequential Function Chart Editor
- Define the steps of an SFC process
- PlantPAx instruction properties
- Controller Properties
- Editing Controller Properties
- Controller Security
- Source Protection
- License Source Protection for Routines and Add-On Instructions
- Module Information
- 1756 ControlLogix I/O Modules
- Instruction Set
Enter Ladder Logic
After creating a project, configuring the controller, the input and outputs, and defining tags and aliases, start creating the programming for the control system. Ladder Logic is one of the languages used to define operation based on the inputs and outputs from the controllers.
Entering Ladder Logic uses these items:
Item | Description |
|---|---|
Routine | A routine is a sequence of logic that is executed as a block. The main routine is the routine that executes first when the program runs. Subroutines are blocks of logic that are execute in response to another routine and are contained within the main routine. Fault routines are routines that execute when a program fault occurs |
Instructions | Composed of a mnemonic abbreviation and a data address that define the operation to be performed by the controller. Example: CMP is the mnemonic for performing a comparison between two values. A program consists of a set of input and output instructions. Input instructions are evaluated by the controller as being True or False. The controller sets the output instructions to True or False in response. |
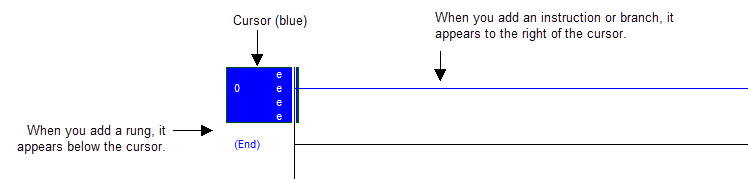
Rungs | The composition elements of ladder logic. Ladder logic is comprised of a set of rungs. A rung is made up of several components, which are:
The area to the left of the power rail is called the rung selection region. The last rung in a routine is called the End rung and is not editable. |
Branches | A parallel logic path within a rung of a ladder program. |
To enter Ladder Logic
- Right-click the Main Routine icon in theController Organizer, and selectOpen.TheLogix Designerapplication opens the Ladder Editor Routine window. If the ladder routine is empty, the application automatically adds the first rung that is ready for instructions.
- Use theInstruction Toolboxto add a ladder diagram element.TIP: TheLanguage Elementtoolbar is hidden by default. To display it, selectView > Toolbars > Language element.
- To add an instruction from the Instruction Toolbox, search for an instruction or expand an instruction category, and select the instruction to add. You can also drag instructions, except Sequence instructions, and drop them into the routine. Green dots indicate valid placement locations, or drop points.

- Modify the instruction as necessary.Use the Tag Browser to define the corresponding tag.
- Add additional rungs, branches, branch levels, or instructions as required by your routine.
- In theStandardtoolbar select the
 Verifyicon.
 - Errors are listed in theOutputwindow on theErrorstab at the bottom of the application.
- To go to the first error or warning, press theF4key.
- Correct the error according to the description in theErrorstab.
- Repeat until you have corrected all errors.
- Right-click and chooseAccept Pending Rung Edit.TIP:This is only required if you are online with the controller. You do not need to do this when you are offline unless you have a pending rung edit you created while online.If you are online, theAccept Pending Rung Editcommand transfers the rung to the controller, but does not execute it if in Run mode. Any errors in your rung are sent to theOutputwindow.
Provide Feedback