DataView
Pre-requisites: PostgreSQL, FT Activation Service, FT Activation Manager, FTA Security, and Elasticsearch.
If the user is upgrading DataView, they can refer the
application.properties
and dataimporter.properties
files for the configuration details of the Third-Party components. In case of fresh installation, user can skip this statement.
NOTE:
If FTA Security and DataView are installed on different machines, update the URLs with DataView hostname (FQDN), refer to “Distributed Mode Configuration: Configure DV Client”.
IMPORTANT:
In distributed mode, ensure that all services are up and running in their respective machines before installing DataView.
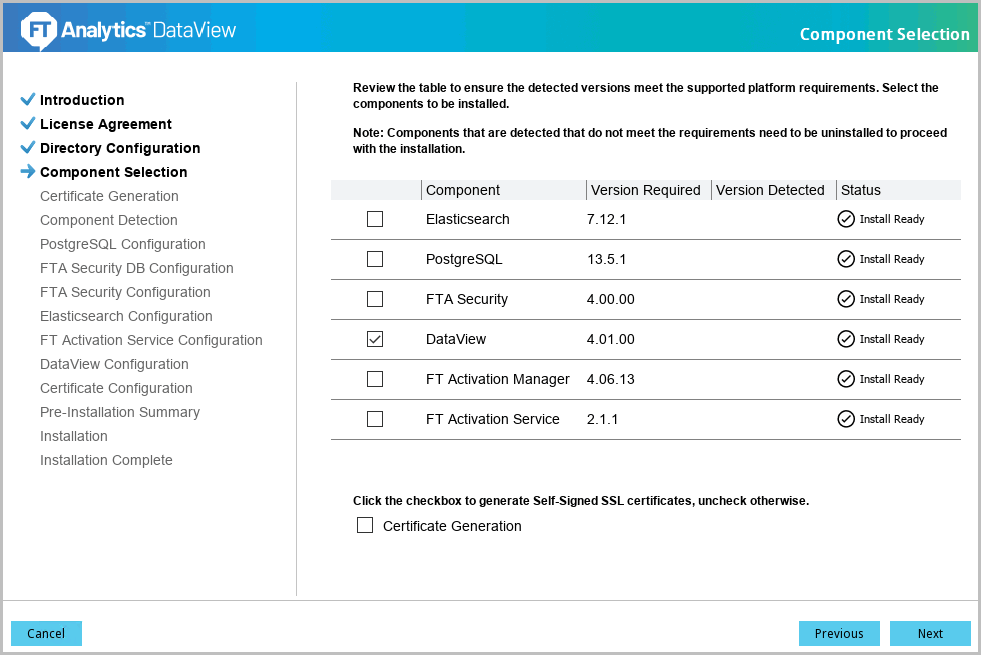
- On the Component Selection screen, select DataView, and then click [Next].Component Selection
- The 'PostgreSQL Configuration' screen displays. Define the following fields:
- Database Hostname: Provide the hostname (FQDN) of the machine where the PostgreSQL database is installed.
- DataView Database Name: The database name for DataView.NOTE:Manually create a clean database where the PostgreSQL database is installed.
- Database Username: Provide the username to access PostgreSQL database.
- Database Password: Provide the password to access PostgreSQL database.
- Database Port: Default port number is 5432. It is recommended to use the default port number.
PostgreSQL Configuration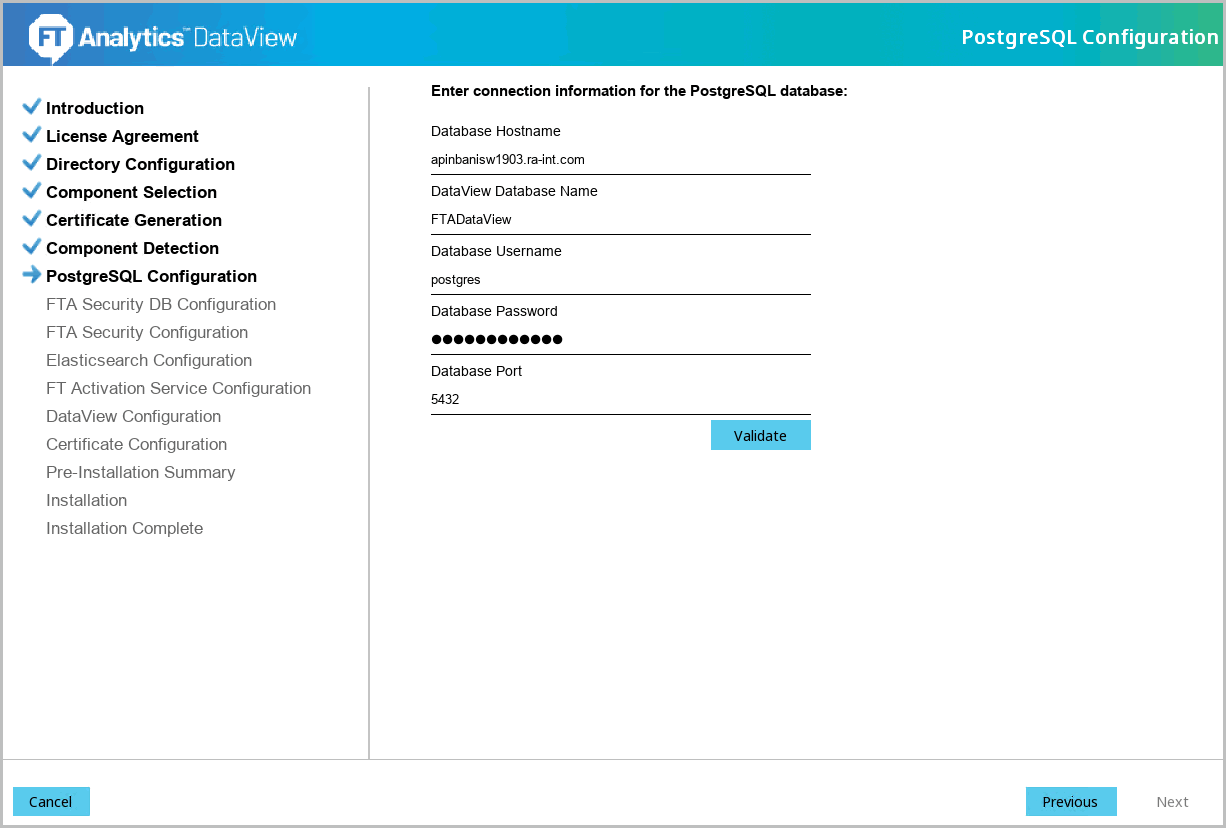
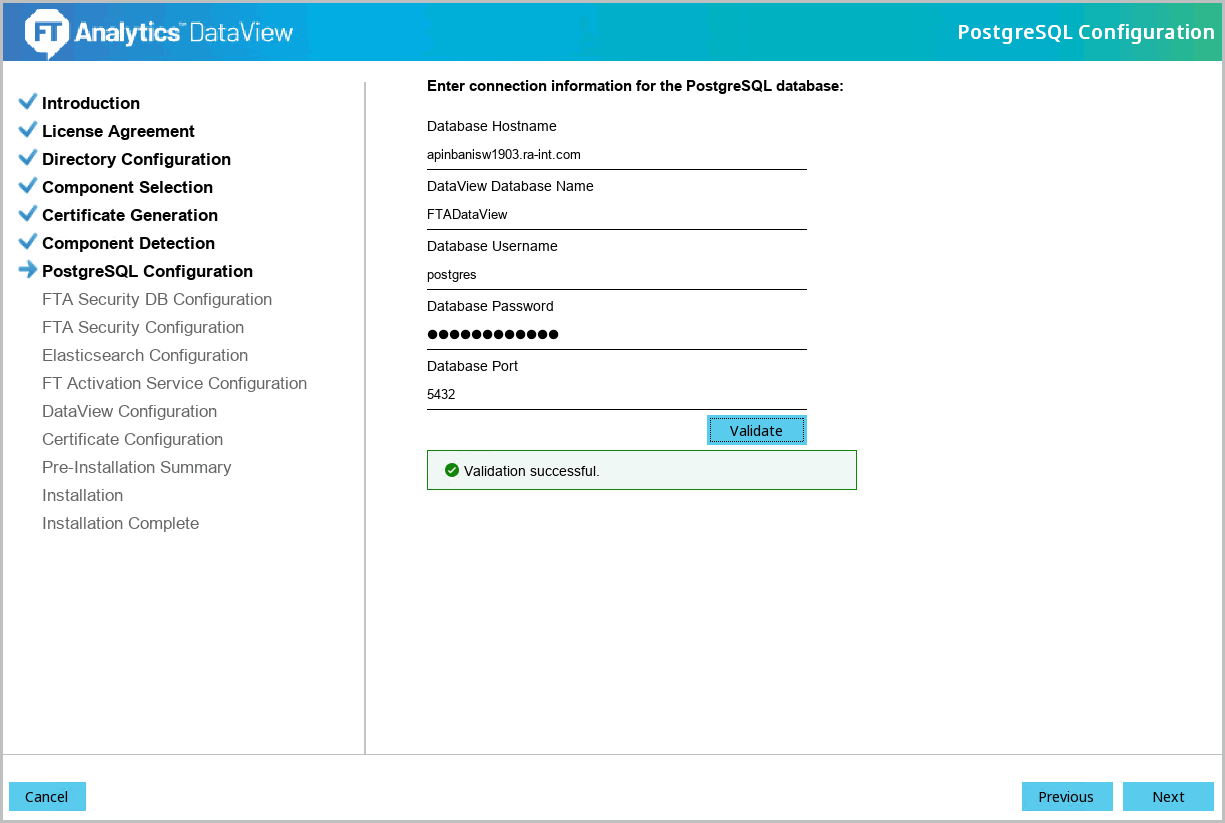
- Click [Validate] to verify the provided details. The ‘Validation successful’ message displays if the details are valid. Click [Next] to continue.Verify PostgreSQL Configuration
 The Installer skips the FTA Security DB Configuration screen.
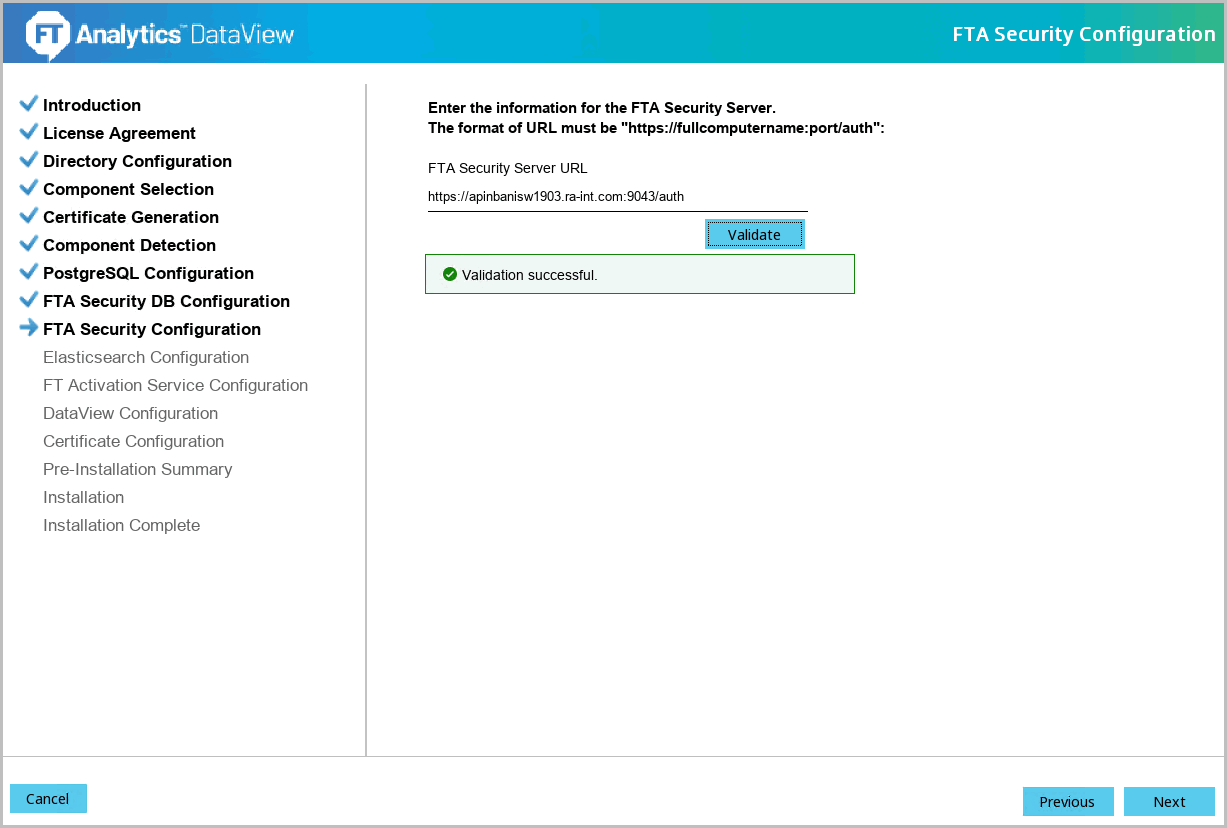
 - The 'FTA Security Configuration' screen displays. Define the following field:
- FTA Security Server URL: Provide the URL to access the FTA Security console.FTA Security Configuration
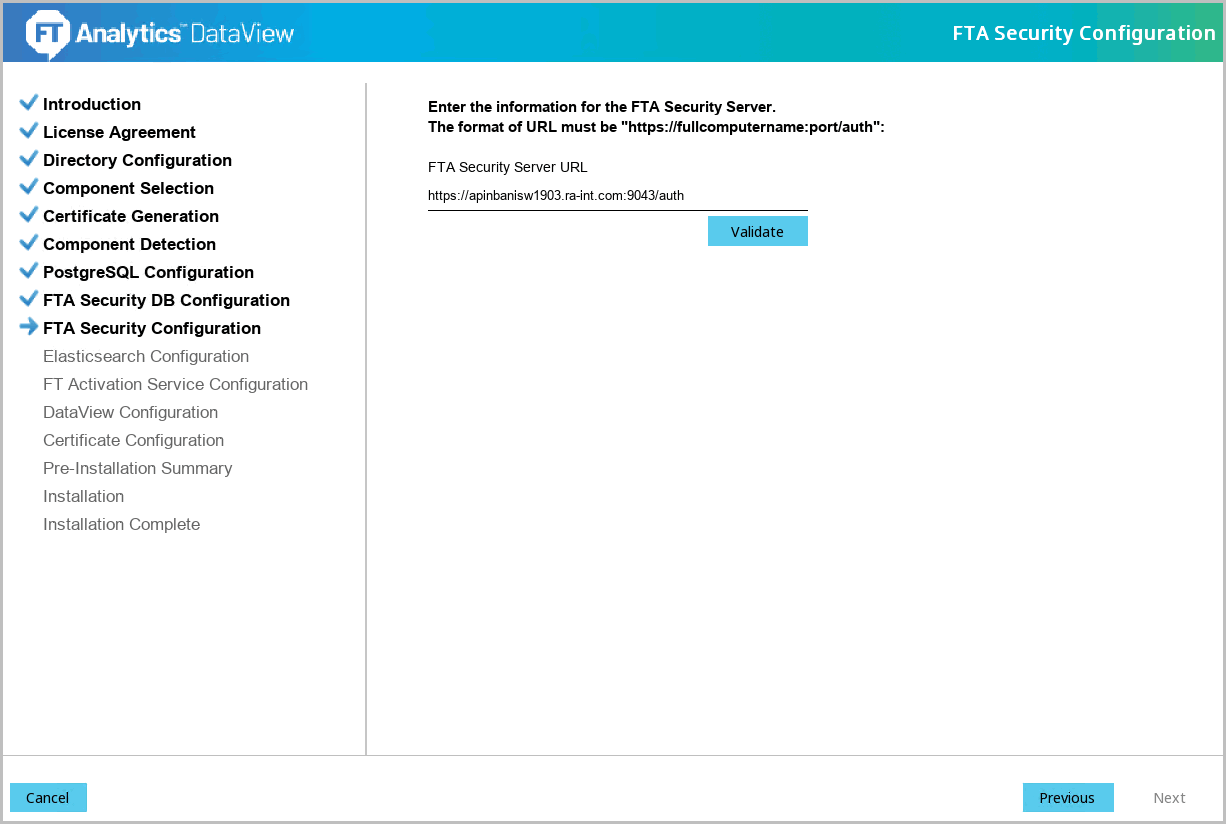
- Click [Validate] to verify the provided details. The ‘Validation successful’ message displays if the details are valid. Click [Next] to continue.Verify FTA Security Configuration
- The 'Elasticsearch Configuration' screen displays. Define the following fields:
- Elasticsearch Host Name: Provide the hostname (FQDN) of the machine where the Elasticsearch is installed.
- Elasticsearch Cluster Name: Default elasticsearch cluster name is FTAESCluster. It is recommended to use the default cluster name.
- Elasticsearch HTTP Port: Default HTTP port number is 9200. It is recommended to use the default port number.
- Elasticsearch TCP Port: Default TCP port number is 9300. It is recommended to use the default port number.Elasticsearch Configuration
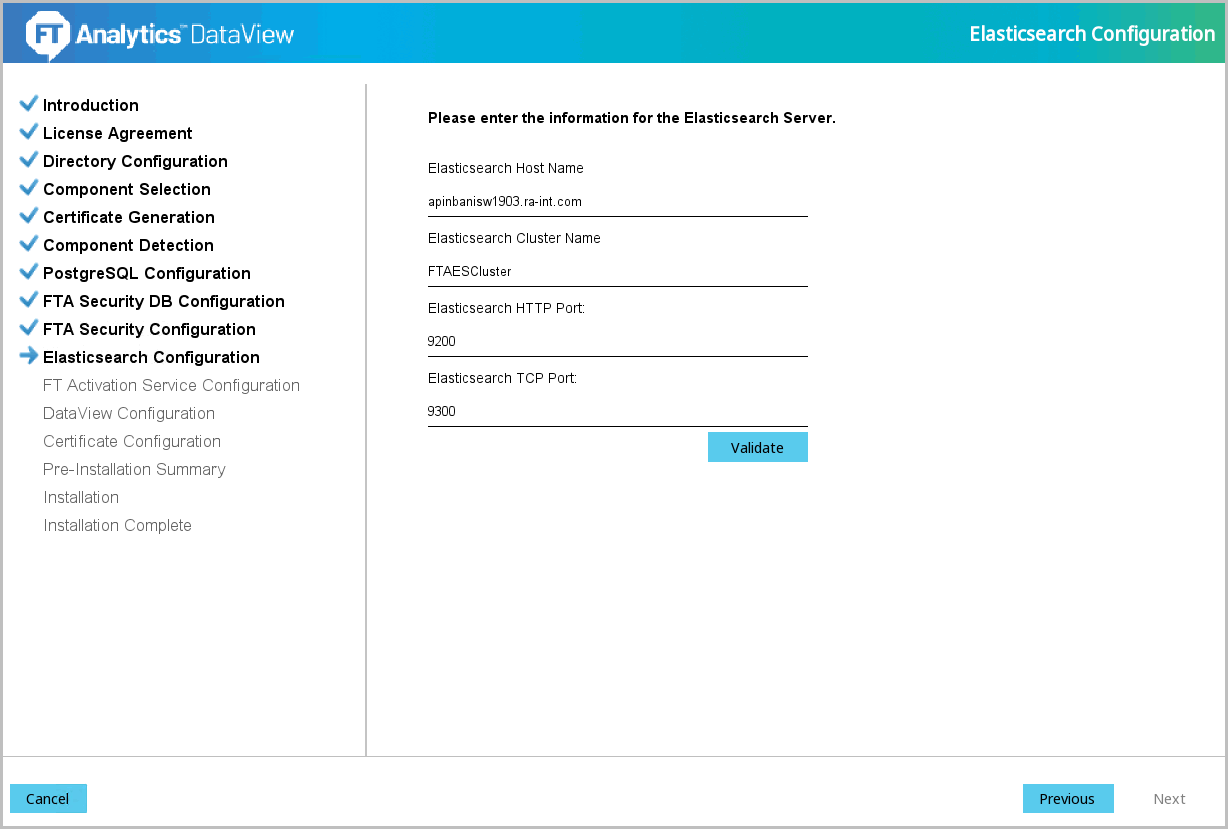
- Click [Validate] to verify the provided details. The ‘Validation successful’ message displays if the details are valid. Click [Next] to continue.
- The 'FT Activation Service Configuration' screen displays. Define the following fields:
- FT Activation Service Host Name: Provide the hostname (FQDN) of the machine where the FT Activation Service is installed.IMPORTANT:It is recommended to use all lowercase letters in domain names and hostnames (FQDN).
- FT Activation Service Port: Default port number is 27100. It is recommended to use the default port number.FT Activation Service Configuration
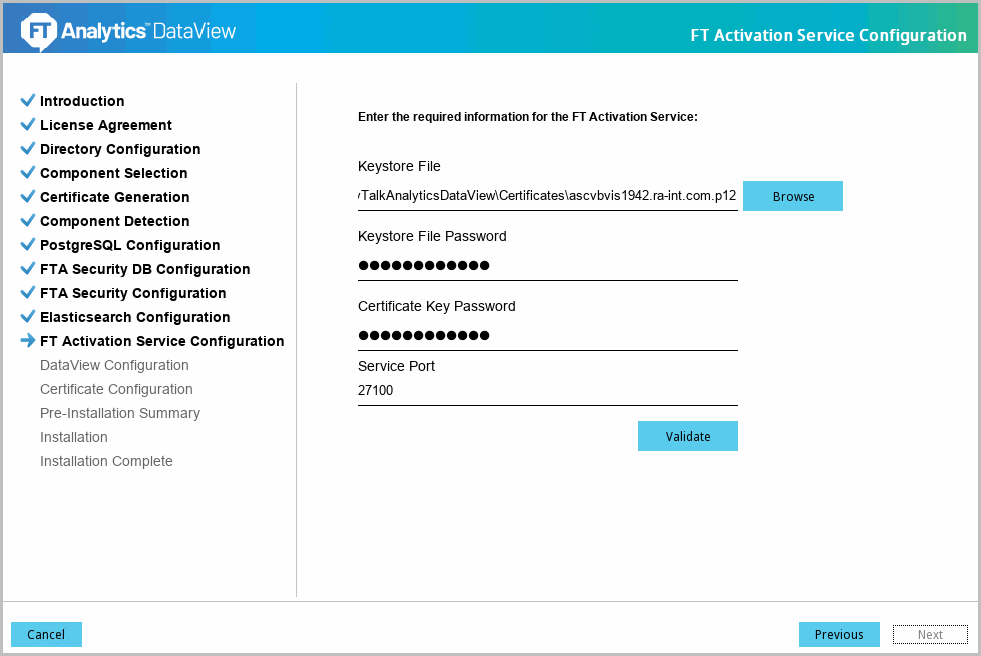
- Click [Validate] to verify the provided details. The ‘Validation successful’ message displays if the details are valid. Click [Next] to continue.Verify FT Activation Service Configuration
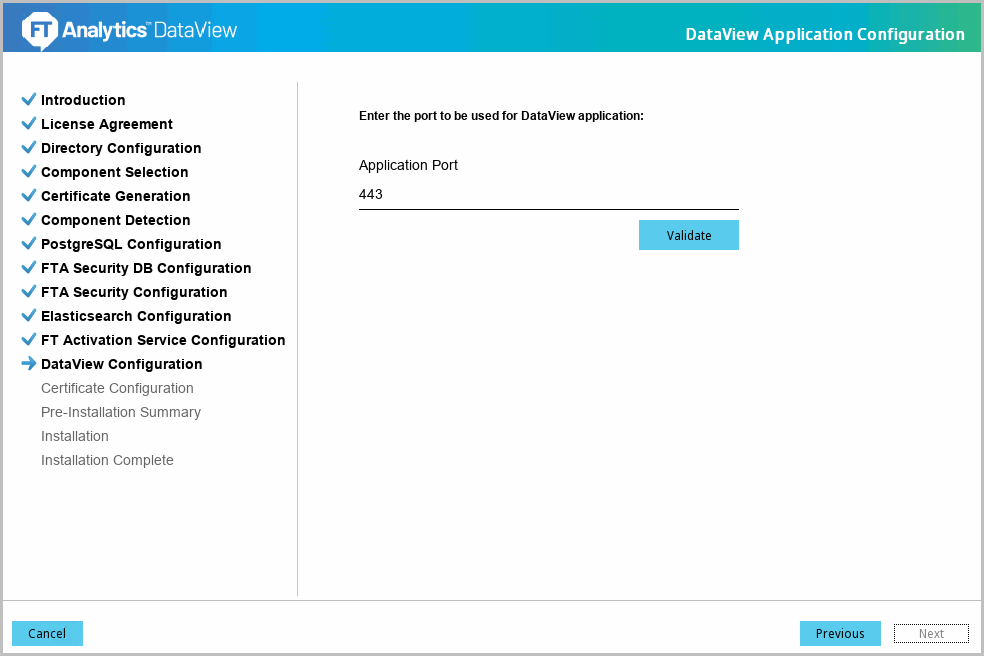
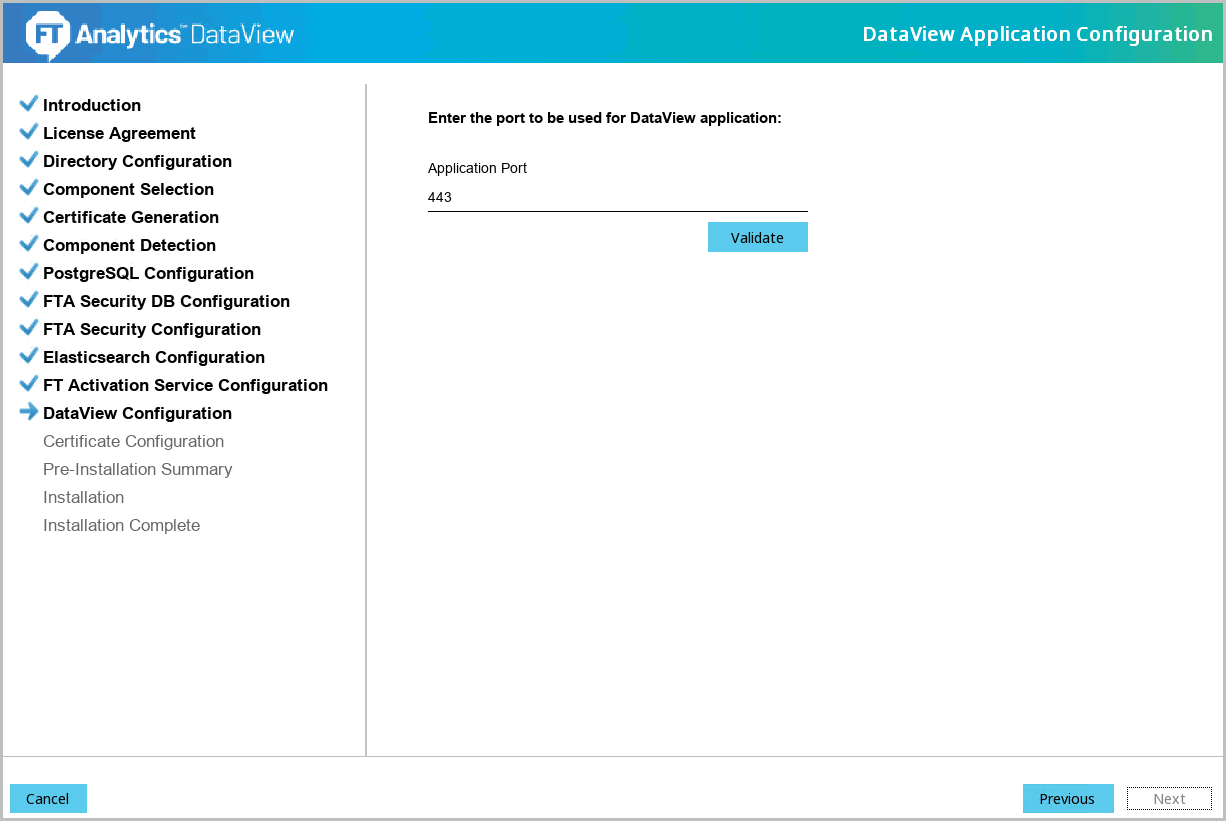
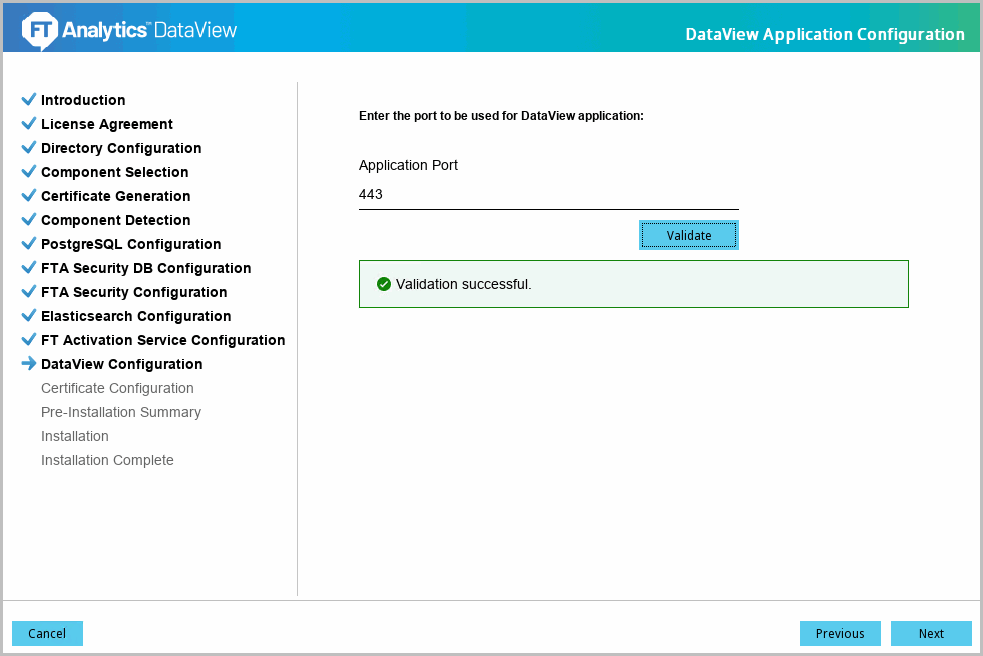
- The 'DataView Application Configuration' screen displays. Define the following field:
- Port: Default port number for HTTPS is 443. It is recommended to use the default port number.DataView Application Configuration
- Click [Validate] to verify the provided details. The ‘Validation successful’ message displays if the details are valid. Click [Next] to continue.Verify DataView Application Configuration
 IMPORTANT:If the current DataView is installed with HTTPS the installer will skip to step 16 during upgrade.IMPORTANT:Ensure that proper permissions are provided to access certificates folder.
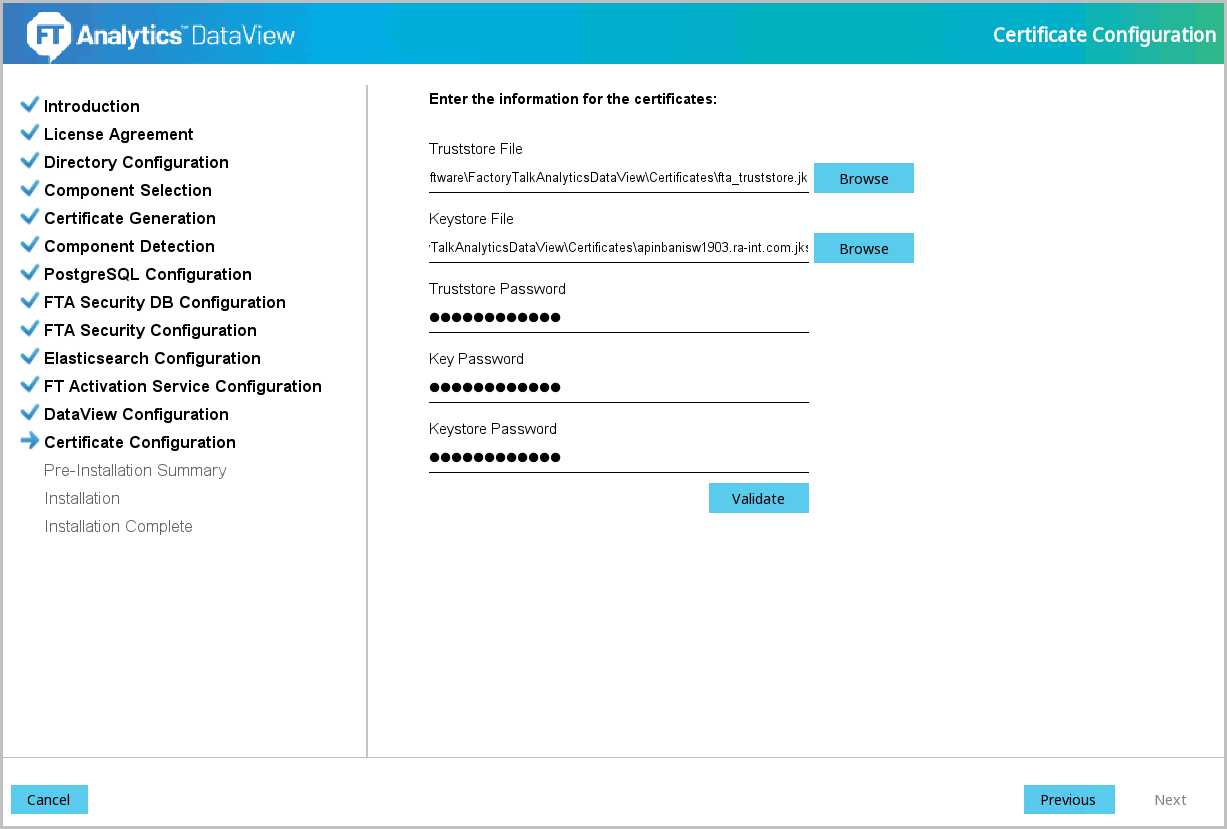
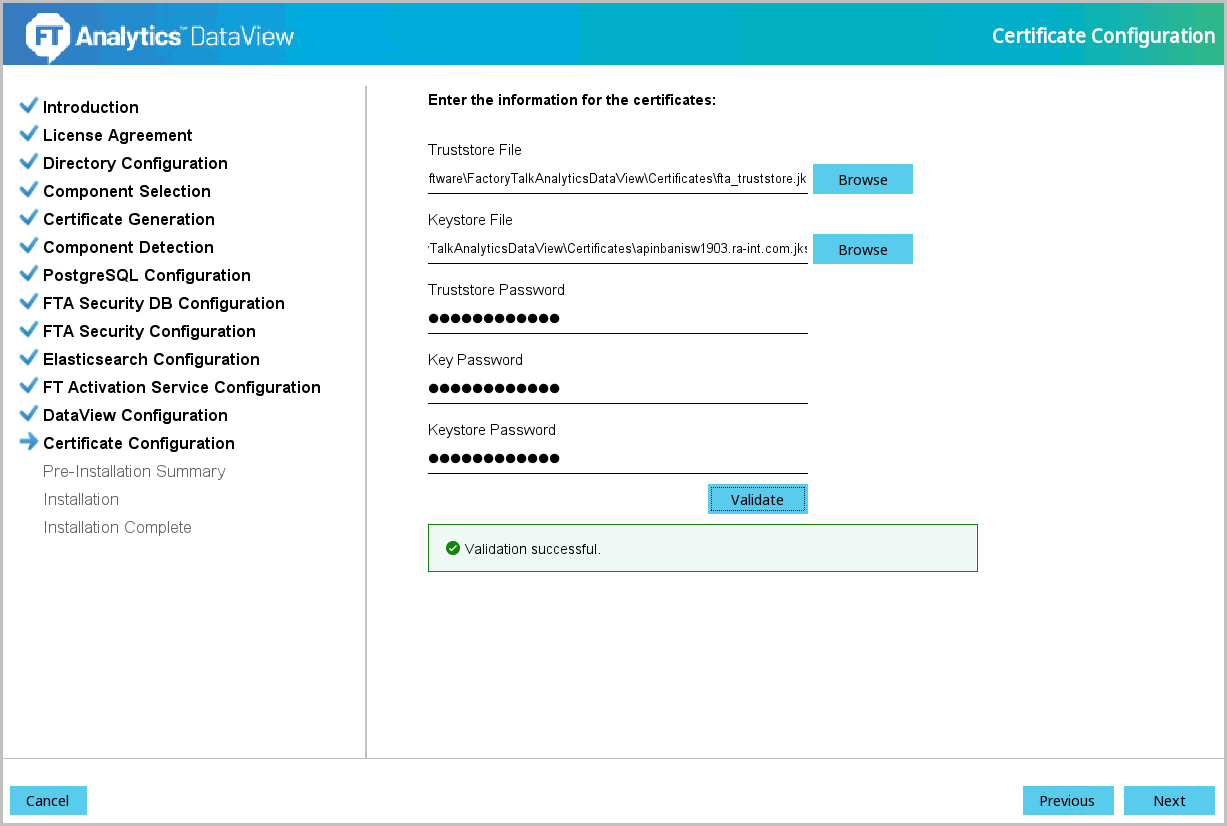
 - The 'Certificate Configuration' screen displays. Define the following fields:
- Truststore File: Provide the truststore file, where the certificates are generated.NOTE:If DataView and FTA Security are installed on different machines, take the Truststore file from FTA Security.
- Keystore File: Provide the path for Keystore file, where the certificates are generated.NOTE:Certificates were generated in the Getting Started section or utilize the company's certificates.
- Truststore Password: Provide the Truststore password.
- Key Password: Provide the password for Certificates Key.
- Keystore Password: Provide the password for Certificates Keystore.Certificate Configuration
- Click [Validate] to verify the provided details. The ‘Validation successful’ message displays if the details are valid. Click [Next] to continue.Verify Certificate Configuration
- The 'Pre-Installation Summary' screen displays. Verify the following:
- Product Name
- Install Folder
- Disk Space Information
- Install Component(s):
- Component Name
- Component Version Numbers
- Component Port NumbersPre-Installation Summary
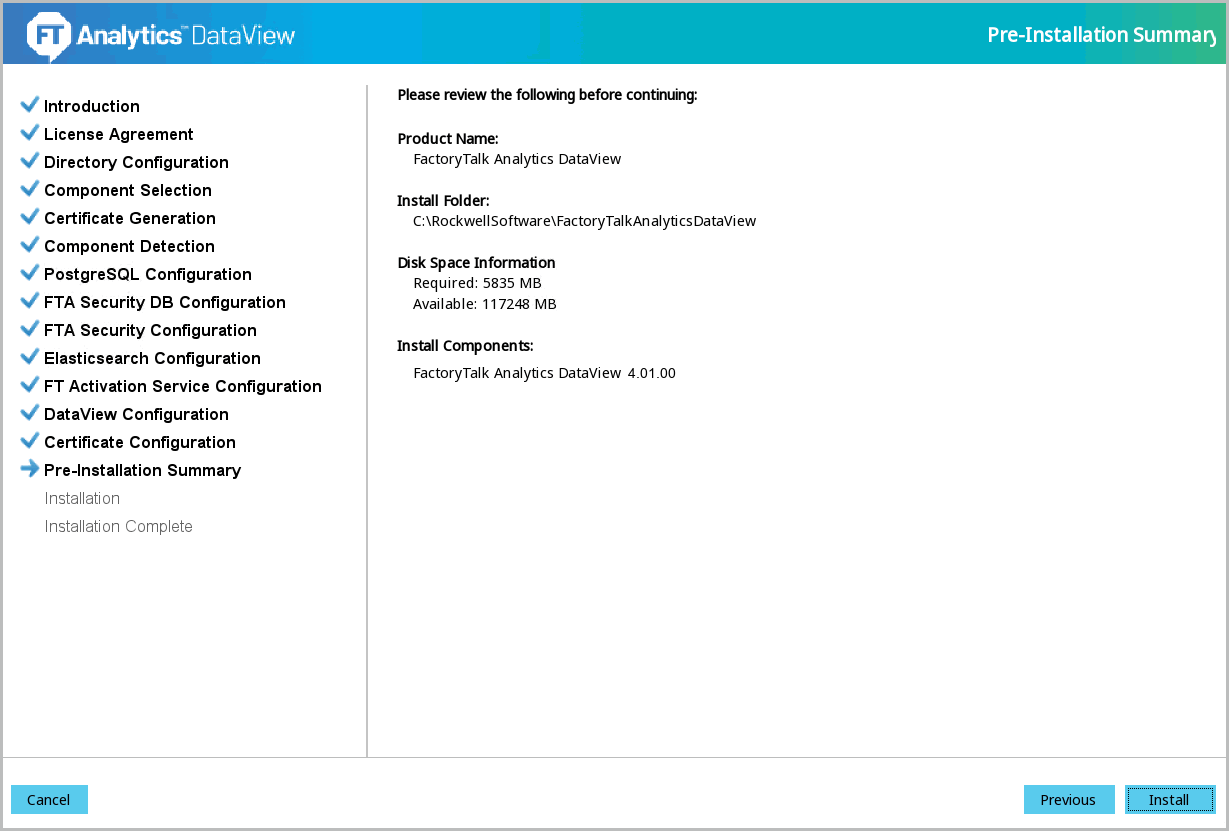
- Click [Install] to begin the installation. The installation progress screen displays.
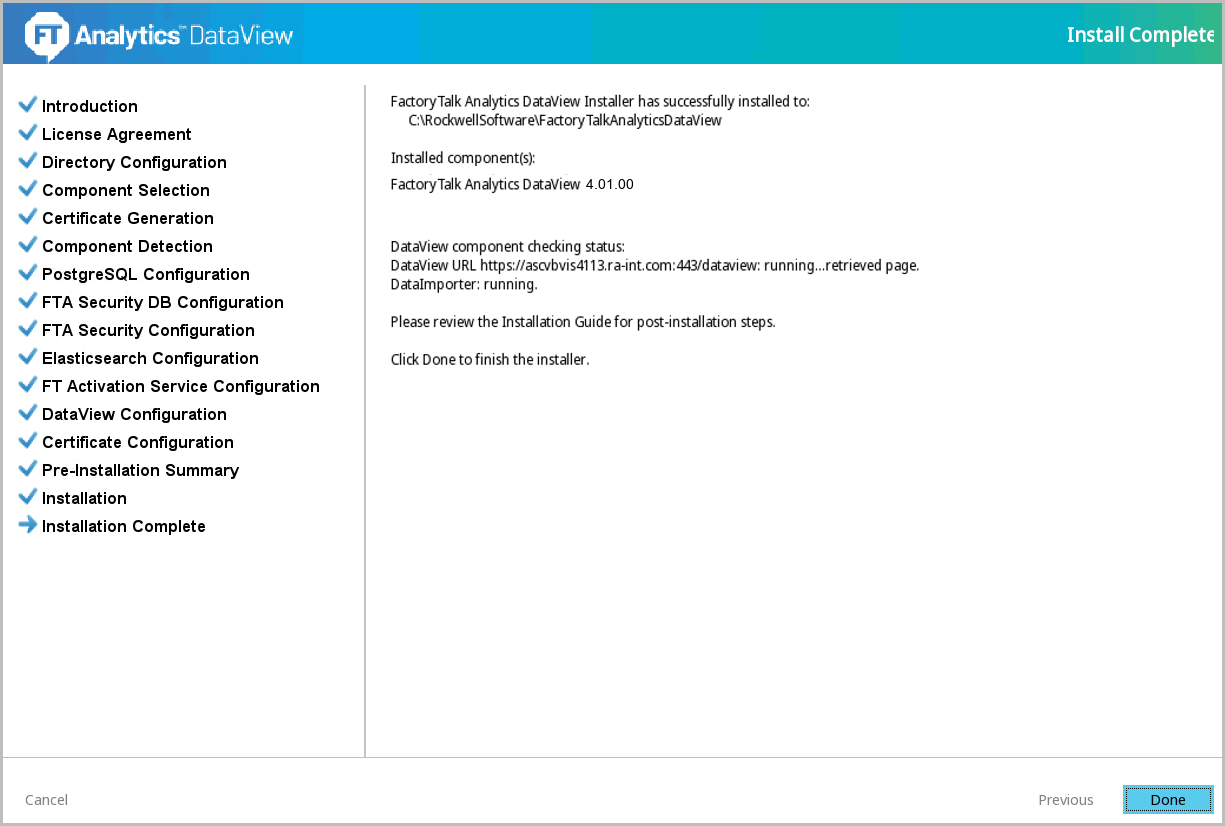
- The 'Install Complete' screen displays. Hereafter theC:\RockwellSoftware\FactoryTalkAnalyticsDataviewfolder is called as<DataView_HOME>in this document.
- Click [Done] to close the installer.NOTE:If any warnings or errors display, check the installation logs before exiting the installer.Install Complete
 NOTE:To configure DataImporter in distributed system or on multiple machines. Refer to Appendix A, “Clustered Environment Configuration” section for steps to configure DataImporter.NOTE:By default, the required ports are opened by the installer. For example: 443, 9043, 9200, 9300, 5432 and 27100.
 - Go to “Post Installation” chapter to continue the installation.NOTE:The folders created during the installation of the product contain critical data. The system administrator must ensure that the proper permissions are set to these installation directories. Only the authorized user may have access to the data. It is the responsibility of system administrator who is extracting the files to keep them secure. This is to ensure that the sensitive and critical information is not shared between the users.
Provide Feedback